
Connect RouteReceipts with Stripe for Selective Receipt Distribution: Installation, Permissions, and Testing
A single Stripe account forces you to send receipts to all customers or none, creating unnecessary email clutter for many clients. This integration guide explains how to connect routereceipts with stripe for distribution, install the app, grant the required permissions, and perform a delivery test. Our website's RouteReceipts is a specialized application that lets businesses manage an allowlist and selectively send receipts from the Stripe dashboard without custom webhooks or code, and our RouteReceipts Overview describes the dashboard-native UI and decision audit log. Setup via the Stripe Marketplace takes about 10 minutes, and the article reveals the permission toggles that determine who receives receipts and a quick test to prove it.
How does Route Receipts integrate with Stripe to enable selective receipt distribution?
Route Receipts integrates into Stripe's receipt pipeline and inserts a decision layer that checks an allowlist before a receipt is delivered. This preserves your existing invoices and payment records in Stripe while preventing global on/off receipt behavior that forces every customer to receive an email. The integration also adds a dashboard-native UI and an audit log so finance teams can review who received a receipt and why.
What does Route Receipts change in the Stripe receipt flow? 🔁
Route Receipts inserts a per-payment decision step that determines whether Stripe should deliver a receipt for that customer. The app listens for payment and invoice events and checks the allowlist you configure in the Stripe dashboard. If the customer matches an allowlist rule, Route Receipts permits the receipt to be sent; if not, the app suppresses delivery so the customer does not receive the email.
This approach preserves Stripe's invoice records and payment metadata, which means accounting and reconciliation remain unchanged. For example, you can keep Stripe's invoices visible to accounting while only sending receipts to enterprise buyers who need expense documentation. Our Route Receipts Documentation explains the exact flow and how to disable Stripe's automatic receipts to avoid duplicates.
Which Stripe permissions does Route Receipts request and why? 🔐
Route Receipts requests the minimum permissions required to read payments, view customer records, and send receipt deliveries. These permissions let the app evaluate allowlist rules and trigger or suppress delivery without needing full administrator access to your Stripe account. During the Stripe Marketplace install you will explicitly authorize Stripe app permissions for receipts so the scope is visible on the approval screen.
Requesting fewer permissions reduces compliance and audit risk for your finance and security teams. For example, the app does not require write access to subscription billing settings or full account management rights. See our Frequently Asked Questions for more about the exact permission prompts you will see during installation.
⚠️ Warning: Grant only the permissions shown during install and restrict app access to production only after testing in a staging account.
DIY receipt routing versus Route Receipts versus custom webhooks (comparison table) ⚖️
Use the table below to compare deployment time, maintenance burden, error risk, compliance, and business impact between manual webhook builds, our Route Receipts app, and third-party middleware.
| Option | Deployment time | Maintenance burden | Error risk | Compliance & auditability | Business impact (example) |
|---|---|---|---|---|---|
| Manual webhook build | Days to weeks to build and test | High. Requires engineering time for edge cases and retries | High. Duplicate deliveries, missed events, and retry logic are common | Moderate. Audit trails depend on your logs and docs | Example: 10–30 dev hours up front and ongoing support hours each month |
| Route Receipts (our app) | Minutes to install via Stripe Marketplace | Low. Dashboard-native allowlist reduces engineering work | Low. Built-in audit log and tested delivery logic reduce mistakes | High. Decision audit log captured in the dashboard for compliance reviews | Example: Finance saves recurring hours on routing and reconciliation; minimal developer involvement |
| Third-party middleware | Days to integrate, depending on product | Medium. Connector updates and mapping maintenance required | Medium. Varies by vendor reliability | Variable. Depends on vendor logging and data handling | Example: Faster than DIY but requires vendor management and subscription costs |
Example scenario: a small SaaS processing 300 receipts per month often finds that installing Route Receipts removes recurring manual triage and saves the finance team several hours each billing cycle compared with a custom webhook approach. For setup details and a no-code alternative walkthrough, see our No‑Code beginner's guide to selective delivery and the Route Receipts Documentation.

How to install and configure Route Receipts in Stripe for distribution?
Install Route Receipts from the Stripe App Marketplace and complete initial configuration in Test mode before switching to Live. This reduces the risk of sending unintended emails and lets you verify allowlist and routing rules without affecting customers.
Prerequisites and account requirements before installation ⚙️
You need a Stripe account with admin access and Test mode enabled to install Route Receipts safely. Confirm your user role grants "Manage apps" and that Test mode is available for your account. Our website recommends checking your billing region and ensuring invoicing and customer email features are enabled in Stripe so Route Receipts can read invoices and send routed copies. If your team separates duties, create or confirm an ops or finance admin who will perform the install and manage allowlist rules.
Recommended checklist before you start:
- Have an admin Stripe login with Manage apps permission.
- Enable Test mode and confirm test card and test customer creation works.
- Identify the sender email you will use for routed receipts (for example billing@yourdomain.com).
- Confirm who will own allowlist updates (finance, ops, or customer success).
See our Documentation for the full preinstall checklist and common account pitfalls.
Step 1: install Route Receipts via Stripe App Marketplace 🛒
Install Route Receipts via the Stripe App Marketplace by selecting your account and choosing Test or Live mode. Our website recommends starting in Test mode and only switching to Live after you verify routing behavior.
Follow these steps:
- Open the Stripe Dashboard and go to the Apps marketplace.
- Search for Route Receipts and click Install.
- Select the Stripe account to connect and choose Test mode for the first install.
- Review the permission prompts (see the list below) and accept if they match your security policies.
Permission prompts to expect during install (names shown as they appear in the Stripe UI):
- Read customer data.
- Read invoices and subscriptions.
- Manage webhooks.
- Send emails on your behalf for routed receipts.
If any permission looks broader than required, pause and compare it to our Documentation or contact support. For a beginner walkthrough of no-code routing, see our No‑Code guide to selective delivery.
Step 2: authorize Stripe app permissions for receipts and map settings ✅
Authorize only the minimal scopes Route Receipts requests and then map default receipt behavior, sender email, and templates inside the Route Receipts dashboard. After install, Route Receipts shows a first-run setup where you pick default blocking behavior and the sender identity.
Configuration items to set immediately:
- Default behavior. We recommend "Block by default" and allowlist specific customers to avoid spamming clients who do not need receipts.
- Sender email. Use a verified address such as billing@yourdomain.com to reduce spam flags.
- Template mapping. Assign a template for customer receipts and a separate template for reseller or partner copies if needed.
Example mapping for a SaaS business with resellers: set default to blocked, sender email billing@saasco.com, and create a "reseller_copy" template that includes partner-facing metadata. After mapping, confirm Route Receipts has webhook permissions so it can intercept receipt events. Our Documentation includes a step-by-step screenshot guide for these settings.
⚠️ Warning: Disable Stripe's automatic customer receipt emails in Stripe Billing settings before enabling routing rules to prevent duplicate emails. Check Billing → Customer emails and uncheck the automatic success receipts.
Step 3: configure the allowlist and routing rules in the dashboard 🗂️
Create allowlist rules by customer ID, email domain, or metadata tags and assign routing targets for individual recipients or distributor groups. Route Receipts supports single-recipient routes and multi-recipient distributor groups so you can send copies to partners, internal expense addresses, or reseller networks.
Use the following recommended ruleset for common profiles:
| Business profile | Rule example | Routing target |
|---|---|---|
| Internal expense reporting | Email domain equals @yourcompany.com | finance@yourcompany.com (single recipient) |
| Reseller network | Customer metadata tag reseller:true | reseller-group@partners.yourcompany.com (group) |
| Partner copies for reconciliation | List of customer IDs (CSV import) | partner-accounting@example.com (single recipient per customer) |
How to create a rule (step-by-step):
- Open Route Receipts → Allowlist.
- Click Add rule and choose match type: customer ID, email domain, or metadata.
- Enter values or upload a CSV for bulk customer IDs.
- Select routing target: single email, group alias, or external webhook.
- Save and tag the rule with a business reason (example: "reseller copies Q2").
For distribution networks that require copies to multiple parties, create a distributor group and assign it as the routing target. Our No‑Code guide shows common templates and group setups used by midmarket businesses.
Step 4: assign team roles and enable the decision audit log 🔍
Assign finance or ops users to allowlist management roles and enable the decision audit log to capture who changed rules and why. The decision audit log records each rule change with a timestamp, user, and reason so you can resolve disputes and meet audit requirements.
Role and audit setup checklist:
- Create roles in Route Receipts: Allowlist Manager, Viewer, and Auditor.
- Assign Allowlist Manager to 1-2 trusted finance or ops staff.
- Enable Decision Audit Log in Settings.
- Set retention period for logs according to your compliance policy.
How to test the install end-to-end (recommended):
- Keep Route Receipts in Test mode.
- In Stripe Test mode, create a test customer that matches an allowlist rule and a second customer that does not.
- Create a test invoice and mark it paid.
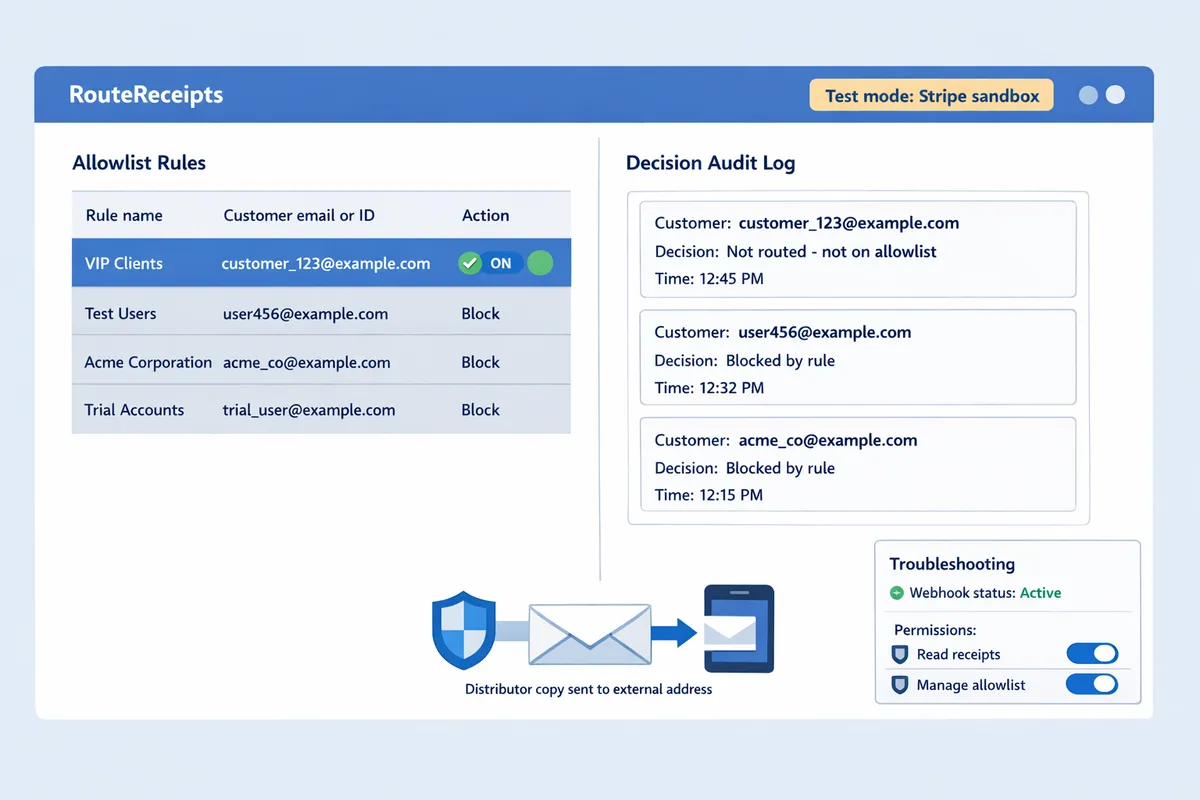
- In Route Receipts, open the Decision Audit Log and confirm the event shows Allowed or Blocked with the rule name and actor.
- Verify the routed receipt arrived at the expected email address for allowed customers and that blocked customers did not receive a receipt.
If the routed receipt does not appear, confirm webhooks are active and that Route Receipts has the required permissions. For troubleshooting tips and webhook details, consult our Documentation and the FAQ.
How to test receipt routing and verify allowlist behavior in Stripe sandbox?
Use Stripe Test mode together with Route Receipts' sandbox settings to run end-to-end scenarios that validate allowlist logic, delivery, and distributor copies. This confirms your routing rules before you flip to Live and prevents accidental customer emails. The steps below list concrete test cases, exact Stripe test cards and webhook triggers, verification checkpoints, and monitoring suggestions.
Test scenarios to validate allowlist behavior 🧪
Run these four scenarios in Stripe Test mode: allowlisted customer charge, non-allowlisted customer charge, distributor multi-recipient copy, and subscription invoice flow.
Allowlisted customer charge. Create a test Customer in Stripe with the email you added to our Route Receipts allowlist. Use card number
4242 4242 4242 4242with any future expiry and CVC123. Create a one-off Payment (orchargevia the Dashboard). Trigger:charge.succeeded. Expected: Route Receipts decision log shows "allowed" for that customer ID and the delivery log shows a successful send to the allowlisted address.Non-allowlisted customer charge. Create a test Customer not on the allowlist and run the same charge flow with
4242 4242 4242 4242. Trigger:charge.succeeded. Expected: Route Receipts decision log shows "suppressed" and no receipt is delivered to the customer's email.Distributor copy to multiple recipients. In the Route Receipts dashboard add a distributor rule that forwards a copy to two test emails (for example
dist1+test@example.comanddist2+test@example.com). Create a charge for the allowlisted customer and triggercharge.succeeded. Expected: Decision log shows "allowed with distribution" and the delivery log lists both distributor deliveries with separate message IDs.Subscription invoice flow. Create a test Product and Subscription in Stripe, attach the allowlisted test customer, and use card
4242 4242 4242 4242. Trigger sequence:invoice.created,invoice.finalized, theninvoice.payment_succeeded. Expected: Route Receipts logs show a single routed invoice receipt for the allowlisted customer and no duplicate receipts from Stripe if automatic receipts are disabled.
For rapid event replay, use the Stripe CLI command stripe trigger invoice.payment_succeeded or stripe trigger charge.succeeded after you create the test customer. Our Route Receipts decision audit log ties each event ID to the routing outcome so you can map each triggered event to a delivery attempt. For step-by-step installation and allowlist setup, follow our Route Receipts documentation.
How to verify delivery and debug failed sends 📬
Check Route Receipts' delivery log, Stripe's Test Event viewer, and your ESP or SMTP responses to confirm sends and diagnose failures.
Verification steps. In Route Receipts open the decision audit for the event ID noted in Stripe. Match the event ID with Stripe Dashboard > Developers > Events. Look at the delivery timestamp, recipient email, ESP response code, and message ID in the delivery log. If you route via a partner ESP, open that provider's message trace for the same message ID to see SMTP response codes.
Common SMTP errors and fixes.
- 550 5.1.1 User unknown. Fix: verify the recipient address and update your allowlist entry or contact the distributor to confirm their address.
- 554 5.7.1 Relay denied or SPF failure. Fix: add or correct SPF/DKIM records for the sending domain used by your ESP.
- 421 Connection timed out or 451 Rate limit. Fix: check your ESP sending quota and reduce concurrent sends or request a quota increase.
Debugging tips. If Route Receipts shows a delivery failure but Stripe shows an event success, copy-paste the event ID into our delivery log search to get the exact ESP response. If you see duplicate receipts, verify that you disabled Stripe automatic receipts for invoices in the Stripe Dashboard and that Route Receipts is set to send the single allowed copy. Our FAQ has a short article on permission scopes and duplicate prevention that explains the required Stripe setting changes.
⚠️ Warning: Before you test Live mode, confirm Stripe automatic receipts are disabled to avoid sending duplicate emails to customers.
Automating tests and setting up monitoring for production 🚦
Automate sandbox test runs and add real-time alerts for any delivery failures or audit-log anomalies before you move to Live.
Automated test runs. Create a CI job or scheduled script that runs the four core scenarios weekly and after every permission change or app upgrade. Use the Stripe CLI to create test customers and trigger events. Example sequence: create customer, attach test card, run stripe trigger invoice.payment_succeeded, then query Route Receipts' audit API for the event ID to confirm status. Store the job output and fail the job if any delivery log shows an ESP error code.
Monitoring and alerts. Configure webhooks or polling that watch for delivery.failed or a surge in suppressed events. Send alerts to Slack or PagerDuty when failure rate exceeds a threshold you set, for example 1% of routed receipts over 24 hours. Also set an alert for changes in permission scopes or plan status because upgrades can add limits that affect routing.
Post-change test checklist. After permission changes or plan upgrades, run these tests: a single allowlisted charge, a non-allowlisted charge, and a subscription invoice test. Keep a short runbook in our Route Receipts documentation for operators to follow when an alert fires.
For automated test templates and webhook configuration examples use our Route Receipts documentation and consult the no-code setup guide if you prefer a dashboard-only verification flow. For background on why selective routing reduces inbox clutter and finance workload, see Why Did We Build Route Receipts and our blog posts on distributor workflows.
How to optimize distribution workflows and troubleshoot advanced issues?
Optimize distribution by using metadata-driven routing, the Route Receipts decision audit log, and a short prioritized troubleshooting checklist during rollout. This section shows three distributor routing patterns, monitoring and compliance checks, a step-by-step troubleshooting list, and a simple ROI model to compare manual routing to Route Receipts.
Optimization tactics for distributor and multi-recipient setups 📦
Group recipients by role and apply metadata-driven rules in Route Receipts to send receipts automatically to partners, finance teams, or corporate customers. Route Receipts reads customer metadata, invoice metadata, or a partner_id field and uses that data to decide delivery targets. Implement three common patterns:
- Single recipient per partner. Set customer.metadata.partner_id and map partner_id to partner email in Route Receipts rules. Example: if partner_id = "dist-42" route to partner.finance@distco.com.
- CC to partner plus customer. Add a boolean metadata key (e.g., include_customer_copy = true) and create a rule that sends one copy to the partner and one to the end customer when enabled. This prevents sending unwanted receipts to end users by default.
- Partner portal forwarding. Route receipts to a central partner inbox (partners@yourcompany.com) and use the partner's portal to distribute copies. This reduces permission scope and keeps partner data handling centralized.
Practical tip: install RouteReceipts via Stripe App Marketplace before creating routing rules so the app can access customer metadata and the decision audit log. See the no-code setup walkthrough in our Beginner's guide for step‑by‑step screenshots and rule examples.
Monitoring, audit logging, and compliance considerations 📑
Use the Route Receipts decision audit log daily during rollout and set retention policies consistent with your legal and partner agreements. The audit log shows the routing decision, the rule evaluated, the operator who changed allowlist entries, and the final delivery status. Monitor these items during the first 7–14 days of rollout:
- Failed deliveries and bounce rates in Stripe's email logs and Route Receipts delivery status. Review error codes and retry rules.
- Recent allowlist or rule changes and the user who made them. Capture a short change rationale in the rule comment field.
- Consent evidence. Store a consent timestamp in customer.metadata or link to a consent record in your CRM when a partner requests emailed receipts.
Retention note: align Route Receipts retention settings with your finance and legal team. If you need longer retention for audits, export daily decision snapshots to your secure storage.
💡 Tip: Record explicit email consent timestamps in customer.metadata so you can show proof of partner or customer permission without searching separate systems.
Troubleshooting checklist for common installation and permission errors 🛠️
Start with these prioritized checks when receipts fail or rules do not apply: verify Marketplace install account, confirm OAuth scopes, check email template mappings, and inspect delivery blocks. Follow this checklist in order:
- Confirm correct Stripe account selected on install. Fix: uninstall and reinstall Route Receipts, choosing the intended Stripe account in the Marketplace flow.
- Verify OAuth scopes. Fix: reauthorize Route Receipts with the missing scopes listed in the Documentation page. Check Stripe Dashboard > Developers > API keys and Connected Apps for scope errors.
- Check template matching. Fix: ensure the template ID used in Route Receipts matches the Stripe template or custom HTML used for receipts.
- Inspect email provider blocks and bounces. Fix: review Stripe Email logs and your SMTP provider (SES, SendGrid) dashboards; whitelist sending domains if necessary.
- Duplicate receipts. Fix: disable Stripe automatic receipts for invoices where Route Receipts will deliver copies, and use Route Receipts' duplicate-protection feature.
⚠️ Warning: If both Route Receipts and Stripe send the same receipt, customers receive duplicates. Disable Stripe's automatic receipt delivery for routed invoices to prevent that.
For error details, consult Route Receipts' decision audit log and Stripe Events page, then open the matching delivery record to see the failure code and suggested action. Our Documentation offers a troubleshooting section that maps common error codes to fixes.
Comparing pricing, migration effort, and ROI for SMBs 💰
Estimate migration effort by calculating initial setup hours, weekly maintenance, and the cost of manual routing to build an ROI case for finance. To create a simple model:
- Measure current manual effort. Track hours spent per week on routing, forwarding receipts, and fixing misroutes for one month.
- Assign an hourly cost to that work (finance or support hourly rate). Multiply hours by rate for monthly labor cost.
- Estimate one-time migration hours. Include install RouteReceipts via Stripe App Marketplace, configure allowlists, and run a 14‑day test. Divide that total over a conservative 12-month amortization period.
- Compare with Route Receipts plan cost plus any marginal email delivery fees.
| Option | Typical monthly hours (example) | Monthly cost (labor) | Maintenance risk |
|---|---|---|---|
| Manual routing | 8 hours | $640 (at $80/hr) | High. Human errors, slower reconciliation |
| Route Receipts (example) | 2 hours | $160 (oversight only) | Low. Rules + audit log reduce mistakes |
| Hybrid (partial automation) | 4 hours | $320 | Moderate. Some manual work remains |
For example, a small distributor processing 200 receipts/month that currently spends 8 hours on routing could reduce labor to 2 hours after deploying Route Receipts and recover migration hours inside 1–3 months depending on plan choice. Use the ROI model above to present a clear savings estimate to your finance team.
For plan details, pricing, and upgrade options, see our FAQ and the Documentation for guidance on choosing the right plan for your volume.
Frequently Asked Questions
This FAQ answers the most common installation, permission, testing, and operational questions for how to connect RouteReceipts with Stripe for distribution. Read each short answer and follow the links to our Documentation or the beginner's guide for step-by-step procedures and screenshots.
How do I install Route Receipts via the Stripe App Marketplace? 🔌
Install Route Receipts from the Stripe App Marketplace by selecting the target Stripe account, approving the app scopes, and choosing Test mode for your initial validation run. After granting the minimal scopes shown in the install prompt, follow the setup checklist in the installation section to map your Stripe account to Route Receipts. Our Documentation shows the exact install flows and the no-code dashboard steps for mapping an allowlist and enabling decision logging. For a visual, see the beginner's guide to dashboard-based routing for selective delivery.
What permissions does Route Receipts require to manage receipts? 🔐
Route Receipts requires read access to payments and permission to trigger or suppress receipt delivery so it can check allowlist rules without needing full admin rights. Grant only the minimal scopes presented in the marketplace prompt to limit exposure; common mistakes include granting broad account write rights when read-plus-delivery control suffices. Check the permissions checklist in our Documentation before approving to avoid extra scopes.
How do I test the receipt allowlist in Stripe sandbox? 🧪
Test the allowlist in Stripe Test mode by creating test customers, adding their IDs or emails to the allowlist in Route Receipts, generating test charges, and confirming results in the Route Receipts delivery log and Stripe test events. Run these scenarios: a customer on the allowlist, a customer not on the allowlist, and a partner group set to receive copies. Use metadata-driven rules to simulate partner routing and validate suppression behavior. For step-by-step scenarios and sample test data, follow the testing checklist in our Documentation and the beginner's guide.
💡 Tip: Start with 5–10 test charges and verify each entry in the Route Receipts decision audit log to catch rule mismatches before flipping to Live.
Can Route Receipts send receipts to multiple recipients or distribution partners? 📬
Yes. Route Receipts supports routing a single transaction's receipt to multiple recipient addresses or partner IDs using rule-based multi-recipient rules. Create rules that match customer metadata, invoice domains, or grouped partner IDs to deliver copies to finance teams, distributors, or consolidated partner inboxes. Configure and validate multi-recipient behavior in sandbox; our Documentation includes examples for partner ID grouping and domain-based routing.
Will installing Route Receipts change Stripe's native receipt settings? ⚙️
No. Installing Route Receipts inserts a decision layer at delivery time and does not delete invoices or payment history stored in Stripe. The app evaluates whether to allow or suppress a receipt when Stripe attempts to send it; you can optionally disable Stripe's automatic receipts to prevent duplicates, but your ledger and stored invoices remain unchanged. See the install notes in our Documentation for the disable/avoid-duplicates setting.
How does Route Receipts handle data privacy and compliance? 🔒
Route Receipts processes only the payment metadata required to evaluate routing rules and retains a decision audit log for compliance and traceability. You control retention windows and can review audit entries to support reconciliation and audits; consult the app's data handling policy in the Documentation to match your legal requirements. Avoid including sensitive personal health or other regulated data in receipt line items—check your compliance team before adding such details.
⚠️ Warning: Do not place regulated personal data in receipt descriptions. Route Receipts can route metadata, but your legal team must approve retention and contents.
What support and migration help does Route Receipts provide? 🛠️
Route Receipts provides detailed Documentation, onboarding guides, and support channels for installs, sandbox testing, and configuring distribution rules. Our website recommends scheduling a short onboarding session for distribution rollouts to reduce go-live risk and speed troubleshooting. For migration templates and rollout checklists, see our beginner's guide and the product blog posts on distributor workflows.
Final checklist: confirm RouteReceipts is installed, authorized, and tested.
You should now have clear steps to install, grant app permissions, and verify routing so receipts only go to intended recipients. For a quick reminder of how to connect routereceipts with stripe for distribution, follow the install, authorize, and test steps in this guide.
RouteReceipts is a specialized application designed to enhance the way businesses manage their Stripe receipt distribution. This app addresses a significant limitation within Stripe's native functionality, which traditionally forces businesses to either send receipts to all customers or none at all.
Start a free trial to apply what you set up here and create your first allowlist from the Stripe dashboard. Follow the getting-started steps in our Documentation for installation details and sandbox testing, and review the no-code setup in The No‑Code Way to Route Customer Receipts in Stripe: Beginner’s Guide to Selective Delivery if you prefer a dashboard-only flow. See the Frequently Asked Questions for common permission and duplicate-receipt issues.
💡 Tip: Test the receipt allowlist in Stripe sandbox and confirm audit-log entries before enabling live receipts.