Custom Receipt Distribution in Stripe Template: Branding, Conditional Sends, and Routing Options
A single misconfigured Stripe receipt template can flood customers with irrelevant emails and increase support tickets. Custom receipt distribution in stripe template is a configuration method that lets businesses send branded receipts only to selected customers. This integration guide shows how RouteReceipts connects to the Stripe dashboard to manage an allowlist, apply conditional sends, and customize branding without building webhooks. Expect a setup via the Stripe Marketplace that takes 10-15 minutes and avoids credential management, retry logic, and monitoring overhead. RouteReceipts starts with a free plan that includes 20 receipts per month so teams can test selective sending. See tactics in our Custom Receipts & Templates hub. One conditional rule most teams miss cuts receipt noise, and we show how to add it.
What prerequisites and permissions do you need before integrating RouteReceipts with Stripe?
You need admin-level Stripe API access, a Route Receipts account installed from the Stripe Marketplace, and prepared branding, test customers, and compliance controls. These prerequisites let you test selective delivery, map template variables, and audit routing decisions before going live. Confirm account scope and billing role so Route Receipts can manage allowlists and log routing events in the Stripe dashboard.
What Stripe roles and API scopes are required? 🔐
Admin-level API access and permission to manage branding and webhooks are required to connect Route Receipts to your Stripe account. Route Receipts installs via the Stripe Marketplace and will request OAuth scopes to read and update Customers, Invoices, and Webhooks so it can match allowlist selectors and log decisions. If your organization requires separation of duties, create a least-privilege integration user or grant only the specific OAuth scopes you will document for auditing.
Document the scopes you grant and store that record in your access control register. For high-security teams, rotate keys or revoke OAuth tokens after tests and use Stripe restricted keys where applicable. Route Receipts handles webhook endpoint registration and retry logic for routing decisions, which eliminates the need for you to build and maintain webhook orchestration, backoff strategies, or manual webhook replay systems.
See the Route Receipts documentation for recommended OAuth scopes and a step-by-step install guide: https://routereceipts.app/docs.
What is the Route Receipts allowlist and how does it work? 📝
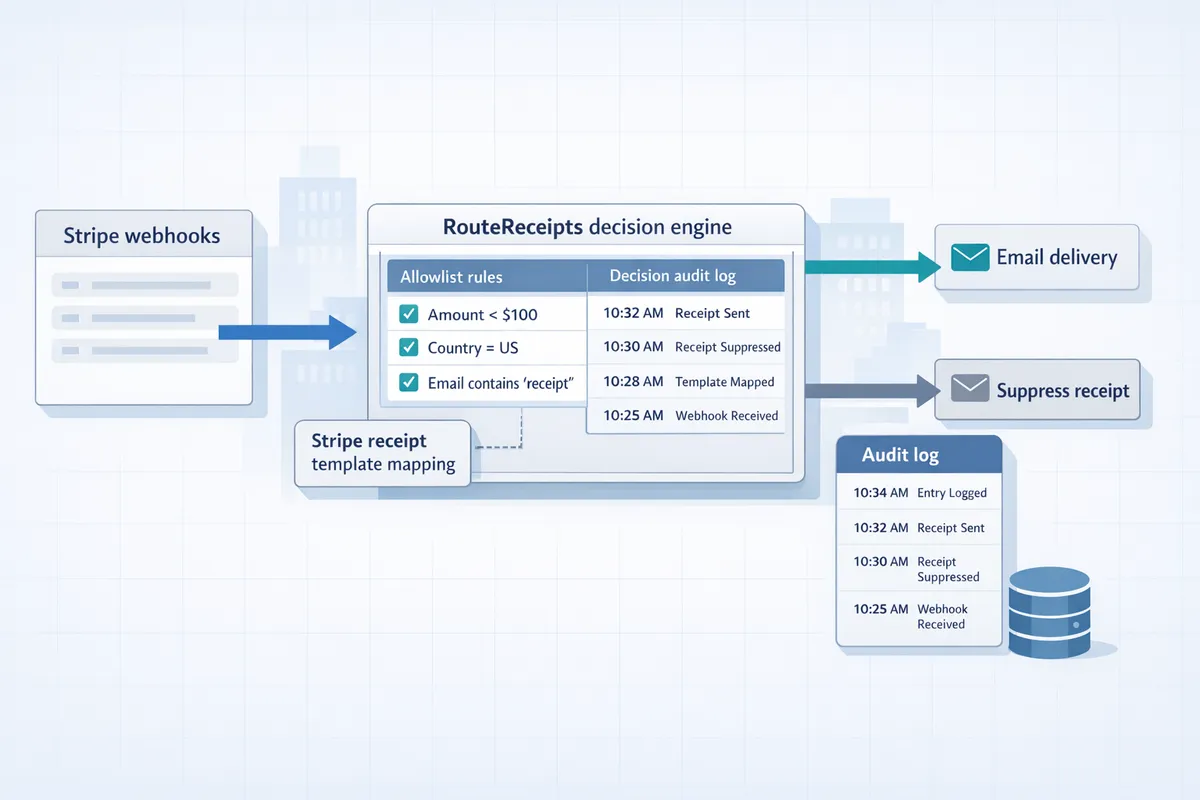
The Route Receipts allowlist is a dashboard-configurable set of customer selectors that limit which Stripe customers receive receipts. You add entries by customer email, Stripe customer ID, or by mapping a metadata key like metadata.send_receipts=true so Route Receipts matches customers automatically when invoices are issued. The allowlist lives in the Route Receipts dashboard and drives selective delivery without custom webhook code.
Example: tag enterprise clients with metadata.segment=enterprise and add a rule that routes receipts only for customers with that metadata value. Route Receipts writes each routing decision to an audit log visible in the dashboard so you can prove why a receipt was sent or suppressed. Without Route Receipts you would need to build a separate service to parse Stripe webhooks, maintain selector mappings, handle quota and retries, and record every decision to an audit store.
Read the no-code walk-through for allowlist setup: https://routereceipts.app/blog/how-to-limit-stripe-receipts-to-chosen-customers-stepbystep-no-code.
Which branding assets and template variables should you prepare? 🎨
Prepare high-resolution logos (SVG plus 2x PNG), brand color hex codes, a primary mailing address, and locale and date formatting settings before editing templates. Map Stripe variables such as {{customer.name}}, {{invoice.number}}, {{invoice.amount_due}}, and {{receipt.receipt_url}} to your design tokens so you can test how values render across languages and currencies. Keep alternate-brand assets ready if you support multiple brands and plan to swap templates based on metadata or customer segment.
Practical checklist: export SVG logos at 72dpi and a 600px PNG fallback; collect primary and secondary hex values; define address lines exactly as they should appear on receipts; decide whether to show VAT or tax ID and where. Use Route Receipts to preview a template against sample customers in test mode so you catch layout breaks and character-encoding issues before you push changes to live mode. For templating examples and recommended variables see the documentation: https://routereceipts.app/docs.
What compliance and data controls must be in place? ⚠️
Define which PII appears on receipts, set retention and redaction policies, and confirm opt-in evidence for email communications before you enable selective distribution. Route Receipts records routing decisions in its audit log, but you must decide whether to include phone numbers, email addresses, or line-item descriptions that might contain sensitive details.
- Establish a retention window for receipts and routing logs that satisfies your legal or contractual obligations.
- Decide which fields to redact, for example removing full addresses or personal identifiers beyond the minimum required.
- Ensure your email domain has valid SPF and DKIM records and that transactional mail is sent with TLS to meet delivery and security expectations.
⚠️ Warning: Avoid including full card numbers or protected health information on receipts. Store consent evidence in customer metadata before enabling receipt sends.
For teams building a DIY alternative, expect to add credential rotation, token refresh, webhook retry/backoff, race condition handling for concurrent invoice updates, and a secure audit trail. Route Receipts removes that operational burden by handling webhook orchestration and audit logging inside the Stripe-installed app. If you need help with compliance mapping or retention settings, consult our support center or privacy policy: https://routereceipts.app/support and https://routereceipts.app/privacy-policy.
How do you configure custom receipt distribution in Stripe templates using RouteReceipts?
RouteReceipts controls which customers receive receipts by installing from the Stripe Marketplace, defining allowlist rules, and mapping those rules to specific Stripe receipt templates. Follow a short setup, create rule-based conditions that match customer metadata or subscription plans, and then link each rule to the Stripe template and send action so only intended recipients get an email. This avoids building and maintaining custom webhook handlers, token refresh logic, and retry machinery in your own stack.
How do I install RouteReceipts and connect it to Stripe? 🔗
Install RouteReceipts from the Stripe Marketplace and authorize the requested API scopes so RouteReceipts can read customers, payment events, and manage receipt send decisions. After you complete the OAuth flow, confirm the connection in the RouteReceipts dashboard where you will see the connected account ID and test/live mode indicator. Expect a post-install checklist that asks you to verify webhook delivery and grant access to branding settings if you plan to use template mapping.
Steps.
- Open the RouteReceipts Marketplace listing and choose Install. (See the RouteReceipts Marketplace listing.)
- Authorize the requested scopes for customers, payments, and webhooks.
- In RouteReceipts' dashboard verify the account status and toggle test mode for initial checks. The dashboard should show successful webhook deliveries for sample events.
- Note the installer, installation time, and the approving user for audit logs.
💡 Tip: Record the Stripe account ID and the user who approved the install in your change log for finance and compliance audits.
Refer to the integration docs for step-by-step screenshots: https://routereceipts.app/docs.
How do I define conditional Stripe receipt emails by customer segment? 📂
Create rules in RouteReceipts that match explicit customer attributes so receipts only send to chosen segments. Use metadata keys (for example metadata.send_receipt = true), subscription plan IDs (for example plan_id = enterprise_monthly), or email domain patterns (for example ends_with "@acme.com") as rule predicates. RouteReceipts evaluates rules in priority order and supports boolean logic so overlapping conditions resolve predictably.
Example rule set.
- Priority 10: metadata.send_receipt == true -> Allow send.
- Priority 20: subscription.plan_id == "enterprise_monthly" -> Allow send.
- Priority 30: email_domain == "@internal.example" -> Deny send.
Export rule definitions as JSON for version control and finance review. Exported files include rule ID, priority, predicates, and linked Stripe template ID so reviewers see exactly which customers receive receipts. For a no-code walkthrough of rule creation see our blog post on selective delivery: https://routereceipts.app/blog/the-nocode-way-to-route-customer-receipts-in-stripe-beginners-guide-to-selective-delivery.
How can I customize Stripe receipt template and distribution rules without code? ✍️
Edit branding and receipt templates inside Stripe while using RouteReceipts to decide whether the receipt send action should run. Keep all visual changes—logo, color, footer copy, legal text—inside Stripe's template editor, and use RouteReceipts to map rule outcomes to the receipt_url and email send action instead of changing delivery code.
Practical steps.
- Create or update the receipt template in Stripe's Branding settings and save as a versioned template.
- In RouteReceipts map each allowlist rule to a Stripe template ID and label that mapping with a version tag for rollback (for example v2026-02-14-invoice-template).
- Test in Stripe test mode and confirm RouteReceipts returns 'allow' or 'deny' for the sample customer webhook before moving to live.
This separation keeps design changes in Stripe and distribution logic in RouteReceipts. For step-by-step no-code setup and examples, see our detailed guide: https://routereceipts.app/blog/how-to-limit-stripe-receipts-to-chosen-customers-stepbystep-no-code.
What API and webhook options exist for advanced workflows? 🛠️
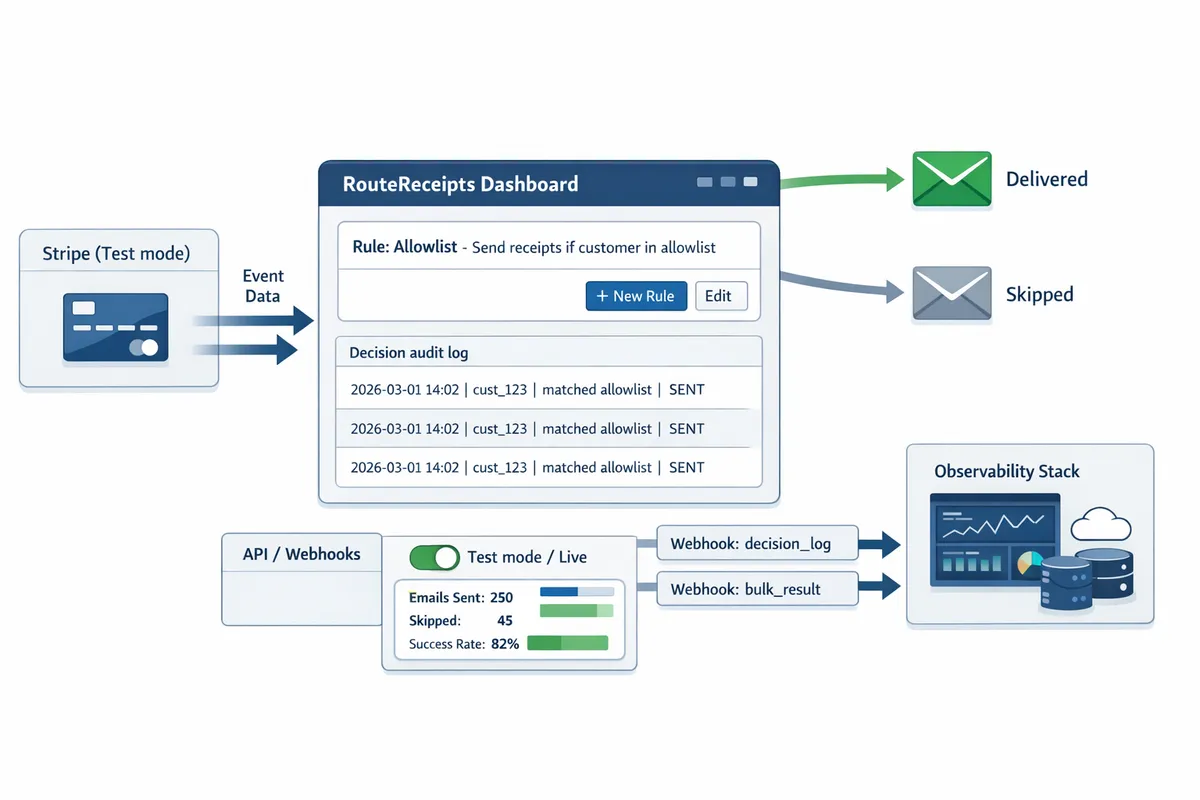
RouteReceipts exposes optional webhooks and a small REST API so you can programmatically update allowlists and run bulk operations from CI/CD or a CRM sync. Use the API to perform atomic updates to rule sets, push bulk customer allowlist changes, or subscribe to decision audit events for downstream systems.
When you build a DIY integration you would need credential rotation, token refresh, quota monitoring, and retry/backoff logic; RouteReceipts handles those concerns so you avoid that operational burden. Example CI/CD workflow: push rule changes in a Git branch, run tests that call RouteReceipts' API to validate predicates, then the pipeline POSTs the new rule bundle to the RouteReceipts endpoint.
Code example (illustrative, not production-ready).
POST /v1/allowlist/bulk
Authorization: Bearer <CI_TOKEN>
{
 "rules": [{ "id": "r1", "predicate": "metadata.send_receipt == true", "action": "allow" }]
}
RouteReceipts provides webhook events for decision logs and bulk operation results; subscribe to those if you need audit traces in your observability stack. See the API reference for available endpoints and webhook schemas: https://routereceipts.app/docs.
How do you test, verify, and monitor conditional receipt delivery in Stripe and RouteReceipts?
Testing, verification, and monitoring require end-to-end checks in Stripe test mode, RouteReceipts' decision audit log, and production delivery telemetry. Set a test matrix that covers customer segments, locales, and template versions, then run staged rollouts and automated checks before flipping to live.
How do I run tests in Stripe test mode vs live mode? 🧪
Use Stripe test mode to validate template rendering and RouteReceipts' routing decisions without sending production emails. Create a set of test customers that mirror each real-world segment (enterprise, SMB, manual-invoice customers, international locales) and assign distinct metadata keys (for example: customer.segment=enterprise; customer.locale=fr). Run charges using Stripe test card numbers and open the receipt_url for each charge to confirm visual rendering. RouteReceipts records decisions in test mode the same way it does in live mode, so check the audit log entries after each simulated charge.
Steps to run a quick end-to-end test:
- Create a test customer with metadata for the segment and locale.
- Make a test charge in Stripe test mode.
- Confirm a RouteReceipts audit entry exists with rule hit and template version.
- Open the charge's receipt_url or a test inbox (Mailtrap or Ethereal) to verify content.
Short illustrative API example (not production-ready):
# create a test charge (Stripe test mode API key required)
curl -X POST https://api.stripe.com/v1/charges \
 -u sk_test_xxx: \
 -d amount=5000 -d currency=usd -d source=tok_visa \
 -d metadata[segment]=enterprise
Document differences you observe between test and live rendering and include them in your changelog so the team knows what to expect when you flip to live.
How do I verify routing decisions and audit trails? 📋
Verify routing decisions by cross-checking RouteReceipts' decision audit log with Stripe payment events and your email provider's delivery logs. RouteReceipts' audit entries include timestamp, rule evaluation, matched allowlist entry, and template version, which you should match to the Stripe event ID for each charge. Export audit logs regularly for finance or compliance reviews and keep a mapping table that ties RouteReceipts decision IDs to Stripe event IDs and to delivery provider message IDs.
Building this audit trail yourself requires reliable event storage, idempotent processing, token refresh handling, retry logic for failed webhooks, and clock-synchronized timestamps. RouteReceipts removes that operational burden by providing a dashboard-native audit log so your engineering team does not need to implement persistent event capture or complex retry semantics.
Refer to the RouteReceipts documentation for log export options and supported fields in the audit entries: https://routereceipts.app/docs.
What monitoring and alerting should I configure? 🚨
Monitor delivery rates, bounce counts, and rule hit rates and set alerts for sudden deviations. Track these metrics per segment, per template version, and per sending domain. Recommended metrics and alert thresholds:
- Delivery rate (per hour) with a 5% drop alert.
- Permanent bounce count with a low-threshold alert for spikes.
- Rule hit rate by segment; alert if a rule drops to zero unexpectedly.
- Template rendering errors and 500-level responses from RouteReceipts.
Integrate delivery alerts with your on-call channels and retain a high-resolution log window (at least one week) for fast incident triage. Link template-change events to delivery telemetry so you can correlate a deployment with any delivery changes.
💡 Tip: Configure a low-severity alert for bounce-rate increases during staged rollouts to catch DNS or SPF regressions before they affect all customers.
For implementation details and best practices, see our support resources: https://routereceipts.app/support and the operational guides in the docs: https://routereceipts.app/docs.
How should I version templates and roll back changes? ⏪
Use semantic versioning for templates and stage changes in a staging Stripe account or limited production cohort before full rollout. Keep each template version and its rule set in a changelog that records author, reason, and test results. Workflow to follow:
- Clone the current template to create vX.Y+1.
- Test vX.Y+1 in a staging Stripe account across segments and locales.
- Release to a small production cohort (1 to 5% of traffic) and monitor delivery and audit logs for 24 to 72 hours.
- If issues appear, switch the cohort back to the previous version and promote fixes to a new version.
RouteReceipts supports associating rule sets with specific template versions so you can roll back by remapping the allowlist and rules to a known-good template. Rollback requires a tested previous template, a rollback playbook with verification steps, and automated monitoring to confirm the rollback fixed the issue.
What common delivery failures should I watch for? ⚠️
Invalid customer emails, DNS/SPF/DMARC failures, and transient SMTP errors account for most delivery failures. Monitor bounce categories separately: hard bounces for invalid addresses, soft bounces for transient SMTP issues, and spam-complaint events from the mailbox provider. RouteReceipts surfaces failure categories in its delivery reports so you can triage quickly by segment and sending domain.
Triage checklist for repeated delivery failures:
- Verify the customer's email format and recent changes in customer data imports.
- Check SPF, DKIM, and DMARC records and look for recent DNS changes.
- Correlate delivery failures to template changes and to any upstream sending provider incidents.
If you plan to track conditional Stripe receipt emails by customer segment at scale, expect to build monitoring for sender reputation, complaint rates, and automated remediation for bounced addresses. RouteReceipts reduces the operational load by surfacing categorized failures and by keeping a clear audit trail for each decision.
How should teams apply use cases, optimize routing, and troubleshoot advanced issues?
Teams should map distinct receipt use cases to dedicated rule sets and template variants while centralizing routing in RouteReceipts, an app that enables selective distribution for Stripe receipts. This prevents one-size-fits-all sends and reduces support volume while letting you customize Stripe receipt template and distribution rules for each customer segment. The guidance below shows which scenarios benefit most, how to localize and brand templates, a comparison of implementation options, and operational checks for advanced troubleshooting.
Which real-world use cases benefit most from RouteReceipts? 🔍
Enterprise expense reconciliation, wholesale billing, and marketplaces with multiple sellers benefit most from RouteReceipts' selective distribution. RouteReceipts is an app that integrates into the Stripe dashboard and enforces allowlist and rule-based routing without a custom webhook stack. For each use case map a rule set to a template variant:
Enterprise expense receipts. Rule: metadata.payer_type = "enterprise" or customer.metadata.expense_code present. Template variant: expense-compact.pdf with line-level GL codes. Admin steps: create template variant, add metadata-based rule, test in Stripe test mode for three enterprise customers. Expected outcome: finance gets machine-readable receipts for reconciliation, support tickets drop.
Wholesale billing. Rule: invoice.amount > X and metadata.account_type = "wholesale". Template: wholesale-summary with net pricing and PO fields.
Marketplace sellers. Rule: charge.metadata.seller_id maps to seller-specific branding. Template: seller-branded receipt. Admin steps: create seller templates, map seller_id in RouteReceipts rules, run a 50-event smoke test.
Refer to our no-code guides for implementation examples and screenshots at https://routereceipts.app/blog/how-to-limit-stripe-receipts-to-chosen-customers-stepbystep-no-code.
How do I support localization and multi-brand templates? 🌐
Store locale and brand identifiers in Stripe metadata and map them to localized template variants inside RouteReceipts. Use metadata.locale (for example en-GB or fr-FR) and metadata.brand_id to select both language and visual styles at decision time. Implement a single source of truth for translations (JSON or an internal i18n service) and reference that in template variables so all text, date, number, and tax formatting comes from the same file.
Practical steps:
- Add customer.metadata.locale and customer.metadata.brand_id on the customer object during onboarding.
- Create template variants in RouteReceipts named by brand and locale (example: brandA_en-GB, brandA_fr-FR).
- In RouteReceipts rules map metadata.locale + brand_id to template variant and include a fallback chain (brand+locale -> brand-> default_locale).
- Automate render previews for each variant and run sample Stripe events through test mode to validate formatting.
See the implementation checklist in our docs for localized templates at https://routereceipts.app/docs.
How does RouteReceipts compare to DIY and third-party automations? 📊
RouteReceipts reduces operational overhead compared with a custom webhook server or a Zapier-like automation while providing audit logs and native Stripe dashboard integration. The table below compares development effort, ongoing maintenance, auditability, and best-fit scenarios for scale, compliance, and speed to market.
| Approach | Development effort | Maintenance burden (auth, tokens, retries) | Auditability & compliance | Speed to market | Best fit |
|---|---|---|---|---|---|
| RouteReceipts | Low. Configure rules in-dashboard. | Low. RouteReceipts handles credential rotation, retry logic, and delivery telemetry. | High. Decision audit log and Stripe-native install help for audits. | Fast. Marketplace install and UI-driven rules. | Teams needing low-maintenance, auditable routing. |
| DIY webhook + server | High. Build event ingestion, rule engine, template rendering. | High. Must manage credential rotation, token refresh, quota monitoring, retry backoff, and monitoring. | Medium. You control logs but must build retention and access controls. | Slow. Several sprints to build and test. | Organizations with unusual requirements and engineering capacity. |
| Zapier-like automation | Low. Point-and-click connectors. | Medium. Credentials stored in third-party, limited retry behavior, and hard to scale high volumes. | Low-Medium. Limited event-level audit trails. | Fast. Good for prototypes. | Small teams validating concepts or low-volume flows. |
A short DIY snippet that highlights complexity (Node.js, incomplete):
// illustrative only: requires token refresh, retries, and error handling
const res = await fetch(stripeEventUrl, { headers: { Authorization: `Bearer ${TOKEN}` } });
if (!res.ok) retryWithBackoff;
const event = await res.json;
// evaluate rules, render template, POST to mail provider with retry
For pricing and plan comparisons, check https://routereceipts.app/pricing and technical docs at https://routereceipts.app/docs.
What advanced troubleshooting steps address routing mismatches? 🧰
Routing mismatches usually trace to metadata mismatches, rule priority ordering, or recent template updates and should be diagnosed by validating the Stripe event and checking RouteReceipts' decision audit log. Follow this checklist:
- Validate the Stripe event. Confirm event.id, event.type, and object.metadata fields match the values expected by your rules. Use Stripe test mode to replay failed events.
- Inspect rule priority. A more specific allowlist rule may be evaluated after a broader rule; reorder or add explicit negatives to prevent shadowing.
- Confirm template versioning. Recent template edits or name changes can cause fallback behavior; verify template IDs used in rules.
- Check caches and delays. If you cache rule results or metadata in a proxy, ensure cache TTLs and invalidation are correct.
- Use RouteReceipts' decision audit log to trace which rule matched and which template was selected. Provide event IDs, timestamps, and rule names when escalating.
⚠️ Warning: Avoid pasting full customer PII into public support tickets. Provide event IDs and timestamps instead to let support retrieve the payload securely.
If you need help, include the Stripe event ID, RouteReceipts rule name, and the timestamp when contacting https://routereceipts.app/support.
How do I scale routing rules and maintain governance? 📈
Scale rules with a naming convention, automated tests, and a change approval workflow that includes finance sign-off for billing-related templates. Use a predictable naming scheme such as scope/service_rule_purpose_version (example: billing_enterprise_expense_v1). Maintain a change process:
- Require a PR-style change with sample events for any rule touching invoices or taxes.
- Run automated test runs for rule changes against a matrix of customer locales and brands.
- Establish weekly reviews of rule hit rates, exceptions, and orphaned templates. Remove templates not hit for a configurable retention period.
- Implement role-based access so only authorized users can change billing templates; log all changes for audit.
💡 Tip: Use automated test runs on rule changes to prevent accidental billing emails; integrate tests into your CI pipeline and surface failures before release.
Use RouteReceipts' audit logs and telemetry to power the weekly review and the pruning process. For governance examples and templates, see our blog posts and policy examples at https://routereceipts.app/blog.
Frequently Asked Questions
This FAQ answers the common operational, technical, and compliance questions about custom receipt distribution in Stripe templates with Route Receipts. Use these entries to speed configuration, testing, and audits when you set up selective receipt sending and template variants.
Can I customize Stripe's receipt template content and still use Route Receipts?
Yes, Route Receipts decides whether Stripe sends a receipt while you keep full control of template content inside Stripe's Branding and receipt editor. Route Receipts acts as a gating layer: you design logos, header/footer copy, and localized strings in Stripe's template UI and Route Receipts evaluates rules to permit or block the actual send. This separation means you do not modify Stripe's delivery code or webhooks to achieve selective delivery.
Practical example: keep a single Stripe receipt template named "Default-Basic" and create a Route Receipts rule that only allows sends for customers with metadata[receipt_opt_in] = "true". See our setup steps in the Route Receipts docs for mapping template IDs to rules: https://routereceipts.app/docs.
How do I set up conditional Stripe receipt emails by customer segment?
Define segments with stable attributes (customer metadata, subscription plan IDs, or email domain) and map those segments to matching rules in Route Receipts. Create a rule set that matches a metadata key (for example metadata.receipt_opt_in = "true") or a plan ID, then assign the rule to the Stripe receipt template you want to control.
Step-by-step example:
- Add metadata to customers via your backend or Stripe update call, e.g., in Node:
await stripe.customers.update('cus_ABC', {metadata: {receipt_opt_in: 'true'}})
- In Route Receipts, create a rule that matches metadata.receipt_opt_in == "true" and map it to the target template.
- Test each rule against sample test-mode customers before enabling in production.
For a no-code approach and common rule examples, see our walkthrough: https://routereceipts.app/blog/the-nocode-way-to-route-customer-receipts-in-stripe-beginners-guide-to-selective-delivery.
Does Route Receipts store customer PII and how should I manage retention?
Route Receipts stores only the minimal fields required to evaluate rules and to record decision logs; keep primary PII in Stripe and reference customer IDs in rules when possible. Configure retention and redaction settings in the Route Receipts dashboard to meet your compliance policies, and avoid embedding sensitive fields (full SSNs, payment card numbers, health data) in rules or logs.
Operational guidance: prefer customer IDs or hashed identifiers in rule logic to reduce exposure. Use the Route Receipts retention controls to set deletion schedules and automatic redaction for audit logs. For legal and privacy references, consult our privacy policy and documentation: https://routereceipts.app/privacy-policy and https://routereceipts.app/docs.
⚠️ Warning: Do not include full payment card data or health information in receipt rules or logs. Redact or reference tokens instead.
Can I test receipt routing in Stripe test mode without sending live emails?
Yes, you can validate routing decisions and template rendering in Stripe test mode while preventing customer contact by using Route Receipts' test-view features and Stripe's test customers. Mirror production metadata on test customers to achieve parity and exercise every rule prior to production rollout.
Suggested test matrix:
- Create 5–10 test customers that cover each segment and locale.
- Apply the exact metadata and plan IDs used in production to those test customers.
- Use Route Receipts' decision audit log and test-view to confirm which template would be sent without routing to your SMTP provider.
For a step-by-step testing checklist, see our how-to guide: https://routereceipts.app/blog/how-to-limit-stripe-receipts-to-chosen-customers-stepbystep-no-code.
💡 Tip: Mirror production metadata in test mode to catch rule mismatches before customers receive messages.
What happens if an email delivery fails after Route Receipts approves sending?
Route Receipts records the approval decision but does not perform or retry SMTP delivery; email delivery failures surface in your email provider and in Stripe delivery events. Use your email provider's bounce metrics and Stripe's receipt delivery events to detect soft bounces, hard bounces, and spam complaints.
Operational steps on failure:
- Monitor bounce and delivery events via your email provider and Stripe webhooks.
- Correlate failed deliveries with Route Receipts decision logs to determine if the right template was chosen.
- Handle retries or suppression in your email platform; Route Receipts will not re-send on your behalf.
If you need help wiring alerts or reconciling failed sends with Route Receipts logs, contact support: https://routereceipts.app/support.
How do I support multiple brands and locales for receipts?
Tag customers with brand and locale metadata, maintain versioned template variants for each brand/locale, and map those variants to corresponding rules in Route Receipts. Keep translations and brand assets in a version-controlled source (JSON or a translation management system) and publish template versions to avoid accidental overwrites.
Implementation details:
- Use metadata keys like metadata.brand = "enterprise" and metadata.locale = "fr-FR" to drive rule matching.
- Create a template-per-brand-locale (for example "brandA_fr-FR_v2") and assign that template in the matching Route Receipts rule.
- Implement a template versioning and rollback process: tag templates, run tests in Stripe test mode, and promote only after automated checks pass.
For examples and a multi-brand workflow, see our docs and the multi-step blog posts: https://routereceipts.app/docs and https://routereceipts.app/blog/why-did-we-build-route-receipts.
Next steps to finalize selective receipt sending with RouteReceipts
Use RouteReceipts to apply selective rules, branding, and routing without building custom webhooks or heavy credential management. This article showed how to set up custom receipt distribution in stripe template so receipts go only to the customers who need them. For a step-by-step walkthrough, see our guide on how to limit Stripe receipts to chosen customers and the no-code routing tutorial.
Start a free trial to test allowlists, conditional sends, and branded templates with your Stripe account.