
Customize Stripe Receipts: Branding Guide 2026
A single unbranded receipt can trigger support tickets and cost small accounting teams two hours per week reconciling invoices. Customize Stripe Receipts is a how-to process that applies brand and selective delivery rules to Stripe receipt emails, including changing the support email, logos, colors, and footer. Our Route Receipts app is a Stripe Marketplace integration that lets you maintain an allowlist, manage receipt rules directly in the Stripe dashboard, and stop sending receipts to customers who do not need them. Follow the step-by-step instructions below to change support email, swap logos and colors, edit footers, and implement selective receipt delivery, then see the single setting many teams miss that prevents duplicate notices while preserving corporate branding.
Choose the receipt workflow that matches your product, volume, and branding needs. Which Stripe receipt workflow should you use for your business?
Pick the receipt workflow by matching customer type, transaction volume, and the degree of branding control you need. Different Stripe paths trade off configuration simplicity for branding depth and delivery control. Use the decision map below to pick the simplest path that meets finance and branding requirements, and add RouteReceipts when you need selective delivery.
Which customer types need receipts and which do not? 🧭
Enterprise clients and internal finance teams typically require full invoices, while casual retail buyers often need only a basic payment confirmation or no emailed receipt. Enterprise buyers want line-level detail and a stable customer ID for expense systems, so send them Stripe Invoices or hosted invoice PDFs. Internal finance and AP teams often prefer emailed invoices with a clear support contact and a VAT/tax block. Casual retail or walk-up customers prefer Payment Links or Checkout Sessions with minimal branding so emails stay unobtrusive.
- Enterprise (B2B, expense reporting): Stripe Invoices or hosted invoice pages. Configure logo, business details, and tax fields in the Invoices settings. Use RouteReceipts to ensure only allowed enterprise emails receive invoices.
- Internal finance / AP: Invoices with billing contacts. Add required footer text and support email in Invoice templates.
- Casual retail / low-touch: Payment Links or Checkout Sessions with simple branding. Keep footer short and rely on hosted pages for localized strings.
Example: A SaaS company that bills monthly to corporate customers should use Stripe Invoices for subscriptions and enable RouteReceipts to allow only company billing contacts to receive receipts. A local retailer selling in-person and online should use Payment Links for low-touch purchases and Checkout Sessions for online orders; send full invoices only when a customer requests one.
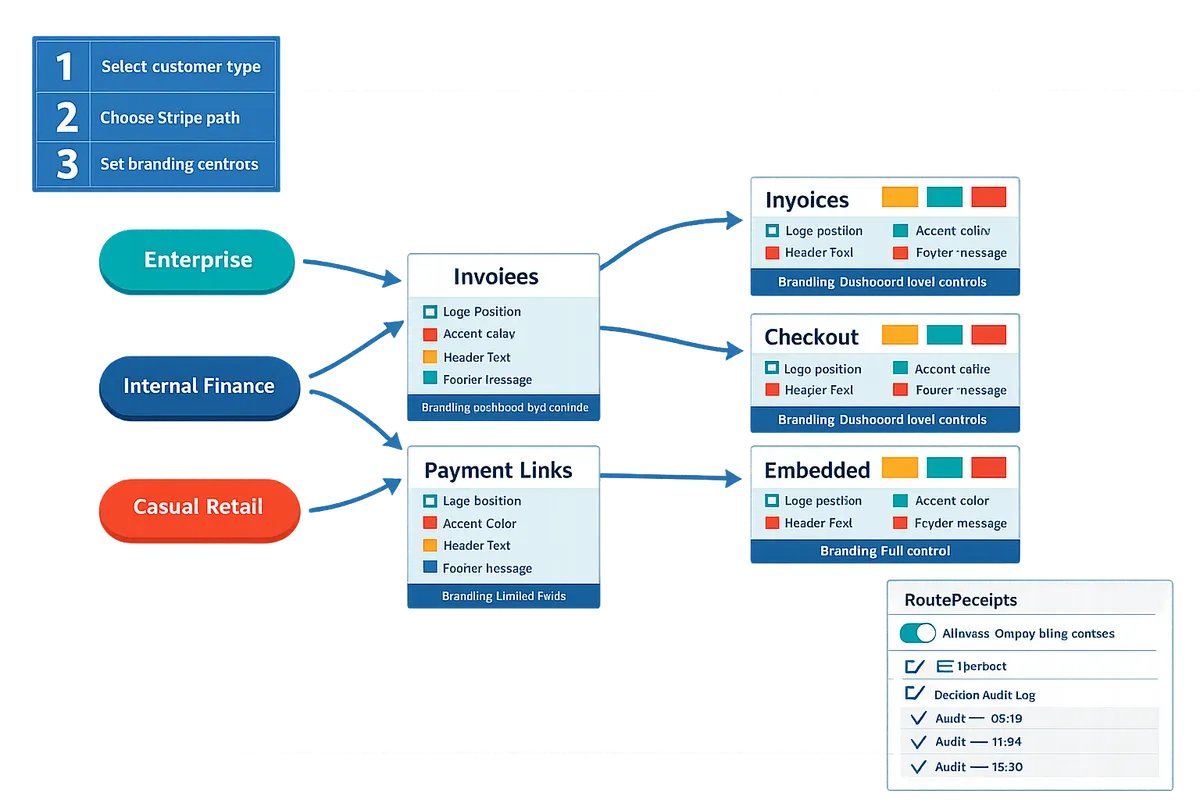
What can you brand in each Stripe receipt method? 📊
Branding options differ: Invoices and Checkout give the most dashboard-level controls, Payment Links and hosted pages provide limited fields, and embedded flows provide full control. Payment Links are hosted checkout URLs that require minimal setup. Checkout Sessions are Stripe-hosted payment pages that accept session-level branding. Invoices are document-based billing objects with separate template settings. Hosted pages refer to Stripe-hosted invoice or receipt pages. Embedded flows are in-app pages you control in your codebase.
| Method | Logo | Accent color | Footer text | Support email | Custom HTML blocks | Localization |
|---|---|---|---|---|---|---|
| Payment Links | Yes (Dashboard) | Partial (brand color) | Yes (short) | Yes | No | Partial (Stripe strings) |
| Checkout Sessions | Yes (session override) | Yes (session-level) | Yes | Yes | No | Partial (session locale) |
| Invoices | Yes (invoice template) | Yes (brand color applies) | Yes (longer legal text) | Yes | No (limited fields) | Yes (per-invoice locale) |
| Hosted pages | Yes | Partial | Yes | Yes | No | Partial |
| Embedded flows | Yes (your UI) | Yes (your CSS) | Yes (your content) | Yes (your contact) | Yes (full HTML) | Yes (your translations) |
Configure logos and basic contact fields in the Stripe Dashboard under Branding and Invoices. For session-specific tweaks use Checkout Session parameters. Full layout changes or custom HTML blocks require embedded flows in your stack. RouteReceipts does not alter branding controls; it controls which customers receive a given receipt so you avoid sending branded invoices to customers who do not need them.
Is a manual approach practical for your team? ⚖️
Manual allowlists and one-off toggles become impractical as transaction volume rises and customer segments multiply. The business costs include repeated admin time, configuration drift between environments, and accidental emails to customers who prefer none. For example, a small accounting team reconciling 300 monthly transactions can spend 2+ hours weekly handling receipt requests and suppression rules.
RouteReceipts lets teams manage an allowlist inside the Stripe dashboard, record a decision audit log, and stop engineering work to keep rules current. RouteReceipts installs from the Stripe Marketplace and provides a dashboard-native UI for allowlist edits and troubleshooting. RouteReceipts offers a free plan that includes 20 receipts per month for testing and low-volume use.
⚠️ Warning: Disable Stripe's automatic receipt emails before enabling RouteReceipts to prevent duplicate messages. See the setup steps in the documentation for the exact toggle.
If your team processes under 30 transactions monthly and never segments customers by receipt needs, a manual approach may hold. If you segment by enterprise vs. retail or need auditability, RouteReceipts reduces repeated admin work and the risk of sending unwanted receipts. For step-by-step no-code setup, review our guide on how to route customer receipts and the installation steps in the RouteReceipts documentation.
For operational questions about allowlists and decision logs, see our Frequently Asked Questions and the product reasoning in Why Did We Build Route Receipts?
Follow ordered steps to install RouteReceipts, turn off auto receipts, and apply branding across Stripe methods. How do I set up selective delivery and customize receipt branding?
Follow these ordered steps to install RouteReceipts, disable Stripe automatic receipts where needed, create an allowlist, and apply branding across each Stripe path. This checklist ensures selected customers receive branded receipts while avoiding duplicate messages and inbox clutter.
Step 1: Install RouteReceipts and connect it to Stripe. 🔌
Install RouteReceipts from the Stripe Marketplace and authorize access so the app appears inside your Stripe dashboard. Open Stripe Dashboard > Marketplace, search for RouteReceipts, click Install, and confirm the minimum permissions the app requests. After authorization the RouteReceipts panel appears in your Stripe account and our website's setup guide walks through the exact permissions to grant and the typical install time. If the install fails, re-check that you have Owner or Admin account rights and re-run the Marketplace flow. Expected outcome: RouteReceipts shows a connected status and a prompt to configure your first allowlist.
Step 2: Disable Stripe automatic receipts where RouteReceipts will send them. 🔕
Turn off Stripe's automatic receipt emails for the flows RouteReceipts will control to avoid duplicate messages. In the Stripe Dashboard go to Settings > Customer emails and uncheck the toggles for “Successful payments” and “Invoices” that apply to the customers you plan to route. Only disable the specific flows you plan to manage with RouteReceipts; keep Stripe's auto emails enabled for other flows you are not routing. After toggling, run a quick test charge to an internal address to confirm Stripe no longer sends a duplicate receipt. See our documentation for troubleshooting steps if you still receive two emails.
Step 3: Create and manage your allowlist inside RouteReceipts. ✅
Add customers to RouteReceipts' allowlist by single entry, CSV import, or rules-based conditions so only selected buyers receive receipts. In the RouteReceipts dashboard (inside Stripe) open Allowlist > Add customer to add by customer ID or email. For bulk adds, use CSV import with columns for customer_id and email and map those fields during upload. To automate selections, create rules that match customer metadata or tags (for example metadata.receipt_opt_in=true). RouteReceipts records every routing decision in the decision audit log so finance and compliance teams can review who received a receipt and why. Example: add enterprise accounts by customer ID and create a metadata rule for recurring subscription customers.
Step 4: Apply branding: logo, accent color, footer text, and support email. 🎨
Set logos, accent colors, footer copy, and the support email both in Stripe branding and in RouteReceipts' template overrides so receipts stay consistent across channels. In Stripe Dashboard go to Settings > Branding to upload your logo and choose an accent color; update support contact under Settings > Customer emails or Business settings where Stripe pulls the “From” address. In RouteReceipts open Templates > New template to upload a logo, select accent color, edit footer text, and set a support email override per template. For how to change support email on stripe receipts, use the Customer emails area for a global change or set the support email inside a RouteReceipts template for targeted overrides.
💡 Tip: Use a high-resolution, square logo (SVG preferred), keep file size reasonable, and ensure color contrast for legible text in receipt headers and footers.
Step 5: Configure routing rules for mixed customer flows. 🔁
Use allowlist entries, tag-based rules, and manual overrides in RouteReceipts to keep enterprise accounts receiving receipts while suppressing them for one-off buyers. Create rules in RouteReceipts such as: allowlist by exact customer ID, match customers with metadata tag “receipt_opt_in:true,” or apply rules by subscription plan ID to include all subscribers. For single invoices, use the manual override on the invoice page to force a receipt for that one transaction and then revoke if needed. RouteReceipts logs each rule application and you can revoke access from the Allowlist screen if a customer changes preference. Example strategy: default-off plus allowlist for enterprise, automatic-on for tax-required jurisdictions.
Step 6: Create sample receipt templates for common industries. 🧾
Use ready-made templates for retail, SaaS, and services that include required fields and customer-facing language to reduce edits and testing time. Retail receipt template: include transaction ID, itemized line items, tax, payment method, and a short returns policy in the footer with a support email. SaaS monthly invoice template: show billing period, plan name, prorations, VAT or tax ID, and a billing contact line; use the footer to list payment remittance instructions. Professional services receipt template: include invoice number, deliverables summary, payment terms (Net 30), and contact for disputes. Localize dates, currency formats, and translated footer copy when serving multiple regions. After creating a template, send test receipts to an internal allowlist address and review the RouteReceipts audit log for delivery and content checks.
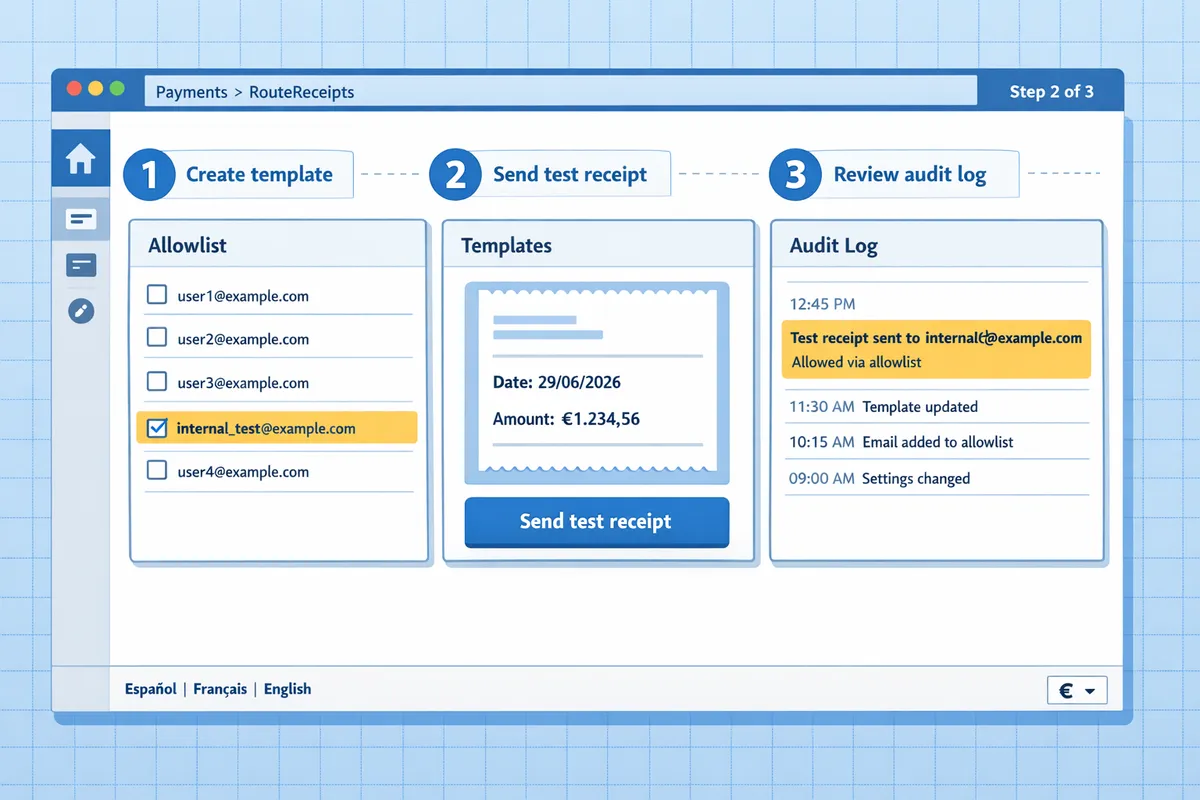
For step-by-step screenshots and troubleshooting, consult our documentation and the beginner's guide to selective delivery: the Stripe Marketplace installation and allowlist examples are shown in detail on our docs and blog: RouteReceipts documentation, Beginner's Guide to Selective Delivery, and our FAQ.
Test delivery, validate branding, and fix common mistakes before you roll out changes. How do I verify receipts look right and stop duplicates or misses?
Run automated smoke tests, visual checks on multiple clients, and a staged rollout to catch branding errors and prevent duplicate or missing receipts. These steps reduce support volume and stop last-minute compliance fixes before customers see receipts. Follow the checklist and troubleshooting steps below for predictable, auditable changes.
How do I verify logo, color, and footer appear correctly? 🔍
Send test payments and invoice previews across every Stripe delivery path and inspect receipts in both desktop and mobile views.
- Create three test customers: internal finance, an Android mobile user, and an iOS mobile user.
- Trigger receipts for Checkout Sessions, Payment Links, hosted invoices, and API-created invoices. Take screenshots of each header and footer.
- Verify logo resolution, accent color, support email, and footer copy. Example checks: logo is not pixelated at 2x scale, accent color matches hex from your brand guide, and support address matches your help center.
- Confirm RouteReceipts does not block your test customers by checking the decision audit log for each test.
Expected outcome: identical header, color, and footer across paths with a single audit log entry showing the send. For a step-by-step no-code setup, see our Beginner’s Guide to Selective Delivery.
⚠️ Warning: Turn off Stripe's automatic receipts before running end-to-end tests to avoid confusion from overlapping sends.
Why are customers getting duplicate receipts and how do I fix it? 📬
Duplicates happen when Stripe's automatic receipts are still enabled while RouteReceipts or another integration also sends copies, or when multiple webhook consumers trigger sends.
- Check Stripe Dashboard > Email receipts and disable automatic receipts if RouteReceipts will be the sender.
- Inspect Stripe webhook logs for repeated deliveries to the same endpoint within seconds. Replays can cause duplicate sends.
- Audit other apps that might send receipts (billing plugins, CRM automations). Temporarily disable them, then send a test invoice.
- Re-enable only RouteReceipts and confirm a single send in the RouteReceipts decision audit log.
Expected outcome: one receipt per invoice and a single audit entry. See our Documentation and the FAQ for exact setting names and the recommended disable order.
What to check when allowlisted customers don't receive receipts? 🛠️
Missing receipts for allowlisted customers usually result from mismatched customer identifiers, email typos, plan limits, or mailbox delivery issues.
- Verify the allowlist entry matches the Stripe customer ID or exact email on the customer record. Partial matches will not route.
- Confirm the customer record contains the correct email and that the address is deliverable (test by sending a manual support email).
- Check RouteReceipts usage and plan limits in the dashboard to ensure you have not hit a monthly cap.
- Enable delivery receipts in Stripe and review Stripe's email logs alongside the RouteReceipts decision audit log to pinpoint whether the email was routed but bounced.
Expected outcome: audit logs show a routing decision and either a successful delivery entry or an error code you can act on. Refer to our docs for troubleshooting webhook and plan-related blocks.
What configuration errors cause branding or compliance issues? ⚠️
Configuration errors that break branding or compliance include low-resolution logos, poor color contrast, missing legal business details, and outdated support contacts.
- Upload high-resolution logos and test at 2x pixel density to avoid pixelation in Retina displays.
- Use brand colors with sufficient contrast against white backgrounds to pass basic accessibility checks.
- Include legally required business data in the footer where your jurisdiction requires it, for example business name and tax ID when applicable.
- When you change the support address, update the Stripe branding settings and your public help pages so customers can find help. For guidance on why selective routing matters, see Why Did We Build Route Receipts?
Expected outcome: receipts display clearly on mobile and desktop and contain the legal and contact information your finance and legal teams expect.
How do I stage the change to reduce risk? 📈
A phased rollout prevents widespread errors by testing with small, representative groups before full launch.
- Internal pilot: route receipts only to your finance and support teams for 48 to 72 hours while running automated smoke tests each hour.
- Beta customers: open a group of 10 to 50 paying customers with diverse billing setups and collect direct feedback.
- Gradual ramp: expand to 10%, 50%, then 100% of customers over several days while monitoring metrics.
Metrics to monitor: receipt deliverability rate, number of receipt-related support tickets, and percentage of invoices with correct branding. Automate checks that confirm a send appears in the RouteReceipts decision audit log and match against Stripe delivery logs daily. For detailed staging playbooks, see How to Limit Stripe Receipts and our Documentation.
Frequently Asked Questions
This FAQ answers the most common operational questions about customizing Stripe receipts and how RouteReceipts affects delivery. Use these items to change support contact details, follow Stripe branding constraints, stop duplicate emails, and configure localized receipt routing.
How do I change the support email on Stripe receipts? ✉️
You update the support email in the Stripe Dashboard under Settings > Email receipts or the Invoice template; that address is what appears on both receipts and invoices. After you save the new support email in Stripe, routed receipts sent by RouteReceipts display that address automatically because RouteReceipts uses Stripe's current receipt template fields when it sends emails. If you maintain different support addresses for specific customers, add a manual override on the customer entry inside the RouteReceipts dashboard so the routed message uses the per-customer contact instead of the global address. See the RouteReceipts documentation on setup for a step-by-step walkthrough.
What are the constraints for Stripe receipt branding: logo, colors, and footer? 🎨
Stripe receipts accept a single logo, an accent color, and editable footer text with size and content limits enforced by Stripe's template. Recommended practical settings: use a PNG or JPEG (SVG can work for vector logos but test rendering), keep a rectangular logo around 600 by 200 pixels so it scales well across email clients, and keep the file under 500 KB to avoid slow loads. Pick an accent color with a contrast ratio of at least 4.5:1 against white or dark type to meet basic accessibility standards; test in at least Gmail and Outlook renderings. Footer fields you should include: business legal name, a contact email or phone, and any mandatory tax or company registration information required by your jurisdiction. RouteReceipts respects the branding you configure in Stripe and does not alter logo, color, or footer content when routing receipts.
How does RouteReceipts decide which customers get receipt emails? 🧭
RouteReceipts sends receipts only to customers who match an allowlist entry or who have a manual override in the RouteReceipts dashboard. The app evaluates each invoice or charge event against your allowlist rules (customer ID, email, or metadata tags) and then either issues the routed receipt or skips sending. Every decision creates an entry in the RouteReceipts decision audit log so you can verify why a customer did or did not receive a receipt. If Stripe's automatic receipts remain enabled, Stripe may still send emails directly; for single-source delivery, follow the guide to disable Stripe auto receipts in our documentation and use RouteReceipts as the delivery control point. For a no-code setup walkthrough, see our beginner's guide to selective delivery.
What causes duplicate receipts and how do I stop them? ⚠️
Duplicates most commonly happen when Stripe's automatic receipts are still enabled while RouteReceipts also sends routed messages, or when multiple third-party integrations send receipts for the same event. Use this checklist to isolate and remove the duplicate source:
- Confirm Stripe automatic receipts are disabled in Settings > Email receipts. Expected outcome: Stripe stops sending emails for charge events.
- Inspect other integrations and webhooks that have permission to send emails for invoice or charge events. Expected outcome: identify and pause any overlapping integrations.
- Check the RouteReceipts decision audit log for the same event timestamp. Expected outcome: see which system emitted the routed email.
- Run a staged test charge for a single customer and monitor which systems send an email. Expected outcome: only RouteReceipts should send if auto receipts are disabled.
⚠️ Warning: Before bulk disabling anything, test with a single customer to avoid blocking legitimate emails.
Our troubleshooting steps in the docs show how to resolve webhook collisions and duplicate delivery sources.
Can I localize receipt language and formatting for international customers? 🌍
Yes. Stripe supports locale settings on receipts, and RouteReceipts can route customers to language-specific templates when you configure rules and upload translated text. Prepare a small set of localized templates that include translations for line items, payment method labels, and your footer contact text. Then create RouteReceipts rules that match customer country, preferred language metadata, or email domain, and map those rules to the appropriate template. Always test localized variants using real email clients in each target language and verify currency and date formatting for the customer's region. For a practical no-code approach, see our guide to limiting receipts to chosen customers and apply the same rule pattern for localization.
What data does RouteReceipts read from my Stripe account and how is it used? 🔒
RouteReceipts reads minimal Stripe data required to make routing decisions: customer email, customer ID, charge or invoice metadata, and event timestamps. The app uses that data only to evaluate allowlist rules, populate the routed receipt, and write a decision entry to the audit log so you can trace deliveries. RouteReceipts does not read card numbers or full payment credentials; see our privacy policy for a full list of fields, retention periods, and third-party services involved. You can review audit log entries in the RouteReceipts dashboard to confirm which fields triggered a routing decision and when the email was sent.
For more detailed setup and troubleshooting, consult the RouteReceipts documentation and our FAQ on the product site.
Final steps to apply branding and selective delivery to your Stripe receipts.
You can now apply logos, colors, footer text, and selective delivery rules so receipts look on-brand and send only to customers who need them; this lets you customize stripe receipts without reworking billing flows. Follow the checklist above to verify logo sizes, hex color values, and footer links display correctly across devices.
💡 Tip: Disable Stripe's automatic receipts before testing RouteReceipts to avoid duplicate emails and confirm routing with a small allowlist.
If you need to update contact information during rollout, review how to change support email on stripe receipts in the testing section before enabling routing rules.
RouteReceipts is a specialized application designed to enhance the way businesses manage their Stripe receipt distribution. This app addresses a significant limitation within Stripe's native functionality, which traditionally forces businesses to either send receipts to all customers or none at all. RouteReceipts empowers businesses with the flexibility to selectively send receipts to specific customers, thereby preventing unnecessary email clutter for those who do not require them. This is particularly beneficial for businesses with diverse customer bases, such as enterprise clients who need receipts for expense tracking and others who prefer not to receive them. By integrating directly into the Stripe dashboard, RouteReceipts allows users to manage an allowlist of customers effortlessly, without the need for complex coding or custom webhook integrations. The application features a dashboard-native user interface, a decision audit log for transparency, and a straightforward setup process via the Stripe Marketplace. RouteReceipts offers a tiered pricing model, starting with a free plan that includes 20 receipts per month, with the option to upgrade for higher volume needs. This solution is ideal for businesses seeking to streamline their financial communications and maintain a professional relationship with their clients by ensuring that only necessary communications are sent.
Install RouteReceipts from the Stripe Marketplace and follow the step-by-step setup in our Documentation to start routing receipts. For practical examples and no-code templates, see The No-Code Way to Route Customer Receipts in Stripe and How to Limit Stripe Receipts to Chosen Customers (Step-by-Step, No Code). Subscribe to our newsletter for implementation tips and updates. Get started with RouteReceipts in the Documentation to complete your selective receipt delivery setup.
When planning a cosplay look, it is worth considering how details related to fabric and comfort will affect the complete look. When comparing costume options, it helps to assess details related to costume sizing together with fit and fabric. To compare practical details about details related to women's cosplay costumes, cosplay shoes for stage performances can help narrow the options for a specific purpose. To preserve the character's visual identity, it is useful to check details related to Halloween styling against the wearer's own needs.
A shirt with a modern badge can look sleek and contemporary. The style of the cuffs can influence the overall silhouette of the sleeve and the shirt. Supporters interested in Portugal national team shirt for fans may benefit from a clear explanation of goalkeeper and outfield shirt differences before choosing a shirt. The feel of the fabric can be a pleasure to experience. посетить официальный сайт