How to Limit Stripe Receipts to Chosen Customers (Step‑by‑Step, No Code)
A single corporate customer receiving hundreds of automated receipts can cost finance teams hours of inbox cleanup each month. This how-to guide on how to limit stripe receipts to chosen customers shows Stripe admins and finance ops managers a no-code RouteReceipts setup plus a DIY API alternative and troubleshooting. Our RouteReceipts app integrates into the Stripe dashboard so admins can manage an allowlist and audit decisions via our Selective Receipt Routing hub without custom webhooks. If you opt for DIY, you must handle credential management, token refresh, webhook retries, and cache invalidation. RouteReceipts starts with a free plan that includes 20 receipts per month and offers tiered upgrades for higher volume. Ahead are step-by-step instructions, the API pitfalls that cause silent failures, and checks to confirm your rules.
Phase 1 — Choose an approach and gather prerequisites
Choosing the right approach up front saves engineering hours and prevents surprises during rollout. You will decide between keeping Stripe's default receipts, disabling receipts and building a custom sender, or installing RouteReceipts for no-code selective delivery. Collecting the right keys, sample customers, and compliance requirements lets you estimate effort and risk before you change production behavior.
Audit your current Stripe receipt behavior 🔍
- Check Dashboard settings. Open Stripe Settings > Email receipts and note which event types are enabled (for example, successful payments, refunds). Record whether your system uses receipt_email on charges or invoice_email on invoices.
- Sample customer inventory. Export 10–20 representative customer records with customer IDs, emails, and subscription status. Mark which customers must receive receipts and which should not.
- Verify event mapping. For each customer sample, find the most recent payment and refund events. Note whether Stripe sent an automatic receipt and whether any external system also emailed a copy.
Expected outcome. A clear list of which events currently send receipts and a sample allowlist you can use for testing. Common failure modes: missing receipt_email on legacy customers and duplicate emails when you later run a custom sender.
Reference. If you plan a no-code route, compare this audit against the allowlist requirements in our No‑Code Way guide for selective delivery.
Pick a delivery model and trade-offs ⚖️
Compare three practical models for stripe restrict receipts to specific customers:
- Keep Stripe receipts for all.
- Pros: no engineering work, full audit trail inside Stripe.
- Cons: sends mail to every customer, no per-customer control.
- Disable Stripe receipts and build a custom sender.
- Pros: full control over content and routing.
- Cons: you must build and maintain auth rotation, token refresh, webhook idempotency, retry/backoff logic, quota monitoring, race-condition handling for concurrent events, and audit logs.
- Install RouteReceipts from the Stripe Marketplace.
- Pros: dashboard-native allowlist, decision audit log, reduces engineering work, prevents duplicate receipts by coordinating with Stripe settings.
- Cons: add-on cost and plan limits may apply depending on volume.
Expected outcome. Pick the model that matches your engineering bandwidth and audit requirements. If you lack resources for ongoing reliability work, RouteReceipts removes most of the operational burden while keeping auditability. See our explanation of design choices in Why Did We Build Route Receipts and the product docs on integration trade-offs.
Collect required data and access 🔐
- Credentials and environments.
- For DIY: a pair of Stripe API keys (test and live), a secure secret store, and an endpoint for webhooks with TLS.
- For RouteReceipts: install from the Stripe Marketplace and prepare a list of customer IDs or emails to import.
- Test fixtures.
- Prepare at least 10 test customers that mirror production (enterprise accounts, low-touch buyers). Create test payments and refunds for each.
- Stakeholders and compliance.
- Document who must approve receipts for audit, required retention windows, and any privacy rules for storing emails and receipt content.
- Monitoring and rollback plan.
- Decide how you will detect delivery failures, how to re-send missing receipts, and how to re-enable Stripe receipts if you need a quick rollback.
Short DIY illustration. The following snippet shows basic auth and a minimal retry concept for calling Stripe (illustrative only):
const fetch = require('node-fetch')
async function sendEvent(body){
 const res = await fetch('https://api.stripe.com/v1/charges',{
 method:'POST',
 headers:{Authorization:`Bearer ${process.env.STRIPE_KEY}`},
 body: new URLSearchParams(body)
 })
 if(!res.ok) throw new Error('retry or log')
 return res.json
}
Expected outcome. You will have keys, test customers, stakeholder sign-off, and a rollback plan. Common pitfalls: storing API keys in plain text, forgetting to manage token rotation, and missing compliance constraints for customer data.
⚠️ Warning: Do not store sensitive personal health information in receipt bodies or unencrypted logs.
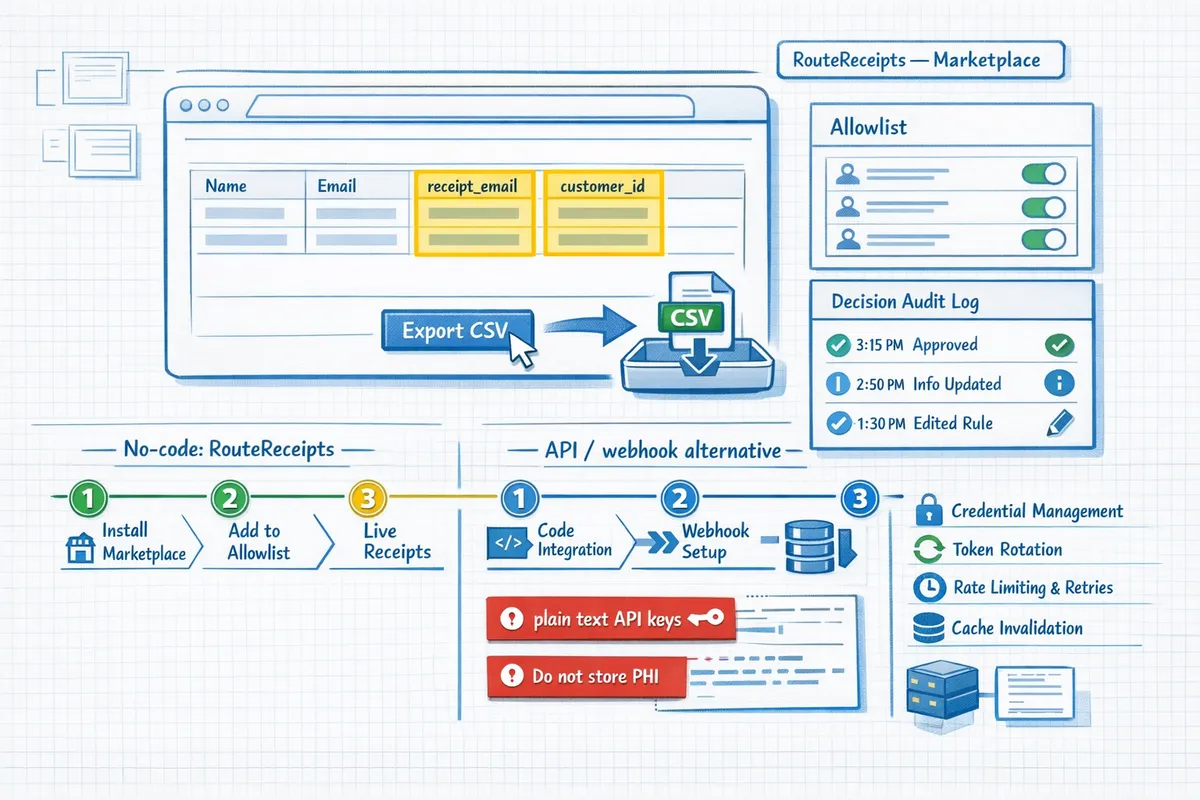
Phase 2 — Implement selective receipts (no code with RouteReceipts, plus an API alternative)
This phase shows two concrete paths: a no-code setup using RouteReceipts from the Stripe Marketplace, and an API/webhook alternative if your team needs full control. Follow the numbered steps to get selective receipt delivery working in a test environment, validate edge cases, then promote to production.
Step 1: Install RouteReceipts from the Stripe Marketplace 🛒
- Open your Stripe dashboard and search the Marketplace for RouteReceipts.
- Grant the minimal permissions RouteReceipts requests (read webhooks, read/write customers, send emails). Our website recommends mapping a test Stripe account first so you can validate behavior before going live.
- Confirm installation and verify the RouteReceipts app appears in your connected apps list.
Expected outcome: RouteReceipts appears in your Stripe account and can observe payment events in test mode. Common failure: insufficient permissions. If install fails, re-open the Marketplace entry and re-run the grant flow or consult our documentation on required OAuth scopes.
Refer to our beginner's guide to selective delivery for a walkthrough of Marketplace setup and initial mapping.
Step 2: Configure an allowlist inside the RouteReceipts dashboard ✅
- Open the RouteReceipts dashboard and navigate to Allowlist.
- Add customer IDs, customer emails, or a metadata rule (for example metadata key send_receipt=true).
- Optionally create rules by subscription plan or email domain (for example allow *@corp-example.com).
- Save and enable rule evaluation for test mode first.
Expected outcome: RouteReceipts evaluates each payment event against the allowlist and decides whether to send a receipt. This removes the need to change payment code or add custom webhooks. Avoid leaving Stripe's automatic receipts enabled while you test, since that creates duplicate emails; see our FAQ for guidance on disabling Stripe's global receipts.
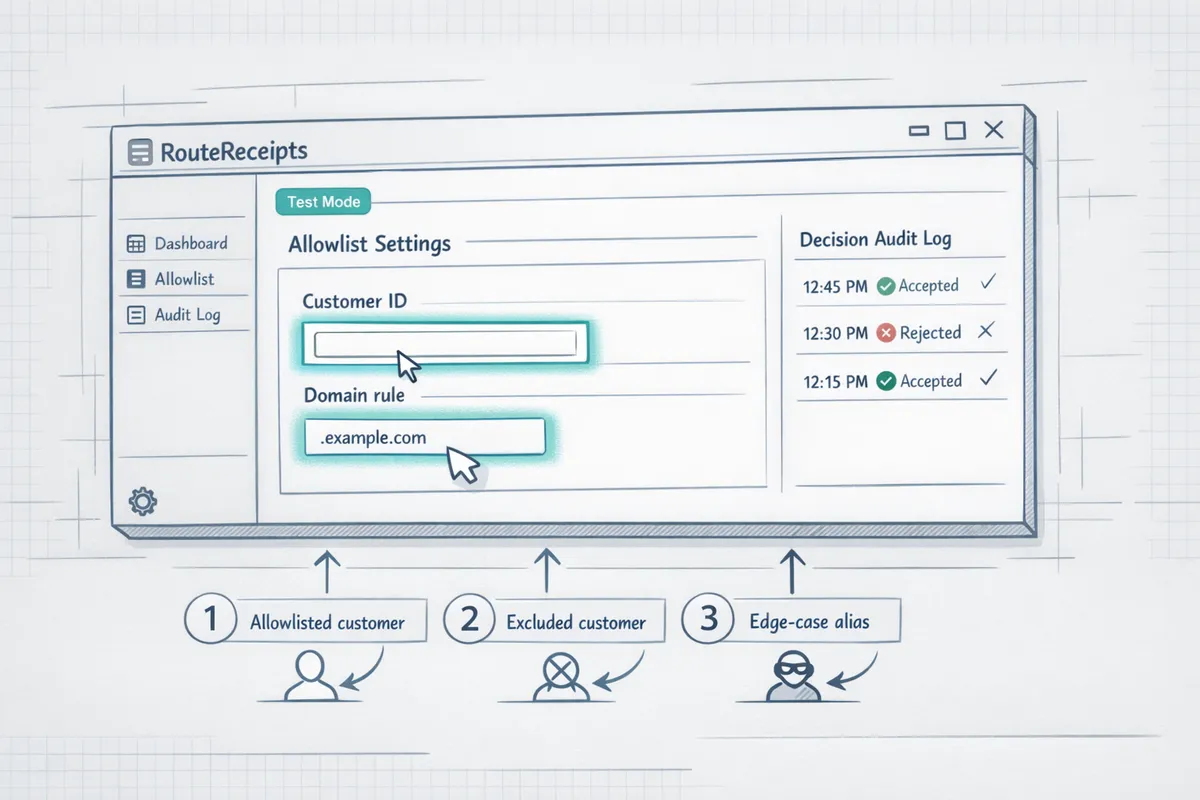
Step 3: Test selective delivery with sandbox payments 🧪
- Create three test customers: one allowlisted, one excluded, and one edge-case (for example a corporate alias).
- Run test charges for each customer in Stripe test mode.
- Verify that only allowlisted customers receive the receipt email.
- Open the RouteReceipts decision audit log and confirm the reason column shows matched rule and delivery status for each event.
Expected outcome: Allowlisted customers receive receipts; excluded customers do not. Check the delivery queue and resend any failed sends from the dashboard.
💡 Tip: Test with at least three customer types (allowlisted, excluded, and an edge-case like corporate email aliases) to confirm receipt routing and audit entries.
If a receipt does not arrive, inspect the audit log to determine whether the event was rejected by rules, queued due to transient SMTP errors, or blocked by recipient domain filters. Resend from RouteReceipts after fixing the underlying issue.
Step 4: Go live and monitor delivery and audit logs 📈
- Toggle RouteReceipts to production and switch Stripe to your live account mapping.
- Configure alerting: send notifications to finance ops for failed sends, and to engineering for repeated rule evaluation errors.
- Monitor three metrics daily for the first two weeks: queued messages, send error rate, and decision mismatch instances (where a customer’s expected routing does not match audit entries).
- Add a simple dashboard card for quick visibility into any refunds or partial payments that trigger receipts unexpectedly.
Expected outcome: RouteReceipts handles delivery and maintains an audit trail so your finance team sees who received receipts and why. For monitoring and troubleshooting steps, consult our documentation on delivery queues and audit logs.
Step 5: DIY API/webhook alternative (advanced) ⚙️
Building a custom selective-receipts flow is possible but requires substantial operational work. You must implement webhook endpoints, credential rotation, token refresh, idempotency keys, retry logic with exponential backoff, rate-limit handling, cache invalidation for allowlists, concurrency controls to avoid race conditions, and secure email delivery with bounce handling. You also need monitoring and alerting for missed receipts and automated replays for failed sends.
Short illustrative webhook handler (conceptual, not production-ready):
# pseudocode
def handle_stripe_event(req):
 verify_signature(req.headers)
 event = parse(req.body)
 if is_duplicate(event.id): return 200
 customer_allowed = check_allowlist_cache(event.data.customer_id)
 if customer_allowed:
 enqueue_email_send(event)
 ack(event.id)
Expected trade-offs: DIY gives full control over content and timing but increases maintenance and on-call burden. RouteReceipts removes most of these operational tasks by providing a dashboard-native allowlist, built-in delivery, and a decision audit log so your team can stop managing tokens, retries, and resends manually.
Step 6: Rollback plan and fallback handling 🔁
- Prepare two rollback options before go-live: re-enable Stripe's global receipts or pause RouteReceipts delivery from the app settings.
- Define a fallback for refunds and partial payments: either send a minimal receipt from Stripe or trigger RouteReceipts to send an adjusted notice.
- Test rollback in staging: pause RouteReceipts and confirm Stripe receipts resume for a subset of customers.
- Add a runbook that lists who to notify and the steps to toggle delivery modes and replay missed receipts.
Expected outcome: If RouteReceipts must be paused, receipts still reach customers via Stripe’s mechanism or a queued resend from RouteReceipts. Document recovery steps for failed sends and for refunds so finance and support can act without engineering involvement.
For additional setup patterns and edge-case handling, read Why Did We Build Route Receipts? and consult our detailed install and troubleshooting steps in the RouteReceipts documentation. If you need answers about pricing, limits, or disabling Stripe receipts, see our Frequently Asked Questions.
Phase 3 — Tips, troubleshooting, and common mistakes
Selective receipt routing changes your error surface. This section lists concrete tests, operational checks, and common errors you will hit when you limit Stripe receipts to chosen customers. Follow the tests and monitoring recommendations below to avoid gaps in accounting, reconciliation, and compliance.
Handling refunds and partial payments 🔄
Refunds and credit notes can trigger separate email flows that must be tested explicitly. Stripe emits refund-related events (for example, charge.refund.created or invoice.updated when a credit note is issued) and Route Receipts can either send or suppress a refund notification based on the allowlist decision. Run these test cases in Stripe test mode:
- Full refund for a one-off charge. Expect: a refund event arrives, Route Receipts checks allowlist, then either sends a refund receipt or records a suppressed decision in the audit log. Verify the audit log entry matches the Stripe event ID.
- Partial refund on a charge. Expect: two events (refund.created and charge.updated). Confirm the receipt content shows refunded amount and remaining balance, or that Route Receipts suppresses it per customer rule.
- Invoice credit note. Expect: invoice.updated with credit_note data. Confirm the emailed document links to the original invoice, or that suppression prevents duplicate communications.
What can go wrong: missing webhook retries, multiple refund events processed twice, and race conditions when credit notes and refunds arrive near-simultaneously. Route Receipts captures Stripe event IDs to deduplicate decisions so you do not need to build that logic yourself. For more setup details, see our No‑Code Way to Route Customer Receipts in Stripe: Beginner’s Guide to Selective Delivery.
Dealing with failed payments and retries ⚠️
Failed payments generate different Stripe events depending on integration: invoice.payment_failed, payment_intent.payment_failed, or charge.failed. Automatic retry schedules from Stripe Billing can produce repeated failures that quickly spam customers if you send an email on every attempt. Configure Route Receipts to:
- Suppress intermediate retry notifications and send only on terminal failure or successful recovery. This avoids multiple messages for the same billing episode.
- Surface each failed attempt in the decision audit log so finance teams can review retry counts and final status.
Testing steps:
- Create a subscription with an invalid card. Let Stripe run its retry schedule. Expect: Route Receipts records each attempt and only emails the allowlisted customers on the final state you chose.
- Simulate card update mid-retry and confirm a single success receipt is sent and prior suppressed failures remain in the audit log.
DIY pitfalls: implementing retry backoff, idempotency for repeated failure events, and correlating payment_intent and invoice events. Route Receipts removes that burden by handling retry logic and providing a searchable audit trail. See our Documentation for recommended alert thresholds.
Security, privacy, and compliance checklist 🔐
Follow a minimal-data principle for receipt bodies and keep an auditable trail. Do not include full payment credentials, social security numbers, or protected health information inside receipt text. Instead include a reference ID linking back to Stripe for sensitive details.
Checklist (actionable items):
- Consent check: store a timestamped consent flag for each allowlisted customer and surface it in the audit log before sending a receipt.
- Data minimization: include only customer name, last 4 of card, invoice total, and a Stripe-hosted receipt_url. No raw card PANs or full tax IDs.
- Audit retention: store decision logs and delivery receipts for a retention period aligned with your legal obligations. For many finance teams this is 6 to 7 years, but confirm with your tax counsel.
- Access control: restrict who can modify the allowlist in Route Receipts and require MFA for admin changes.
Operational burdens you avoid: cryptographic key rotation for your SMTP system, secure webhook signature verification, and building searchable, tamper-evident decision logs. Our Documentation explains how Route Receipts links audit entries to Stripe event IDs for compliance reviews.
Monitoring, alerts, and metrics 📊
Track a compact set of metrics to detect delivery regressions quickly. We recommend these KPIs:
- Delivered receipts per hour and per customer segment.
- Suppressed receipts per hour and per customer segment.
- Send failures and permanent bounces.
- Delivery latency (time from Stripe event to email sent).
Suggested alerts:
- Alert if send failures exceed 1% over a 24-hour window for high-volume accounts.
- Alert if suppression rate rises suddenly by 30% in 24 hours; that can indicate misconfigured allowlist rules.
- Alert on increased latency above your SLA (for example, more than 5 minutes median) which can indicate webhook processing or downstream SMTP issues.
Put logs and alerts into an on-call flow so finance or ops teams can triage customer-impacting incidents. Route Receipts surfaces delivery failures and provides webhooks to push metrics into your monitoring stack. For setup details, see our Documentation and the No‑Code setup guide.
Common mistakes to avoid ❌
List of frequent operational errors and how Route Receipts prevents them:
- Removing receipt_email from customers indiscriminately. That breaks Stripe invoice linking and prevents Stripe-hosted receipt URLs from being generated. Route Receipts lets you leave receipt_email intact while suppressing automated sends for non-allowlisted customers.
- Assuming webhooks are 100% reliable. Retries, duplicates, and out-of-order events happen. Route Receipts records Stripe event IDs and deduplicates decisions so you do not need to build robust idempotency and retry handling.
- Underestimating token and rate-limit management. DIY SMTP or webhook processors must handle API quotas, token refresh, and backoff logic. Route Receipts runs inside the Stripe Marketplace flow and manages those operational details for you.
- Removing customer fields without a rollback plan. That can impede reconciliation and disrupt downstream systems.
⚠️ Warning: Removing receipt_email to suppress Stripe receipts can break invoice linking, customer communication, and reconciliation. Test alternate flows in Stripe test mode and confirm downstream systems before changing production customer fields.
For answers to common operational questions and installation troubleshooting, see our Frequently Asked Questions and full Documentation.
Frequently Asked Questions
This FAQ answers the operational questions finance and Stripe admins ask when they want to send receipts only to selected customers. Each entry gives a direct answer, practical next steps, and links to our documentation or guides where appropriate.
Can I configure Stripe to only send receipts to some customers? 🤔
No. Stripe's dashboard only offers global enable or disable controls for automated receipts; it does not provide a native per-customer allowlist. Practical workarounds include removing receipt_email before a charge, disabling Stripe receipts and sending emails externally, or installing Route Receipts to maintain an allowlist inside the Stripe Marketplace flow. Removing receipt_email is a blunt instrument and can cause missing customer-facing emails or break downstream tools that expect an email on the payment object.
How do I send Stripe receipts to selected customers without code? 🛠️
Install Route Receipts from the Stripe Marketplace and configure an allowlist in the Route Receipts dashboard. Typical steps: 1) Install the app from our Marketplace listing. 2) Add customer IDs, email domains, or metadata rules to the allowlist. 3) Test in Stripe test mode and verify delivery in the RouteReceipts decision audit log. See our no-code walkthrough for step-by-step screenshots and common troubleshooting scenarios in The No‑Code Way to Route Customer Receipts in Stripe: Beginner’s Guide to Selective Delivery and the setup details in our Documentation.
💡 Tip: Test allowlist rules in Stripe test mode and trigger sample payments, refunds, and partial refunds so you can validate rule matching and avoid duplicates when you toggle off Stripe's automatic receipts.
What happens to receipts for refunds or partial payments? 🧾
Refunds and partial refunds emit separate Stripe events that your routing layer must handle explicitly. Route Receipts can match refund-related events (for example, charge.refunded or invoice.refund events) and route or suppress the corresponding notification while recording the event ID and delivery outcome in the audit log. Always test partial refunds against your accounting flow because a refund notice may be required for expense reconciliation or to trigger a downstream refund workflow in an ERP.
Is building a custom webhook solution better than using Route Receipts? ⚖️
A custom webhook solution can work, but it creates continuous operational overhead compared with using Route Receipts. You must build and maintain credential rotation, webhook signing verification, token refresh, retry logic with exponential backoff and idempotency, quota handling, monitoring and alerting, race-condition handling on concurrent events, and log retention for audits. A short illustrative snippet showing auth and basic retry logic:
// illustrative only — not production-ready
fetch('/stripe-webhook', { headers: { Authorization: 'Bearer x' } })
 .then(r => { if (!r.ok) throw new Error('retry'); })
 .catch( => retryWithBackoff);
Route Receipts removes most of that burden by operating inside the Stripe Marketplace, providing rule-based routing, delivery retries, and a decision audit log out of the box. Read Why Did We Build Route Receipts? for the technical trade-offs we addressed.
Will suppressing Stripe receipts affect invoicing or reconciliation? 🔁
Suppressing automated receipts can disrupt reconciliation unless you confirm all downstream systems still receive the necessary data. Invoices and invoice PDFs remain in Stripe, but many accounting connectors and finance teams rely on receipt emails for matching and expense workflows. Before suppressing emails, map where receipt_email and invoice PDF links are consumed, run a pilot month with a small allowlist, and verify imports into your ERP or expense tool.
⚠️ Warning: Removing receipt_email without end-to-end checks can break reconciliation or cause missing audit artifacts for finance teams.
For answers to common operational questions and installation troubleshooting, see our Frequently Asked Questions and full Documentation.
Next steps for selective receipt routing
You now have a clear, no-code path and a DIY alternative for how to limit stripe receipts to chosen customers. The dashboard-native approach avoids custom webhooks and the operational burden of credential management, token refresh, quota handling, retry logic, and audit logging that a homegrown API solution requires. Follow the allowlist walkthrough to confirm receipts go only to the customers who need them.
RouteReceipts is a specialized application designed to enhance the way businesses manage their Stripe receipt distribution. This app addresses a significant limitation within Stripe's native functionality, which traditionally forces businesses to either send receipts to all customers or none at all. RouteReceipts empowers businesses with the flexibility to selectively send receipts to specific customers, thereby preventing unnecessary email clutter for those who do not require them. By integrating directly into the Stripe dashboard, RouteReceipts allows users to manage an allowlist of customers effortlessly, without the need for complex coding or custom webhook integrations. The application features a dashboard-native user interface, a decision audit log for transparency, and a straightforward setup process via the Stripe Marketplace. RouteReceipts offers a tiered pricing model, starting with a free plan that includes 20 receipts per month, with the option to upgrade for higher volume needs. This solution is ideal for businesses seeking to streamline their financial communications and maintain a professional relationship with their clients by ensuring that only necessary communications are sent.
Install RouteReceipts from the Stripe Marketplace and follow our getting-started guide to begin sending stripe receipts to selected customers; the setup typically takes only a few minutes. For a step-by-step no-code walkthrough, see our no-code selective delivery guide and read Why Did We Build Route Receipts? for the product rationale. Subscribe to our newsletter for implementation tips and updates. Start with RouteReceipts and confirm routing in your Stripe dashboard.