
How to Selectively Send Stripe Receipts to Chosen Customers: Native Settings vs Webhooks vs RouteReceipts
Unwanted receipt emails increase support tickets by up to 20% for some SaaS finance teams. How to selectively send Stripe receipts to chosen customers is a comparison post that evaluates native Stripe settings, DIY webhook patterns, and RouteReceipts to decide the best way to send receipts only to selected customers, a core Selective Receipt Routing requirement. Our website compares the operational cost of building webhook logic, including credential management, token refreshes, retries, quota handling, and monitoring, with RouteReceipts, a Stripe Marketplace app that offers a dashboard allowlist, decision audit log, and setup without custom code. See the step-by-step selective delivery guide for concrete examples. Which option truly minimizes developer time while keeping receipts accurate and auditable?
Which methods allow you to send Stripe receipts only to selected customers?
Three practical methods let you send Stripe receipts only to selected customers: Stripe's native receipt settings, a webhook-driven custom workflow, and Route Receipts. Each method fits different operational constraints: no-engineering teams, engineering teams that accept ongoing maintenance, and teams that want a dashboard-native allowlist without building infrastructure. Match your requirements for control, auditability, and operational overhead before choosing.
What is Stripe's native receipt setting? 📨
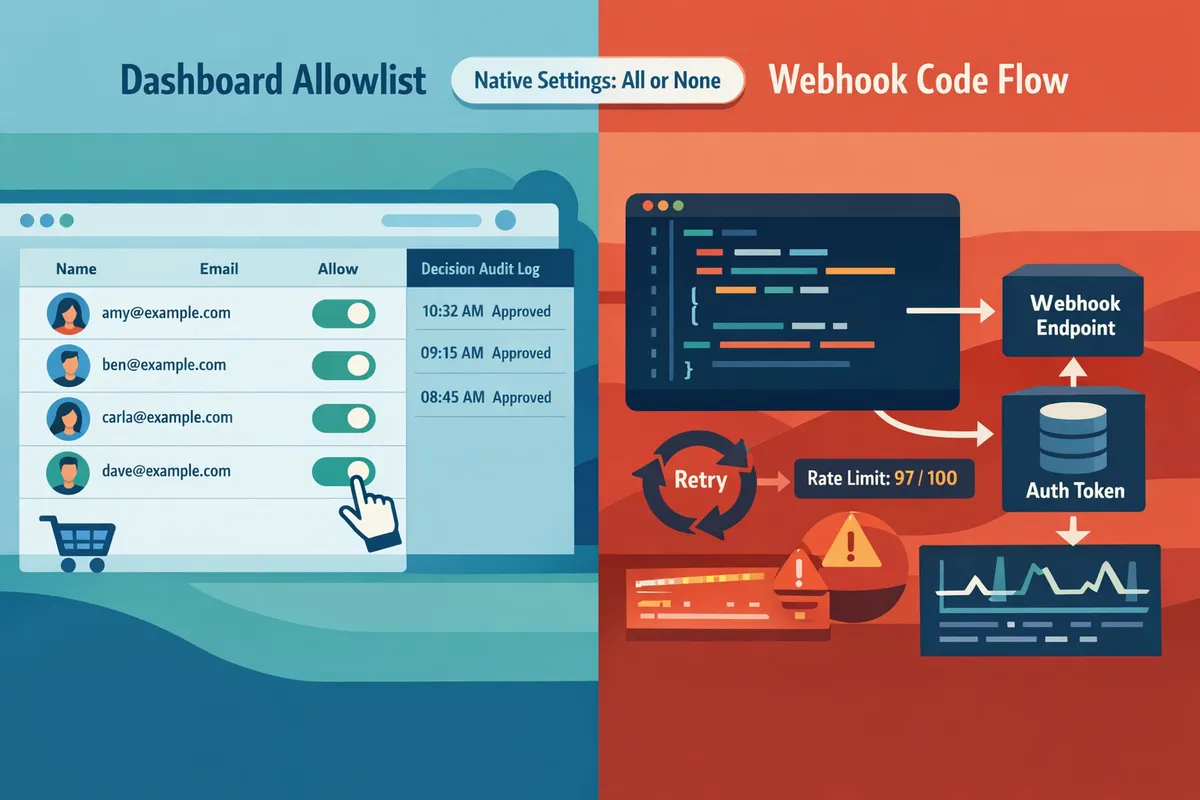
Stripe's native receipt controls send receipts automatically for successful payments or use a per-payment receipt_email to target a recipient. Stripe's Dashboard lets you toggle automatic receipts for successful payments and you can include receipt_email on a PaymentIntent or Charge to direct a single receipt. This option requires no engineering and works well for small teams that only need occasional per-transaction overrides.
Operational fit and limitations:
- Pros: no code, immediate, works with Stripe-hosted emails.
- Cons: no allowlist UI, no decision audit log, and no built-in selective routing for groups of customers.
If you want a dashboard-based allowlist rather than per-transaction receipt_email, see our no-code routing guide for a step-by-step setup with an allowlist UI and audit concerns: The No‑Code Way to Route Customer Receipts in Stripe: Beginner’s Guide to Selective Delivery. Route Receipts addresses the native gap by adding an allowlist and audit log inside the Stripe workflow.
What is a webhook-based selective receipt workflow? 🔁
A webhook-based selective receipt workflow is a custom integration that listens to Stripe events and sends emails only to allowed customers through your email provider. This pattern gives maximal control over who receives receipts and how they look, but it requires building and operating infrastructure to handle events reliably.
Operational responsibilities you must build and maintain:
- Webhook signature verification and idempotency checks.
- Credential management and token refresh for your email provider APIs.
- Retry logic with exponential backoff, rate-limiting handling, and monitoring.
- Race-condition handling when concurrent events touch the same customer record.
Example pseudo-code showing the minimum checks (illustrative, not production-ready):
// verify signature
if (!verifyStripeSignature(req.rawBody, sig)) throw Error('bad sig')
// idempotency check
if (seenEvent(event.id)) return
// send email via provider with token refresh handling
sendReceipt(customer.email).catch(handleRetry)
Building this stack adds ongoing maintenance: credential rotation, alerts for failed deliveries, and costs from email providers. For teams that prefer not to operate that stack, Route Receipts removes that burden by providing a Stripe-integrated allowlist and routing so you do not have to write or host webhook logic. For a deeper DIY pattern and testing checklist, read our API and no-code comparison: How to Limit Stripe Receipts to Chosen Customers (Step‑by‑Step, No Code).
⚠️ Warning: Always verify Stripe's webhook signature and implement idempotency to avoid duplicate receipts and potential compliance issues.
What is Route Receipts? 🚀
Route Receipts is an app that provides a dashboard-native allowlist and selective routing for Stripe receipts without custom webhook engineering. Route Receipts installs from the Stripe Marketplace, lets teams maintain an allowlist of customer IDs or emails, and records each routing decision in an audit log for compliance and troubleshooting.
How Route Receipts fits operationally:
- It removes the need to build webhook signature verification, token rotation, retry logic, and monitoring for receipt delivery.
- It provides an allowlist UI inside the Stripe workflow so finance or support teams can manage recipients without engineering changes.
- It offers controls to disable Stripe's automatic receipts to prevent duplicates when using selective routing.
For the technical rationale and implementation trade-offs that led to Route Receipts, see: Why Did We Build Route Receipts?. For install steps and troubleshooting, consult our Documentation and the Frequently Asked Questions.
How do native settings, webhook DIY, and Route Receipts compare feature-for-feature and operationally?
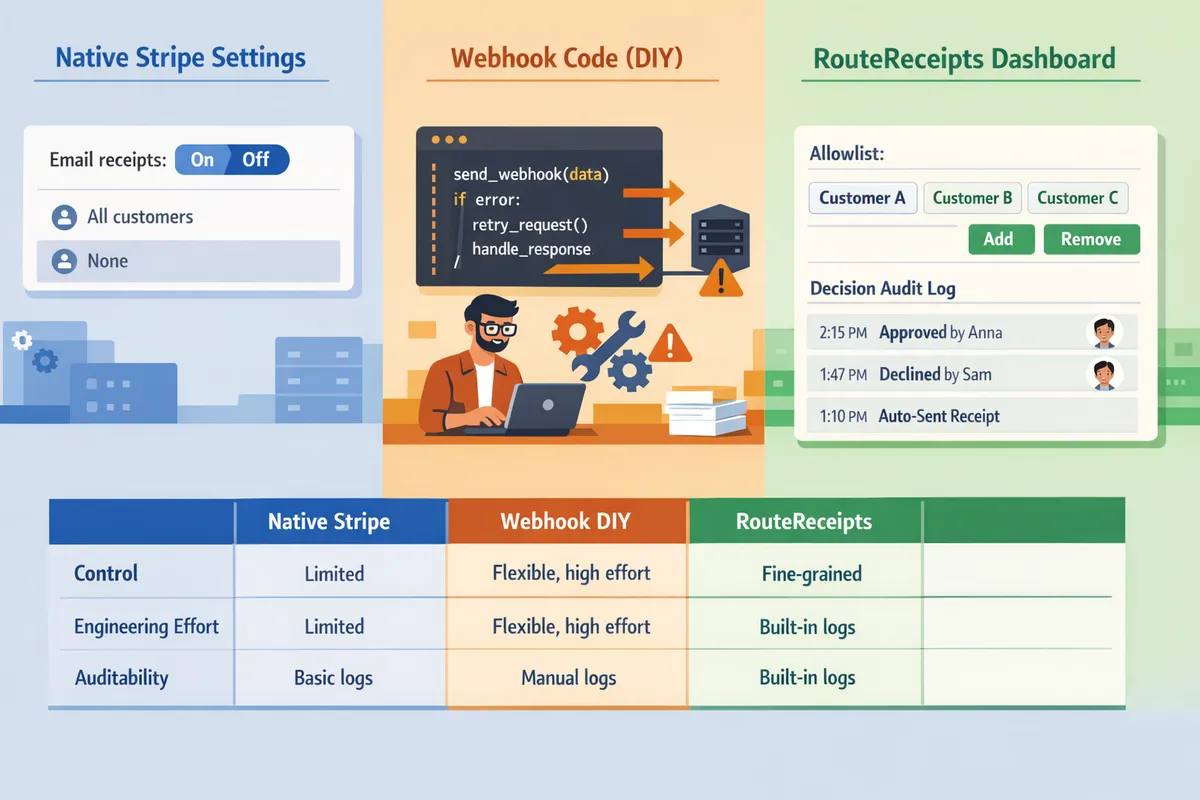
Native settings, webhook DIY, and Route Receipts differ in control, engineering effort, auditability, and cost and those differences change which option suits finance vs engineering teams. This section gives a side-by-side table and concise operational notes so procurement and engineering can compare trade-offs quickly. Read each criterion to see where Stripe's built-in controls end and where engineering or a managed app like Route Receipts becomes necessary.
How do they compare on control, engineering effort, and auditability? 📊
Route Receipts offers the most fine-grained allowlist control and built-in audit logs, webhook DIY provides the most flexible controls at high engineering cost, and Stripe native settings provide the least control.
| Criterion | Stripe native settings | Webhook DIY | Route Receipts |
|---|---|---|---|
| Control over who receives receipts | On/off per account only. No per-customer allowlist. | Full control (allowlists, rules, per-transaction logic) but must be implemented by engineers. | Dashboard allowlist and per-transaction overrides managed in-app. |
| Setup time | Minutes (toggle in Dashboard). | Days to weeks (design, auth, deploy, test). | Minutes to hours via Stripe Marketplace install and UI setup. |
| Ongoing maintenance | None beyond Stripe updates. | Continuous: credential rotation, token refresh, monitoring, retry logic. | Minimal; Route Receipts maintains app updates and audit storage. |
| Audit log availability | Stripe shows receipts sent but not decision-level allowlist logs. | Must build persistent decision logs and UI for non-engineers. | Decision audit log available in the Route Receipts dashboard. |
| UI for non-engineers | None for allowlist management. | Usually none unless you build an admin UI. | Native dashboard UI for ops and finance to manage allowlists. |
| Pricing model | No extra product cost beyond Stripe fees. | Engineering and infra costs scale with volume and complexity. | Tiered product pricing; operational work shifts to Route Receipts. |
| Ability to maintain an allowlist | Not supported. | Supported if you build and maintain it. | Built-in allowlist UI and CSV import. |
| Per-transaction overrides | Not supported. | Supported via custom logic on event payloads. | Supported with dashboard controls and API. |
For a no-code walkthrough of the dashboard allowlist flow, see our guide on The No‑Code Way to Route Customer Receipts in Stripe: Beginner’s Guide to Selective Delivery. For the product rationale and technical trade-offs, read Why Did We Build Route Receipts?.
What operational risks does each option introduce? ⚠️
Native settings introduce the least engineering risk because no custom code runs, but they also introduce operational gaps because you cannot target recipients beyond global on/off.
Webhook DIY introduces several operational risks: credential expiry and token refresh must be automated; webhook signature verification and retry handling require idempotency keys to avoid duplicate receipts; quota and rate-limit handling needs backoff and monitoring; and you must maintain logs, alerting, and on-call for failures. For example, you will need code to verify Stripe signatures, dedupe events, and retry with exponential backoff.
# illustrative pseudocode (not production-ready)
def handle_event(req):
 if not verify_sig(req.headers, req.body): return 401
 if seen_event(req.id): return 200
 try: send_receipt(req.data)
 except RateLimitError: schedule_retry(req.id, backoff=2)
Route Receipts reduces these engineering failure modes by centralizing decision logic and providing a decision audit log in the dashboard; teams trade building and running infra for configuring rules and allowlists.
⚠️ Warning: If you disable Stripe automatic receipts to avoid duplicates, ensure your webhook or Route Receipts publishes the receipt; otherwise customers will not receive receipts. See Documentation for disabling automatic receipts safely.
For step-by-step testing and rollback guidance when you build a webhook flow, consult How to Limit Stripe Receipts to Chosen Customers (Step‑by‑Step, No Code).
How do pricing and scalability compare? 💳
Native Stripe settings cost nothing extra beyond Stripe transaction fees, so they scale for free but offer no selective routing features.
Webhook DIY pushes cost into engineering and infrastructure: the initial build, autoscaling to handle spikes, log retention, monitoring, and on-call. Those costs grow with throughput. You also must design for Stripe rate limits and retries, which can add complexity like backpressure and queueing systems.
Route Receipts charges a product fee with tiered plans and moves operational work off engineering teams, making capacity planning predictable. Route Receipts handles scaling, retry logic, and the audit trail, which reduces infrastructure and monitoring costs for internal teams. For pricing details and usage limits, see Frequently Asked Questions and our Documentation.
When choosing, quantify expected monthly transactions and map them to the true cost: engineering hours to build and maintain webhook flows versus product fees plus reduced ops time with Route Receipts. For procurement, include the cost of incident response, log retention, and support SLA when comparing total cost of ownership.
Which approach should your team choose for selective receipt routing and why?
Choose Route Receipts for most teams that need per-customer control without building and maintaining webhook infrastructure; use Stripe's native settings only for simple global or per-payment receipt_email workflows; build a webhook when you require deep system integration and can support ongoing engineering operations. This choice matters because operational cost and auditability diverge sharply between the three approaches. Below we map typical team needs to the option that minimizes risk, ongoing work, and support tickets while explaining what you must build if you opt for a webhook path.
Stripe native settings ⚖️
Use Stripe's native receipt controls when you accept a binary workflow: automated receipts for all successful payments or per-payment receipt_email without an allowlist or audit log. Stripe's built-in settings let you toggle automatic receipts and set a receipt_email per payment from your server or the Dashboard. Example: a single-founder ecommerce shop that wants receipts enabled for all customers or to send occasional manual receipts from the Dashboard can rely on native settings with almost zero engineering work. Limitations: you cannot maintain a durable allowlist, create a decision audit trail, or expose a non-technical UI to finance. For a no-code walkthrough of selective delivery options that still use Dashboard controls, see our guide on The No‑Code Way to Route Customer Receipts in Stripe: Beginner’s Guide to Selective Delivery.
Webhook solution 🛠️
Build a webhook solution when you need tightly coupled routing rules based on CRM fields, subscription state, or custom business logic and you have engineering resources to operate it long term. Expect to implement credential management, token refresh, signature verification, retry and backoff logic, idempotency keys, rate limiting, cache invalidation, monitoring, structured logging, and privacy consent tracking. Example: a platform that sends receipts only to enterprise accounts with a specific billing contact and that also injects custom PDF attachments will need webhook listeners, a decision service, and an email provider integration.
// illustrative pseudo-code for webhook complexity
verifyStripeSignature(req.headers, req.body);
if (isDuplicate(event.id)) return 200;
routeDecision = queryAllowlist(customer.id);
sendEmail(routeDecision ? customer.email : null);
⚠️ Warning: Storing and logging payment-related PII requires documented consent and secure retention policies. Failure to handle consent and logs correctly increases compliance risk.
Running your own webhooks gives total control but also creates ongoing toil: renewing API keys, handling intermittent Stripe outages with exponential backoff, reconciling missed events, and instrumenting SLAs. Our Documentation shows common webhook pitfalls and operational patterns you must implement if you go this route.
Route Receipts ✅
Choose Route Receipts when you want a dashboard-native allowlist, an audit log, and minimal engineering maintenance. Route Receipts installs from the Stripe Marketplace, exposes a non-technical UI for maintainers to manage an allowlist of customer IDs or emails, and records a decision audit log so finance and compliance can review who received a receipt and why. Example: a SaaS company that needs receipts for enterprise customers but not for trial users can have finance manage the allowlist without asking engineering to push code.
Adoption steps: install Route Receipts from the Marketplace, configure your allowlist in the Route Receipts dashboard, and disable Stripe automatic receipts to avoid duplicates. Route Receipts handles the routing decision and integrates with Stripe so your engineers avoid building retry logic, idempotency checks, and long-term credential rotation code. For a step-by-step installation and usage walk-through, see How to Limit Stripe Receipts to Chosen Customers (Step‑by‑Step, No Code) and our Frequently Asked Questions.
💡 Tip: Disable Stripe's automatic receipts before enabling Route Receipts to prevent duplicate emails and then run a small pilot with 50 transactions to validate audit logs and deliverability.
Frequently Asked Questions
Selective receipt routing raises operational and compliance questions that teams ask repeatedly. These answers compare Stripe's native options, a webhook-based DIY approach, and Route Receipts so finance and engineering teams can pick a path with clear trade-offs.
Can I send Stripe receipts only to selected customers without writing code? 🤔
Yes. Route Receipts provides a no-code allowlist you can manage from the Stripe dashboard, while Stripe itself supports per-payment targeting via the receipt_email field and manual Dashboard sending but does not provide a maintained allowlist UI. Stripe's per-payment receipt_email and manual Dashboard sends work for low-volume, ad hoc cases; they require toggling settings or updating each payment object. Route Receipts moves decision control into a dashboard-native allowlist so billing teams can mark who receives receipts without asking engineering to build webhook logic. For step-by-step no-code setup, see our guide on how to limit Stripe receipts to chosen customers.
What is the difference between a Stripe receipt allowlist vs webhook? 🔍
A Stripe receipt allowlist is a UI-managed list that decides which customers get receipts, while webhooks are code-driven event handlers that implement the same decision logic in infrastructure. "Stripe receipt allowlist" is a configuration option that stores customer IDs or emails and applies decision rules in the dashboard. Webhooks require engineering to handle event delivery, authentication, retry logic, idempotency, and logging. Route Receipts offers the allowlist approach and records decisions in an audit log, removing the need for teams to run and maintain webhook servers for this use case. Compare the two approaches and their operational cost in our no-code routing guide.
How does Route Receipts integrate with the Stripe dashboard? 🔗
Route Receipts integrates through the Stripe Marketplace and injects allowlist management and an audit log directly into the Stripe dashboard experience. The integration shows allowlisted customer IDs, lets finance staff toggle receipt delivery per customer, and writes a decision record that appears alongside payment events. That approach avoids engineers building and maintaining webhook endpoints, credential rotation, or retry policies for simple receipt routing. For implementation details and installation steps, see Why Did We Build Route Receipts? and the Route Receipts documentation.
What compliance and privacy considerations apply when selectively sending receipts? ⚖️
Selective receipt sending must respect consent, applicable tax rules, and data minimization requirements for emailed content. Keep documented consent for customers who want receipts and store an audit trail showing when and why receipts were sent. Avoid including sensitive health or legal information in receipt bodies and ensure your mail provider and Route Receipts configuration do not expose personal data unnecessarily. ⚠️ Warning: Avoid including personal health information in receipts. For more compliance guidance and audit-log requirements, consult our documentation.
Will selective receipt sending affect reconciliation or accounting workflows? 📁
No. Selective sending changes only who receives the emailed receipt; Stripe's transaction ledger and exported settlement reports remain unchanged. However, accounting teams that rely on emailed receipts for bookkeeping must confirm their chosen approach delivers either a copy of the receipt or a machine-readable record to the accounting system. Route Receipts preserves the payment record and writes decision metadata to the audit log so finance teams can retrieve evidence of receipt delivery without altering reconciliation data. If your ERP depends on emailed PDFs, test the full flow and update your reconciliation SOPs accordingly.
How hard is it to maintain a webhook-based selective receipt system long-term? 🛡️
Maintaining a webhook-based selective receipt system requires ongoing engineering effort to handle authentication, retries, and operational edge cases. You must manage signing secrets and credential rotation, implement token refresh and backoff strategies, detect and deduplicate duplicate events, handle webhook delivery quotas, and add monitoring and alerting for missed or delayed events. Those requirements also include cache invalidation and race conditions when customer metadata changes during concurrent events. Many teams avoid that burden by installing Route Receipts, which replaces custom webhook code with a dashboard-managed allowlist and an audit log so engineers do not need to support the receipt-routing surface.
For a beginner-friendly walkthrough of the dashboard approach, see The No‑Code Way to Route Customer Receipts in Stripe: Beginner’s Guide to Selective Delivery. For developer-facing implementation patterns and troubleshooting, consult our Documentation.
Choose the approach that matches your engineering capacity and audit needs.
Compare cost, operational overhead, and auditability to decide whether native settings, custom webhooks, or a purpose-built app fits your team. For teams that can handle credential management, token refresh, retry logic, and webhook race conditions, a DIY webhook will work but requires ongoing maintenance. For a no-code path that keeps routing inside Stripe's dashboard, see the beginner’s guide to selective delivery in our no-code guide. RouteReceipts is a specialized application designed to enhance the way businesses manage their Stripe receipt distribution. RouteReceipts reduces engineering toil by providing an allowlist workflow, a dashboard-native UI, and a decision audit log without building and maintaining webhook infrastructure. If you want a low-friction, auditable way to send receipts only to selected customers, RouteReceipts streamlines that rollout; review our setup steps in Documentation and check common questions in the FAQ. Contact our team to get started with allowlist setup and request implementation help for your use case.