
How to Set Up Stripe Receipts: Settings, Manual Send/Resend, Test Mode, and Invoice vs Payment Emails
For companies that serve both enterprise and retail customers, sending every Stripe receipt creates inbox clutter and extra support work. How to set up receipts in Stripe? is a how-to guide that explains Stripe's receipt settings, manual send/resend, Test Mode, and the difference between invoice and payment emails. Our RouteReceipts app is an application that integrates into the Stripe dashboard and lets businesses maintain an allowlist so only selected customers receive invoice emails; follow our RouteReceipts Stripe setup guide and check the Stripe Receipt Operations hub for related topics. Which Stripe setting causes duplicate or missing receipts for larger accounts, and how do you fix it without custom webhooks?
Which receipt strategy should you choose: automatic receipts, manual sends, or selective routing?
Pick automatic receipts for consistent, immediate delivery; use manual sends for one-off control; use selective routing when you need per-customer rules without custom webhooks. RouteReceipts makes selective routing practical by letting teams maintain an allowlist and keep receipts off for customers who do not want them. Choosing the wrong strategy increases support volume, creates missing expense documentation for customers who need receipts, or floods inboxes for customers who do not.
What is the difference between a receipt and an invoice? 📄
A receipt is a proof-of-payment document that confirms funds were captured, and an invoice is a billing document that requests payment and can remain unpaid. A receipt shows after a charge succeeds; Stripe places receipts on the payment object and delivers them as emails or PDFs. An invoice appears under Billing > Invoices in the Dashboard and can be in draft, open, or paid states.
Example scenarios.
- SaaS subscriptions: the invoice lists upcoming or recurring charges; the receipt confirms when Stripe captured a subscription payment. Use invoices to manage trials and payment attempts; use receipts for bookkeeping and expense reports.
- Event ticketing: issue invoices if you need customer approval before capture; send receipts after capturing card funds at checkout.
Note on selective routing. RouteReceipts controls which customers receive invoice receipt emails but does not change whether Stripe generates invoices. See our RouteReceipts documentation for details on how routing interacts with invoices and receipt delivery.
Decision matrix: automatic vs manual vs selective routing 📊
Automatic receipts suit consistent billing where every customer expects the same communication; manual sends fit occasional one-offs; selective routing fits mixed customer bases that need per-customer control. Below is a quick matrix to match strategy to business needs.
| Approach | Best for | Pros | Business costs |
|---|---|---|---|
| Automatic receipts | High-volume ecommerce or simple SaaS where every buyer needs confirmation | Fast to enable, immediate delivery, minimal operations | May over-email enterprise customers; increased support for customers who need fewer messages |
| Manual sends (Dashboard) | Occasional one-off receipts, refunds, or manual adjustments | Precise control. You can send Stripe receipt from Dashboard for individual customers | Time-consuming at scale; errors and missed receipts increase support load and slow finance audits |
| Selective routing (RouteReceipts) | Mixed customer bases: enterprise + retail, or companies that must limit emails | Per-customer allowlist; no custom webhook code; audit log for decisions. See the RouteReceipts documentation for setup and examples | Requires installing and configuring an app; plan limits apply depending on volume (see FAQ) |
Use the matrix above to weigh implementation time, control level, compliance risk, and customer experience. For teams that handle both enterprise accounting and high-volume retail, selective routing often reduces support tickets and missing-expense complaints.
Prepare account access and test data for receipt changes 🧾
Collect admin access, email templates, and Stripe test-mode transactions before you change receipt settings so you can validate without affecting live customers. Confirm at least one account with Dashboard admin rights, the HTML/plain-text versions of your receipt template, and the email addresses you will test against.
Create test transactions that mirror real scenarios: a successful one-off charge, a subscription invoice payment, a full refund, and a partial refund. Use Stripe test cards (example: 4242 4242 4242 4242 for successful charges) and toggle the Dashboard to Test mode to run these cases. Verify email headers, PDF attachments, resend behavior, and whether receipts are suppressed or delivered as expected.
💡 Tip: Always test receipt changes in Stripe Test mode and verify resend behavior for refunds and partial refunds before flipping settings in live mode.
If you plan to use selective routing, install RouteReceipts from the Stripe Marketplace and create an allowlist entry for a test customer. Our RouteReceipts documentation walks through installation steps, how to disable Stripe's automatic receipts to avoid duplicates, and how the allowlist decision log records deliveries. For background on why selective routing matters for mixed customer bases, see Why Did We Build Route Receipts? and the beginner's guide to no-code receipt routing.

How to enable, customize, and test receipts in Stripe: step-by-step instructions
Follow these sequential steps to toggle Stripe automatic receipts, update branding and template fields, install Route Receipts and create an allowlist, run tests in Stripe test mode, send or resend receipts from the Dashboard, and validate refund behavior. Each numbered step lists exact Dashboard locations, what to change, and the verification to run with a test transaction.
1. Turn automatic receipts on or off in the Stripe Dashboard 🔔
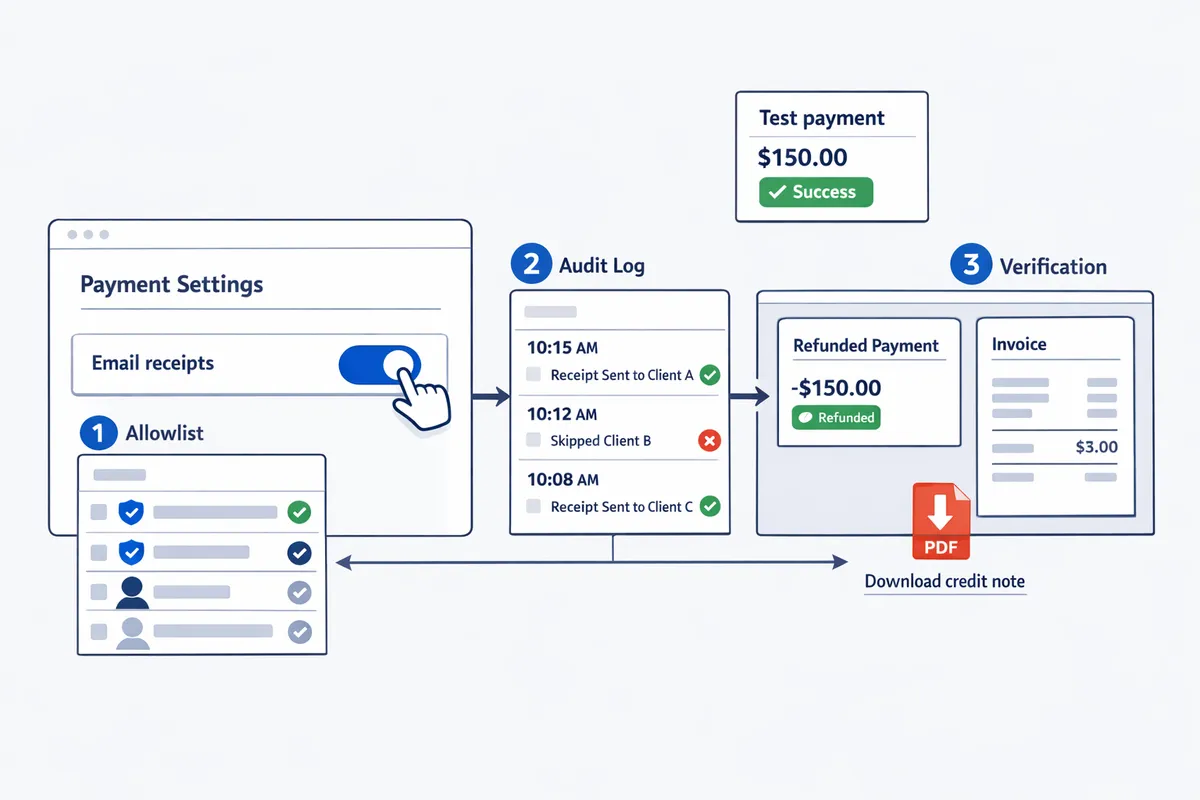
You toggle automatic email receipts in the Stripe Dashboard under Settings > Email receipts. Steps to change the account default.
- Open Stripe Dashboard. Go to Settings (bottom-left) > Email receipts.
- Toggle Email receipts on to send automatic receipts for successful payments and refunds. Toggle off to stop automatic sends.
- Recommended defaults: enable automatic receipts for ecommerce stores to reduce manual work; enable for subscription billing when you want immediate customer confirmation. For enterprise billing, consider disabling account-wide automatic receipts and using selective routing.
- Verify: create a quick test payment in test mode and confirm an email arrives at the test address listed on the payment. Check the payment detail page for the Email activity entry.
⚠️ Warning: Changing the account default affects every customer. Avoid bulk toggles during high-volume billing windows to prevent unexpected customer emails or gaps in records.
2. Edit receipt branding and template fields ✏️
Update receipt branding from Settings > Branding and adjust the receipt template fields under Settings > Email receipts. What to change and sample wording.
- Branding: upload logo, set business name, and confirm support email and phone appear exactly as you want on receipts.
- Template fields: edit Subject, Header, and Footer. For SaaS subscriptions use: “Subscription to [Product] — receipt for [period].” For physical goods use: “Order #[number] — thanks for your purchase.”
- Legal and tax lines: include VAT or GST ID and a tax breakdown when applicable. Many teams forget refund policy and a clear support link; add both.
- Verify: make a test payment, open the receipt PDF from the payment page, and check logo scaling, tax line accuracy, support link, and any localized address formatting.
3. Install Route Receipts and configure the allowlist ✅
Install Route Receipts from the Stripe Marketplace and add customer emails or customer IDs to its allowlist to control who receives invoice emails. Minimal install and allowlist steps.
- In the Stripe Dashboard, open Marketplace and search for Route Receipts. Select Install and authorize access for the relevant account.
- Open Route Receipts in the Dashboard-native app. Choose a plan and add customers to the allowlist by email or customer ID.
- Set a routing policy: typically disable Stripe automatic receipts at the account level and let Route Receipts send only to allowlisted customers to avoid duplicates.
- Verify: create a test invoice for an allowlisted customer and a non-allowlisted customer. Confirm only the allowlisted address receives the invoice email. Check the Route Receipts decision audit log for the routing entry.
See the Route Receipts documentation for step-by-step install screenshots and troubleshooting guidance.
⚠️ Warning: Install Route Receipts before making large account-wide changes to receipt settings to avoid duplicate emails or missed sends.
4. Test receipts using Stripe test mode and verify delivery 📬
Use Stripe test mode to run representative payments, then check Dashboard logs, email rendering, and data accuracy across clients. Which flows to run and how to verify results.
- Test flows: run a successful card payment, a declined or failed card flow, and a multi-currency charge if you support other currencies. Also test a subscription invoice payment.
- Where to check: open the payment or invoice in Dashboard > Payments or Invoices. Inspect the Email activity and Developers > Logs to see outbound email events.
- Rendering checks: open the receipt PDF and view it in Gmail, Outlook web, and a mobile mail client to confirm logo, tax lines, and localized currency display.
- Localized data: create a customer with a different billing currency and tax settings to confirm the receipt shows the correct currency symbol and tax breakdown.
- Verify Route Receipts behavior by repeating the tests for allowlisted and non-allowlisted customers and confirming only allowlisted customers receive emails when Route Receipts is active.
5. How to manually send or resend a Stripe receipt from the Dashboard 🔁
Send or resend a receipt from the payment or invoice page using the Send receipt action in the Dashboard. Step-by-step manual send and permission notes.
- Open the payment or invoice in Dashboard > Payments or Invoices.
- Click Actions and choose Send receipt. Enter or confirm the recipient email and click Send.
- Permissions: the user must have access to view payments and send emails in your Stripe account roles; check your account admin if Send receipt is not visible.
- Route Receipts interaction: when Route Receipts is installed, the send will follow the allowlist policy; a non-allowlisted manual send may be blocked or logged depending on your settings.
- Example: a finance clerk resends a receipt after a merchant request by locating the original payment, using Send receipt, and recording the action in the company CRM.
- Verify: confirm the Send event in Developers > Logs and check the Route Receipts audit log for any routing decision.
6. Validate refund and partial-refund receipt behavior 💸
Run a full refund and a partial refund in test mode to confirm whether Stripe issues a new receipt, a credit note, or an update to the original invoice. How to test and common mismatches to check.
- Full refund on a payment: create a test payment, issue a full refund from the payment page, and observe whether Stripe sends a refund notification email to the customer.
- Partial refund on an invoice: create an invoice, pay it, then issue a partial refund. Confirm whether Stripe generates a credit note PDF or attaches a refund line to the original invoice.
- Common mismatches: payments may show refund emails while the linked invoice status still shows paid; check both payment and invoice pages for consistent status and PDF outputs.
- Route Receipts effect: verify that refund or credit-note emails follow your allowlist rules so enterprise clients still receive updates while other customers do not.
- Verify: open the refunded payment and invoice pages, download any credit note PDFs, and confirm the customer-facing email content and amounts match your accounting records.
Related resources: read the Route Receipts documentation for installation and allowlist details, our post Why Did We Build Route Receipts? for the product rationale, and the Frequently Asked Questions for common setup questions.
How to avoid common mistakes and troubleshoot receipt delivery, localization, and compliance
This section lists the most frequent receipt setup mistakes, a step-by-step triage for missing receipts, and the checks you should run to keep receipts accurate across currencies and compliant with recordkeeping rules. Follow these checks before you roll changes to live traffic to reduce support load and audit risk.
Common mistakes to avoid ⚠️
Leaving Stripe automatic receipts on for all customers, skipping Stripe test mode receipts, and missing tax or business address details cause most delivery and compliance problems. For example, sending receipts to 2,000 unnecessary recipients can create dozens of support tickets per month; a single finance rep handling 30 tickets at $30/hour costs roughly $15 per ticket in labor (example). Prevent those costs by applying rules and an allowlist.
Key mistakes and business impact:
- Leaving automatic receipts enabled for every customer. Result: inbox clutter, duplicated records for enterprise clients, and extra support time. See our explanation in Why Did We Build Route Receipts? for the cost of blanket sends.
- Failing to test in Stripe test mode receipts. Result: misformatted totals or missing tax lines hit live customers and require rescinds.
- Omitting business name, tax ID, or address on receipts. Result: accounting rejects and delayed expense reimbursement for customers.
- Not using selective routing (allowlist). Result: enterprise customers get unwanted emails; Route Receipts lets you send only to customers who need receipts.
Use the RouteReceipts documentation to confirm setup steps and allowlist rules before enabling live sends.
Troubleshooting missing receipts and delivery failures 🔍
If a receipt does not arrive, follow a clear triage sequence: verify the payment, check Stripe send logs, inspect Route Receipts routing decisions, then collect full email headers from the recipient if needed. This sequence isolates whether the issue is a payment problem, an email delivery issue, or a routing rule.
Step-by-step triage:
- Verify the payment succeeded in Stripe (Payments or Invoices list). Expected outcome: a completed charge or paid invoice. If the payment failed or is pending, do not expect a receipt.
- Check Stripe's email and Events logs for a send attempt and any delivery error. The Events log shows webhook attempts and delivery statuses.
- Review the RouteReceipts decision audit log to see if the receipt was routed, blocked, or queued. This explains allowlist decisions and prevents duplicate sends.
- If Stripe shows a successful send and RouteReceipts routed the receipt, ask the customer for full email headers to troubleshoot spam filtering and forwarding rules.
- Resend the receipt from the invoice or payment page after correcting the issue, or use Route Receipts to force a one-off send for that customer.
💡 Tip: Always test receipt content and delivery in Stripe test mode receipts before switching to live mode; this prevents formatting or tax-line mistakes from reaching customers.
Refer to the Route Receipts documentation and FAQ for screenshots of where to read send logs and audit entries.
Localization and multi-currency guidance 🌍
Ensure the payment currency, localized number formatting, and tax lines match the customer locale and the charged currency to avoid misrepresentation. Stripe records currency per payment, but your receipt template must reflect localized formatting and any tax rules that apply to the buyer's region.
Practical checks and examples:
- Template placeholders. Verify your receipt template shows currency symbols in the correct position and uses the right decimal separators (example: 1,234.56 USD vs 1.234,56 EUR). Test with sample USD and EUR payments in Stripe test mode receipts.
- Cross-border example. For a European customer charged in USD, include both the charged amount and a local-currency equivalent (clearly labeled) plus the exchange rate and date if local law or accounting practices require it.
- Ticketing example. For event tickets sold in multiple currencies, show per-ticket subtotal, any country-specific VAT, and a clear refund policy line. Errors here cause chargebacks or tax misreporting.
- Tax setup. Confirm tax rates in Stripe match the regions you sell into and that your receipt template surfaces the tax breakdown.
Use Route Receipts to route receipts per customer locale or billing country when only a subset of customers require localized copies.
Audit logging, privacy, and data handling with RouteReceipts 🔒
RouteReceipts' decision audit log gives a timestamped record of which receipts were routed or blocked and the reason, which supports audits and customer inquiries. You can view decisions in the RouteReceipts dashboard audit view and use entries to explain a support case or compliance request.
How to use the audit log operationally:
- Where to look. Open the RouteReceipts dashboard and filter the decision audit log by customer ID, receipt ID, or date range to find routing events.
- What the entries show. Each audit entry indicates the customer identifier, the routing decision (allowed, blocked, or manual resend), the trigger (invoice issued, payment succeeded), and a timestamp. Use these fields to answer customer disputes and to prove why a receipt was or was not sent.
- Export and retention. For audits, export relevant entries or screenshot them for your records. Check the RouteReceipts privacy policy for retention and data-handling rules.
⚠️ Warning: Restrict exported logs to the minimum fields needed for auditing. Do not include full card numbers or sensitive payment credentials when sharing logs with third parties.
For setup details about the audit log and routing decisions, see the RouteReceipts documentation and the FAQ for common questions about data handling and plan limits.
Frequently Asked Questions
This FAQ answers the most common operational questions about sending, testing, and routing Stripe receipts and how Route Receipts integrates with those flows. Route Receipts can selectively route invoice emails using a dashboard-managed allowlist, and our docs explain installation and decision logging.
How do I send a Stripe receipt from the Dashboard? 📨
You send a Stripe receipt from the Dashboard by opening the payment or invoice record and choosing the Send receipt action on the right-hand panel.
- Open the payment or invoice in the Stripe Dashboard.
- On the right-hand panel choose Send receipt and confirm the email address.
- For invoices, choose whether to send the invoice PDF or a reminder link if applicable. You need a role that permits managing payments or invoices to perform this action. Route Receipts may block or allow the send based on your allowlist; see our Documentation for how that decision works and the audit log.
Can I test receipts without charging real customers (Stripe test mode receipts)? 🧪
Yes. You can use Stripe test mode to simulate successful charges, declines, refunds, and invoice flows without live cards. Run these flows in test mode to validate email copy and PDF rendering: a successful one-time charge (use Stripe test card 4242 4242 4242 4242), a declined card scenario, a full refund, a partial refund, a paid invoice, and a failed invoice payment. Install and run Route Receipts in Stripe test mode to confirm how routing decisions, allowlist behavior, and audit logs appear before you go live. See our Documentation for step-by-step test-mode setup and the FAQ for common test scenarios.
💡 Tip: Test receipts in both Gmail and Outlook and check the attached PDF, subject line, and first 20 words of the email to avoid deliverability surprises.
What is the difference between a payment email, a receipt, and an invoice? 🔎
A payment email notifies a customer about a payment event; a receipt proves payment; an invoice requests payment and can become a receipt once paid. Example: for a SaaS subscription Stripe sends an invoice each billing cycle; when that invoice is paid it becomes the payment receipt the customer can use for expense reporting. For a one-time ecommerce purchase Stripe sends a receipt directly after the successful charge. Invoices include line items, due dates, and payment terms; receipts include final paid amount, payment method, and timestamp.
How does Route Receipts decide which customers receive invoice emails? ✅
Route Receipts uses an allowlist you manage in the Route Receipts dashboard to determine who receives invoice emails. Add customers by customer ID or email in the Route Receipts UI and the app evaluates each invoice event against that allowlist before permitting a send. Every routing decision writes an entry to the decision audit log so you can verify why an invoice was sent or blocked; see our Documentation for the allowlist workflow and audit-log examples.
Will installing Route Receipts stop Stripe's automatic receipts? ⚙️
Installing Route Receipts does not change your Stripe automatic receipt setting by default. Route Receipts routes sends according to your allowlist while your Stripe account keeps the same automatic-send setting unless you change it. We recommend disabling Stripe automatic receipts if you want Route Receipts to be the single source of truth for sending invoices to avoid duplicate emails; our Documentation explains recommended configuration and how to prevent double-sends.
How should I handle refunds and partial refunds on receipts? 💳
Process refunds and partial refunds in Stripe test mode first so you can confirm whether Stripe sends a new receipt, a credit note, or an updated invoice in your configuration. Run a full refund and a partial refund on a test payment, then check the customer-facing email and any attached PDF to ensure line-item adjustments read clearly (for example, show the refunded amount and remaining balance). Route Receipts evaluates refund events the same way it evaluates payments: if a customer is on the allowlist the resulting emails or credit notes will route to them; see our FAQ for examples of credit-note wording and recommended invoice adjustments.
Next steps to finish setting up and controlling your Stripe receipts.
Confirm your receipt settings, run checks with Stripe test mode receipts, and decide which customers should actually get email receipts. If your goal was to learn how to set up receipts in Stripe, focus on disabling automatic sends during testing, using test-mode emails to verify templates, and practicing manual send/resend from the Dashboard.
RouteReceipts is a specialized application designed to enhance the way businesses manage their Stripe receipt distribution. It lets you select which customers receive receipts via a dashboard-native allowlist and audit log, avoiding blanket sending to every customer and reducing inbox clutter. See the getting-started walkthrough in our Documentation and read the no-code implementation notes in the beginner's guide for practical setup steps.
💡 Tip: Disable Stripe's automatic receipts before enabling selective routing to avoid duplicate emails.
Install RouteReceipts from the Stripe Marketplace and follow the getting-started guide in our documentation to try selective receipt routing now. Subscribe to our newsletter for implementation tips and updates.