Route Receipts + Stripe: Webhook-Free Selective Receipts Setup and End-to-End Testing Matrix (Checkout, Billing, Terminal)
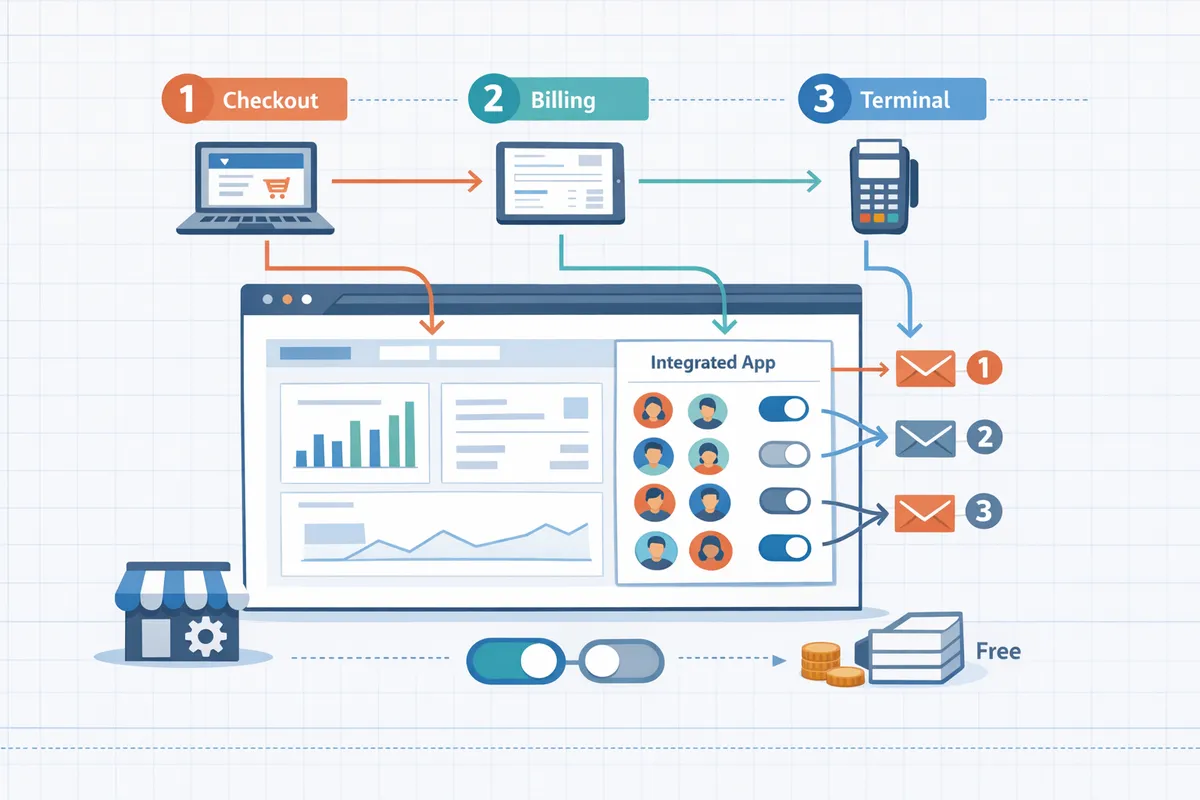
Sending receipts to all customers can create hundreds of unnecessary emails a month for businesses with mixed B2B and B2C clients. A stripe dashboard add-on for targeted receipts reduces inbox noise by permitting per-customer allowlists directly in Stripe. RouteReceipts is a Stripe dashboard add-on that manages an allowlist to send invoice receipt emails only to selected customers without custom webhook integrations. Follow our RouteReceipts Stripe setup guide for step-by-step installation, disabling Stripe's automatic receipts, allowlist creation, plan management, and reviewing the decision audit log. This how-to guide compares Stripe's built-in receipt features to RouteReceipts and lays out a webhook-free setup plus an end-to-end testing matrix for Checkout, Billing, and Terminal that surfaces the exact verification steps you should run.
How should you plan and prepare before installing Route Receipts in the Stripe Dashboard?
You must complete stakeholder approvals, define precise allowlist rules, map receipt-trigger points, and clear privacy checks before installing Route Receipts. These steps prevent missing or duplicate receipts and give finance and legal the information they need to sign off on data access and retention.
Which stakeholders and Stripe roles must approve the install? 🛡️
Assign a Stripe admin and a finance owner to approve the install and review Route Receipts' data access. Add product or billing ops and a security reviewer if your organization requires additional sign-off. Our website recommends an approvals checklist with these minimal items:
- Stripe admin consent (app install and permission review). Expected outcome: App can read customer and invoice metadata.
- Finance owner sign-off (which receipts to include). Expected outcome: Clear scope prevents accidental routing of high-volume or tax-sensitive invoices.
- Security/privacy confirmation (scope, retention, vendor risk). Expected outcome: Legal receives a short data-access summary to avoid delays.
For a sample flow and installation steps, see our Documentation.
What receipt types and customer segments should be included in the allowlist? 🧾
Decide whether the allowlist will cover invoice emails, payment receipts, or both, and define concrete customer attributes for inclusion. Use explicit, testable rules such as "customers with billing_email set and tag expense-report=True," "accounts on plan:enterprise," or "customers with corporate domain @acme.com." Start by creating an allowlist for your top 25 enterprise customers and two internal test accounts. Expected outcome: you minimize missed receipts during the first week and limit audit noise.
For allowlist management for Stripe receipt emails, Route Receipts supports customer IDs, emails, and metadata tags. Use our FAQ and the no-code guide on how to create an allowlist for Stripe receipts to draft your initial rule set before going live.
How to map Route Receipts to your existing email and invoicing flows? 🔁
Document every point where Stripe native receipts currently trigger, mark which channels you will disable, and assign Route Receipts to handle the allowlisted cases. Follow these steps:
- Inventory triggers. List actions that send receipts today: one-off payments (Checkout), invoice finalization (Billing), and Terminal receipts. Expected outcome: a single source-of-truth mapping.
- Decide channel ownership. For each trigger, mark whether Stripe stays enabled or Route Receipts takes control. Expected outcome: no overlap that causes duplicates.
- Set a phased rollout. Enable Route Receipts in test mode, run 50 transactions with allowlist members and non-members, then disable Stripe auto emails for the covered triggers. Expected outcome: safe switch with measurable rollback points.
⚠️ Warning: Do not disable Stripe automatic emails in live mode until you validate 10+ successful test transactions; disabling too early is the most common cause of missing receipts.
Route Receipts is designed as a stripe dashboard add-on for targeted receipts, so this mapping step prevents both duplicate messages and silent failures. See our Documentation for detailed setup steps.
What compliance and privacy checks must legal complete?
Legal must confirm the exact Stripe fields Route Receipts reads, the retention window for routing logs, and the lawful basis for processing customer contact details. Our privacy policy lists the Stripe-sourced fields the app reads and stores for routing decisions; legal should review that list and confirm it aligns with corporate policy and regulations such as GDPR. Specific checks to complete:
- Field review. Verify customer.name, customer.email, invoice.metadata, and any custom tags used for routing are acceptable to ingest.
- Retention and access. Confirm audit-log retention period and which internal roles can view routing decisions.
- Data subject requests. Agree on a process for responding to deletion or access requests affecting allowlisted records.
If privacy needs a longer retention or restricted access, document that requirement before install and consult our Privacy Policy and Documentation to align plan selection and settings.
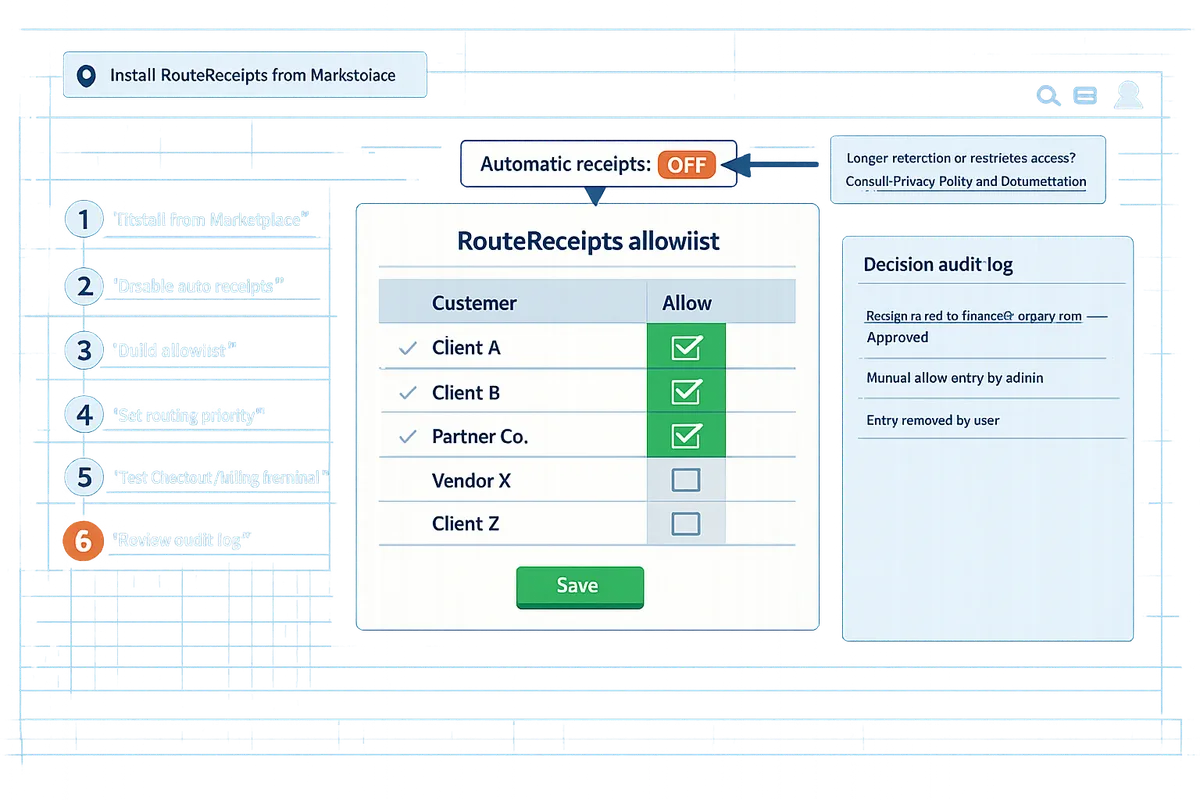
How to install, configure, and create an allowlist in Route Receipts (step-by-step)
Follow these six steps to install Route Receipts from the Stripe Marketplace, safely disable Stripe's automatic receipts, build an allowlist, set routing priorities, test across Checkout/Billing/Terminal, and confirm plan capacity. This section gives explicit UI actions, validation checks, and expected outcomes so you can complete each step without back-and-forth with engineering. Use our documentation for reference if you need screenshots or a full troubleshooting checklist.
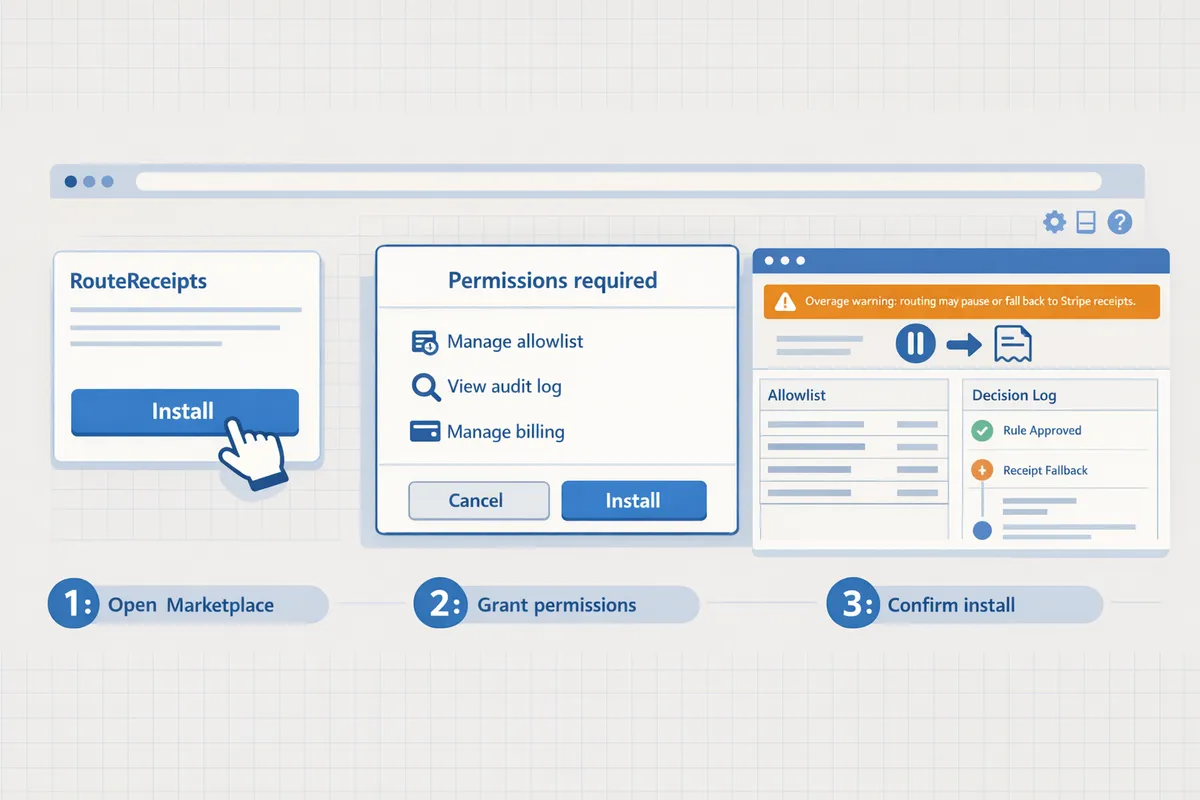
Step 1: Install Route Receipts from the Stripe Marketplace 🧩
Install Route Receipts from the Stripe Marketplace using a Stripe admin account and grant the scopes the installer requests.
- Sign in to your Stripe account as an admin.
- Open the Stripe Marketplace and find "Route Receipts." Click Install and review the permission scopes the app requests. Expected outcome: the installer shows a green confirmation and a redirect back to Stripe.
- Confirm the connection inside the Stripe Dashboard by going to Settings, then Apps or Installed apps and verifying Route Receipts appears as connected. Expected outcome: Route Receipts shows a connected status and you can open its app panel from the Dashboard.
- If the install fails, revoke the partial authorization and retry from an incognito window. For step-by-step visuals, see our RouteReceipts documentation.
Step 2: Disable Stripe automatic receipts without losing historical emails ⚙️
Disable Stripe's automatic receipt emails only after you confirm a test customer receives receipts through Route Receipts to avoid duplicates or missed messages.
- In Stripe, go to Settings > Customer emails and turn off the toggles for payment and invoice receipts you intend to route through Route Receipts. Expected outcome: Stripe stops sending new automated receipts for those event types.
- Before leaving the settings page, run a test transaction for a known test customer that is on your allowlist. Confirm Route Receipts delivers the receipt and Stripe does not send a duplicate. Expected outcome: a single receipt delivered and a corresponding entry in the Route Receipts audit log.
- Quick rollback: if the test fails, immediately re-enable Stripe's toggles and troubleshoot the app connection or allowlist rule.
⚠️ Warning: Do not disable Stripe receipt toggles in live mode until a successful test proves Route Receipts delivery; disabling too early can stop critical receipts for customers.
Step 3: How to create an allowlist for Stripe receipts ✅
Create an allowlist entry inside Route Receipts by adding a customer ID, email domain, or metadata tag and verify matches in the app panel.
- Open Route Receipts in the Stripe Dashboard and go to Allowlist > Create entry. Choose the rule type: Customer ID, Email, Domain, or Metadata tag. Expected outcome: the new rule appears with a green "Active" badge.
- To add a single customer, paste the Stripe customer ID (cus_...) and save. Expected outcome: the customer appears in the allowlist with a timestamp and creator.
- To add many customers, export a CSV with a customer_id or email column, then use Allowlist > Bulk upload. Expected outcome: the app returns an import summary showing accepted and rejected rows; fix malformed rows and re-upload.
- Use metadata rules for dynamic groups (for example, metadata:send_receipt=true). Expected outcome: customers with matching metadata evaluate automatically at send time. Common issues: mismatched customer IDs or missing emails cause no match; check that your CSV contains either customer_id or email and matches Stripe's canonical values. For more examples, consult our documentation on allowlist management for Stripe receipt emails.
Step 4: Configure routing rules and decision audit logging 🔍
Set route priorities in Route Receipts and enable the decision audit log so every routing choice records the rule, the actor, and the reason.
- In the Route Receipts app panel, open Routing rules. Create rules and drag them to set priority. Example: place invoice email rules before payment receipt rules if invoices should always be delivered first. Expected outcome: rules show a numbered priority and a brief preview of matched criteria.
- Enable Decision Audit Log under Settings > Audit log. Toggle on "Record rule decisions." Expected outcome: every routing decision includes event id, matched rule id, actor, and timestamp.
- Validate an audit entry by triggering a test invoice and viewing the audit row inside the Route Receipts panel in Stripe. Expected outcome: the entry shows the Stripe event ID, the rule that matched, and the user who last edited the rule. Business impact: misordered rules often cause allowed customers to be skipped or receive the wrong receipt type. Our docs show recommended priorities and examples for common billing flows.
Step 5: Validate with a focused test matrix for Checkout, Billing, and Terminal 🧪
Run a compact test matrix that covers Stripe Checkout, Billing invoices, and Terminal payments and check both the Stripe event and Route Receipts audit log for each path.
- Build three test cases: Checkout success, Billing invoice finalization, and Terminal charge. For each case, use one allowlisted customer and one non-allowlisted customer. Expected outcome: allowlisted customers receive receipts via Route Receipts; non-allowlisted customers do not.
| Path | Test action | Expected Route Receipts outcome | Stripe event fields to inspect | Audit log entry to verify |
|---|---|---|---|---|
| Checkout | Complete a Stripe Checkout session for a test customer | Receipt sent only if customer is on allowlist | checkout.session.completed -> customer/email | Audit log shows event id and matched rule id |
| Billing (invoice) | Finalize and pay an invoice | Invoice receipt routed per allowlist and routing priority | invoice.finalized / invoice.payment_succeeded -> customer | Audit log shows matched invoice rule and actor |
| Terminal | Process terminal payment in test mode | Receipt routed per allowlist and Terminal rule | charge.succeeded -> payment_method_details, customer | Audit log shows Terminal rule match and timestamp |
- Record expected vs actual delivery in a spreadsheet column for each test. Expected outcome: a short list of failures to triage.
- If a test fails, inspect the Stripe event payload for the customer field and the Route Receipts audit row for the rule evaluation. Common fixes: customer_id mismatch, metadata rule misformat, or rule priority ordering.
💡 Tip: Run tests first in Stripe test mode and then in a low-impact live transaction to verify identical behavior before rolling out to all customers.
Step 6: Manage plans, usage limits, and scale-up steps 📈
Confirm your selected Route Receipts plan supports expected monthly volume and use the app's usage counters to schedule upgrades before you hit limits.
- Open Route Receipts > Billing inside the app panel to view plan details and current usage counters. Expected outcome: you see current month usage and remaining allowance.
- If you expect higher volume, click Upgrade or contact support through the Billing view to request higher limits or a plan change. Expected outcome: a pending upgrade or a support ticket with expected response time.
- Route Receipts starts with a free plan that includes 20 receipts per month; confirm that this baseline fits your low-volume tests before moving to a paid tier.
- If you hit limits unexpectedly, Route Receipts will show an overage warning in the app; plan consequence: routing may pause or fall back to your Stripe receipt settings if you do not upgrade. Check our FAQ for billing behavior and common billing questions.
For step-by-step visuals, bulk-import templates, and a troubleshooting checklist for missing receipts, see our full RouteReceipts documentation and the no-code guide to selective delivery. For background on why selective routing matters for finance teams, read Why Did We Build Route Receipts and the beginner's walkthrough on routing customer receipts in Stripe.
How to run a testing matrix, troubleshoot common failures, and avoid mistakes
Run a focused end-to-end matrix across Checkout, Billing, and Terminal that tests environment, payment method, and allowlist state. This section gives a reproducible test matrix, a prioritized troubleshooting checklist that resolves most delivery issues, and the configuration mistakes that cause repeat failures. Use the tests to validate Stripe object status, confirm Route Receipts audit entries, and verify actual customer receipt delivery before switching to live traffic.
How to run an end-to-end testing matrix for Checkout, Billing, and Terminal 🧾🧪
Execute a small set of deterministic tests that combine environment (test vs live), allowlist status, and payment type to validate routing behavior. Run the following matrix of test cases and perform the three validation steps listed for each case.
- Test cases (run each in Test mode first, then Live):
- Allowed customer, card payment (one-time). Expected: Route Receipts shows allowed decision; customer receives email.
- Blocked customer, card payment (one-time). Expected: Route Receipts shows blocked decision; no receipt sent.
- Allowed customer, invoice payment (Billing). Expected: Invoice status paid; Route Receipts audit shows routing; receipt emailed.
- Terminal (in-person) payment for allowed and blocked customers. Expected: Terminal charge status succeeded and decision logged appropriately.
- Validation steps for each test (do these in order):
- Confirm Stripe object status. Look for PaymentIntent or Charge status = succeeded and invoice status = paid when applicable.
- Inspect the Route Receipts decision audit entry. Confirm matching customer ID/email and the routing outcome.
- Verify customer email delivery. Check the recipient inbox and SMTP headers or your mail provider logs for receipt headers.
- Expected outcomes and failure signals:
- If Stripe shows succeeded but no Route Receipts audit appears, the app installation or Marketplace permissions may be incomplete. See the Route Receipts documentation for permissions steps.
- If Route Receipts logs a decision but the customer did not receive mail, verify SMTP provider logs and ensure Stripe automatic receipts are disabled to avoid duplicates.
Refer to the Route Receipts documentation for step-by-step setup and examples of allowlist rules.
What to check when receipts do not arrive or duplicates occur ⚠️
Follow this prioritized checklist to resolve missing or duplicate receipts quickly. Perform checks in the order listed to isolate the cause with minimal effort.
- Confirm payment and invoice status in Stripe. If PaymentIntent, Charge, or Invoice is not succeeded/paid, no receipt should be sent. Fix payment failures first.
- Verify environment. Ensure you are testing in the correct mode (Test vs Live). Test-mode events do not trigger live email delivery.
- Ensure Stripe automated receipts are disabled if you are using Route Receipts. Having both enabled causes duplicate emails. See the FAQ for how to disable automated receipts.
- Inspect allowlist match logic. Check whether allowlist entries use customer ID, email, or metadata. Ambiguous metadata rules cause false negatives.
- Review the Route Receipts decision audit log for overrides or manual routing. The log shows why a decision was made and any admin actions.
- Check send infrastructure. If Route Receipts logged a send but the customer did not receive mail, inspect your mail provider for bounces, spam filtering, or rate limits.
⚠️ Warning: Leaving Stripe automatic receipts enabled while using Route Receipts will often produce duplicate emails. Disable Stripe receipts before running live tests.
Link to quick fixes in our documentation and the FAQ for routing and common error states.
How does Route Receipts compare to native Stripe settings and custom webhooks? 📊
Route Receipts provides dashboard-native selective delivery with lower ongoing maintenance than a custom webhook and more control than Stripe's all-or-none receipt setting. The table below compares configuration effort, maintenance cost, dashboard visibility, and typical failure modes.
| Feature / Option | Configuration effort | Maintenance cost | Dashboard visibility | Typical failure modes |
|---|---|---|---|---|
| Stripe native receipts | Low. Toggle in Dashboard email settings. | Low. Rare changes. | High for basic settings, no per-customer allowlist. | All-or-none sends; cannot target by customer attributes. |
| Custom webhook solution | High. Build and host routing logic, handle retrying and idempotency. | High. Requires engineering ownership and monitoring. | Low unless you build a custom UI. | Delivery failures from downtime, missed retries, misparsed events. |
| Route Receipts | Moderate. Install from Stripe Marketplace and create allowlist entries. | Low to moderate. Rules managed in Dashboard; audit log reduces debugging time. | High. Decision audit log and allowlist visible in Stripe UI. | Misconfigured allowlist rules or leaving Stripe receipts enabled. |
This comparison helps teams decide between the quick controls of native settings, the engineering burden of custom webhooks, and the dashboard-first middle path Route Receipts offers. See Why Did We Build Route Receipts? for the product rationale and trade-offs.
Which common mistakes block selective delivery and how to avoid them 🔁
The most frequent blockers are easy to fix and usually process-related. Check the list and apply the small process changes to prevent recurrence.
- Forgetting to disable Stripe automatic receipts. Effect: duplicates. Fix: add a pre-launch checklist item to turn off Stripe receipts and confirm in live mode.
- Ambiguous metadata or rule definitions. Effect: allowlist misses intended customers. Fix: prefer customer ID or full email match for allowlist entries and document matching rules.
- Skipping audit-log review after changes. Effect: undetected rule regressions. Fix: require a quick audit-log check after any allowlist update.
- Testing only in one environment. Effect: issues only surface in live mode. Fix: run the full matrix in both Test and Live before wide rollout.
- Stale allowlist entries. Effect: old customers receive receipts unnecessarily. Fix: implement a quarterly cleanup process and record who may edit allowlist entries.
Each corrective action maps to a configuration or process change you can add to team runbooks. For step-by-step allowlist creation guidance, see the no-code beginner's guide to selective delivery.
What privacy and data handling practices should you follow? 🔐
Limit allowlist access, remove stale entries regularly, and keep documented retention windows aligned with your privacy policy. These steps reduce exposure of customer data and simplify audits.
- Access control. Restrict allowlist editing to designated finance or ops staff and record changes in the Route Receipts audit log. Use least-privilege roles in your Stripe account.
- Retention and cleanup. Remove stale allowlist entries on a fixed schedule, for example every 90 days, and log removals. Document the retention window in your privacy policy and changelog.
- Fields read by Route Receipts. Route Receipts reads customer ID, email, invoice metadata, and payment object status from Stripe to make routing decisions. Store any exported lists in encrypted admin tools and avoid exporting PII unless required.
- Export controls and audits. Use Route Receipts' admin controls to limit exports and rely on the decision audit log for compliance evidence rather than ad-hoc CSV dumps.
💡 Tip: Schedule a monthly audit that compares active allowlist entries to recent invoice recipients; flag entries with no activity for 90 days for removal.
Refer to the Route Receipts privacy policy and documentation for a full list of read fields and retention controls.
Frequently Asked Questions
Route Receipts answers the common operational and technical questions finance and Stripe admins ask when evaluating a stripe dashboard add-on for targeted receipts. This FAQ focuses on installation friction, allowlist management, effects of disabling Stripe automatic receipts, data access and retention, testing across Checkout/Billing/Terminal, and common fixes for duplicates or missing emails.
Does Route Receipts require custom webhooks or developer work? 🔌
No. Route Receipts installs as a dashboard-native app and does not require you to build or maintain custom webhooks. The app runs inside your Stripe Dashboard and makes routing decisions using the allowlist rules you configure in the UI, which removes the need for engineering time to wire up webhooks or host a middleware service. For teams that prefer a step-by-step install, the Route Receipts documentation walks through installation from the Stripe Marketplace and the minimal toggles to disable Stripe automatic receipts while you test routing.
How do I create an allowlist for Stripe receipts using Route Receipts? 🧾
You create an allowlist inside the Route Receipts UI by adding customer records individually, importing CSV batches, or defining metadata matching rules. An allowlist is a list that specifies which customers receive receipts. The UI shows recent allowlist activity in the decision audit log and supports edits and removals so finance teams can correct entries without developer help. For bulk onboarding, export customer IDs from Stripe, format them into the CSV template in Route Receipts documentation, and import; expected outcome: imported entries appear in the audit log and match on subsequent test payments.
Will disabling Stripe automatic receipts affect invoices and one-time payments? 🔕
Disabling Stripe automatic receipts will stop Stripe from sending emails for the receipt types you turn off, so you must confirm Route Receipts will route those same messages for allowlisted customers before you flip the switch in production. For invoices, subscriptions, and one-time charges, the recommended workflow is: disable automatic receipts in a staging account, run the testing matrix for Checkout, Billing, and Terminal (see the testing question below), then disable in live once routing is verified. If you miss a testing step, customers risk receiving no receipt or duplicate emails; the audit log helps confirm which system sent each message.
What does Route Receipts read from my Stripe account and how long is data retained? 🔒
Route Receipts reads only the Stripe fields required to match allowlist rules and record routing decisions; data types and retention policies are documented in the app settings and privacy policy. Specifically, Route Receipts accesses basic customer identifiers (customer ID, email), metadata used for rule matching, and the receipt event details needed to log decisions. Retention windows and third-party processors are listed in our privacy policy and in the Route Receipts app settings page so compliance teams can verify alignment with internal policies.
How should I test receipts for Stripe Checkout, Billing invoices, and Terminal payments? 🧪
Run a focused cross-product test matrix that covers test vs live mode, allowlist included vs excluded customers, and your main payment methods; confirm the Stripe object status, the Route Receipts audit log entry, and email delivery for each case. Example matrix: 1) Checkout card payment, allowlisted customer, test mode; 2) Checkout non-allowlisted customer, test mode; 3) Billing invoice paid by ACH, live mode, allowlisted; 4) Terminal tap-to-pay, live mode, excluded customer. For each row: create the payment, check the charge or invoice status in Stripe, open the audit-log entry in Route Receipts, and verify the recipient receives or does not receive an email. Expected outcome: matches audit-log decision and no duplicate emails.
💡 Tip: Use small live-amount transactions when you move to live-mode testing to confirm email routing without creating financial noise.
What steps fix duplicate or missing receipts? 🔁
Start by confirming Stripe automatic receipts are disabled for the same receipt type your allowlist controls; then validate allowlist matching rules and inspect the Route Receipts decision audit log for unexpected overrides. If duplicates persist, identify which system shows the send event in the audit log and re-enable sending only for the intended system. If receipts are missing, reproduce the scenario in the testing matrix, check that the Stripe object reached the expected final status (paid, succeeded), and confirm the allowlist rule matched the customer. The documentation and FAQ pages include a prioritized troubleshooting checklist for common misconfigurations and recovery steps.
Related reading: consult the Route Receipts documentation for installation and troubleshooting details, and read Why Did We Build Route Receipts? for background on the product trade-offs and operating model.
Next steps: test selective receipts and contact Route Receipts.
The core takeaway is practical: you can run a webhook-free, end-to-end testing matrix for Checkout, Billing, and Terminal and keep receipts targeted only to customers who need them. For teams that need a stripe dashboard add-on for targeted receipts, RouteReceipts integrates into the Stripe dashboard and removes the binary all-or-none receipt behavior.
RouteReceipts is a specialized application designed to enhance the way businesses manage their Stripe receipt distribution. It lets teams maintain an allowlist without custom webhooks, provides a dashboard-native UI and a decision audit log for transparency, and offers a straightforward Stripe Marketplace setup with a free plan that includes 20 receipts per month.
If you prefer a guided setup, check the RouteReceipts documentation for step-by-step installation and testing instructions, and consult the Frequently Asked Questions for common troubleshooting and plan details. For help with allowlist management for Stripe receipt emails or to arrange personalized support, contact the RouteReceipts team and we will walk you through setup and verification.
💡 Tip: Disable Stripe's automatic receipts before testing to avoid duplicate messages.