
Selective Receipt Delivery: Definition, Use Cases, and Options in Stripe
Sending receipts to every customer forces finance teams to sift through 200+ irrelevant emails each month and increases support overhead. Selective receipt delivery is a Stripe receipts management feature that lets businesses choose which customers receive post-payment receipts, preserving expense documentation for enterprise clients while cutting inbox noise for casual buyers. Building a custom filter in Stripe requires credential handling, token refresh, webhook maintenance, retry logic, rate-limit handling, and ongoing monitoring; our RouteReceipts app integrates into the Stripe dashboard, provides an allowlist UI and decision audit log, and starts with a free plan that includes 20 receipts per month (see the RouteReceipts overview). Which customer types should you mark for receipts to reduce noise but keep auditors happy?
Selective receipt delivery is a routing method that sends Stripe receipts only to chosen recipients. What is selective receipt delivery and how does it work?
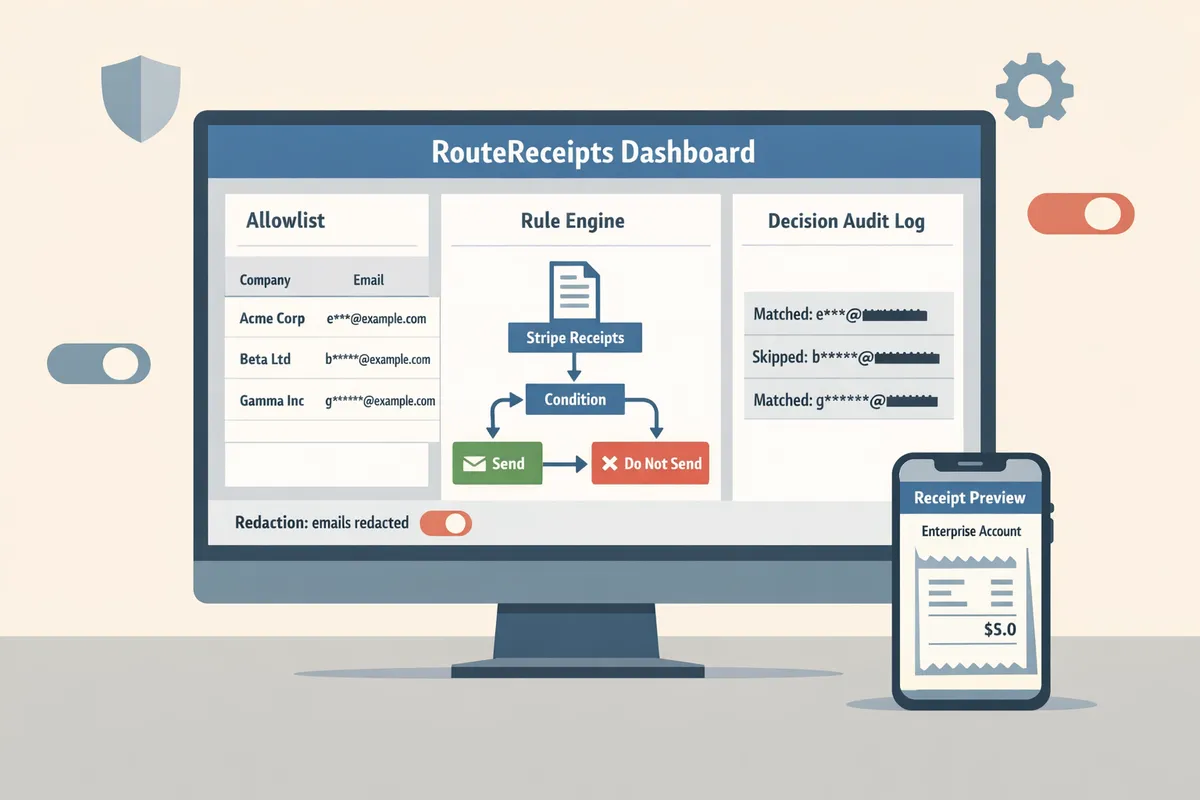
Selective receipt delivery sends receipts only to customers who match specific rules or appear on an allowlist. Stripe by default either sends receipts to every payer or none, which creates inbox noise and extra work for finance teams. Our Route Receipts app adds rule-based routing, an allowlist UI inside the Stripe dashboard, and an auditable decision log so teams can control who gets a receipt without building custom webhooks.
🔎 How does selective routing differ from sending receipts to all customers?
Selective routing applies rules and allowlists to decide who receives a receipt instead of broadcasting to every payer. Rule engines evaluate attributes such as customer metadata, tags, subscription plan, invoice amount, and geographic region to decide delivery. For example: send receipts only when customer.metadata.segment == "enterprise" and customer.metadata.receipt_required == "true". Implementing that yourself requires building and maintaining rule evaluation logic, handling token refresh and credential rotation, dealing with webhook ordering and idempotency, and adding retry logic with backoff for transient failures. Our Route Receipts evaluates rules in the dashboard, toggles Stripe automatic receipts when needed, and prevents duplicate messages without engineers maintaining webhook middleware. For a no-code setup, see our beginner guide to dashboard-based routing in The No‑Code Way to Route Customer Receipts in Stripe: Beginner’s Guide to Selective Delivery and technical steps in our Documentation.
🧾 What is a Stripe receipt allowlist and where should it live?
A Stripe receipt allowlist is a named collection of customer IDs authorized to receive receipts. You can implement an allowlist inside Stripe metadata or keep a managed list in our Route Receipts dashboard. Storing the allowlist in Stripe metadata means extra API writes and potential race conditions when multiple systems update the same customer object. Keeping the allowlist in Route Receipts centralizes management, provides role-based access control, and records who added or removed entries. Avoid placing emails or other PII in metadata; prefer Stripe customer IDs to minimize privacy risk and simplify queries. Our how-to guide, How to Limit Stripe Receipts to Chosen Customers (Step‑by‑Step, No Code), shows a recommended flow for migrating an allowlist into the Route Receipts UI.
💡 Tip: Use non-PII identifiers (Stripe customer IDs) for allowlists and restrict dashboard access to finance and ops roles to reduce exposure.
🛡️ How are delivery decisions logged and verified?
Delivery decisions must include an auditable record with timestamp, rule matched, operator, receipt ID, and delivery outcome. Required audit fields include:
- timestamp (UTC)
- receipt_id or invoice_id
- rule_matched (human-readable rule and rule ID)
- operator (user ID or system ID that triggered the send)
- delivery_status (delivered, bounced, suppressed)
- delivery_provider_response (SMTP or webhook response code)
- correlation_id for traceability across systems
A practical example: when support responds to a finance dispute, they filter the Route Receipts decision log by receipt_id, confirm the rule that allowed sending, and export the CSV row showing operator and delivery response. DIY logging often forces teams to implement tamper-evident storage, retention policies, retry handling for failed writes, and exports to accounting systems. Our Route Receipts dashboard stores the decision log, offers CSV export and webhook forwarding to SIEM or ERP systems, and includes configurable retention and redaction settings to help meet privacy and audit requirements.
⚠️ Warning: Do not store full payment credentials or unnecessary PII in audit logs; keep logs keyed to Stripe customer IDs and redact emails where regulations require it.
For step-by-step setup and troubleshooting, see our Documentation and frequently asked questions in Frequently Asked Questions.
Selective receipt delivery reduces email noise while ensuring required recipients receive receipts. Which businesses benefit and what are typical workflows?
Selective receipt delivery reduces inbox clutter by sending Stripe receipts only to recipients who match configured allowlist rules. This matters for teams that process hundreds of transactions monthly and need receipts routed to buying or billing contacts, not every end user.
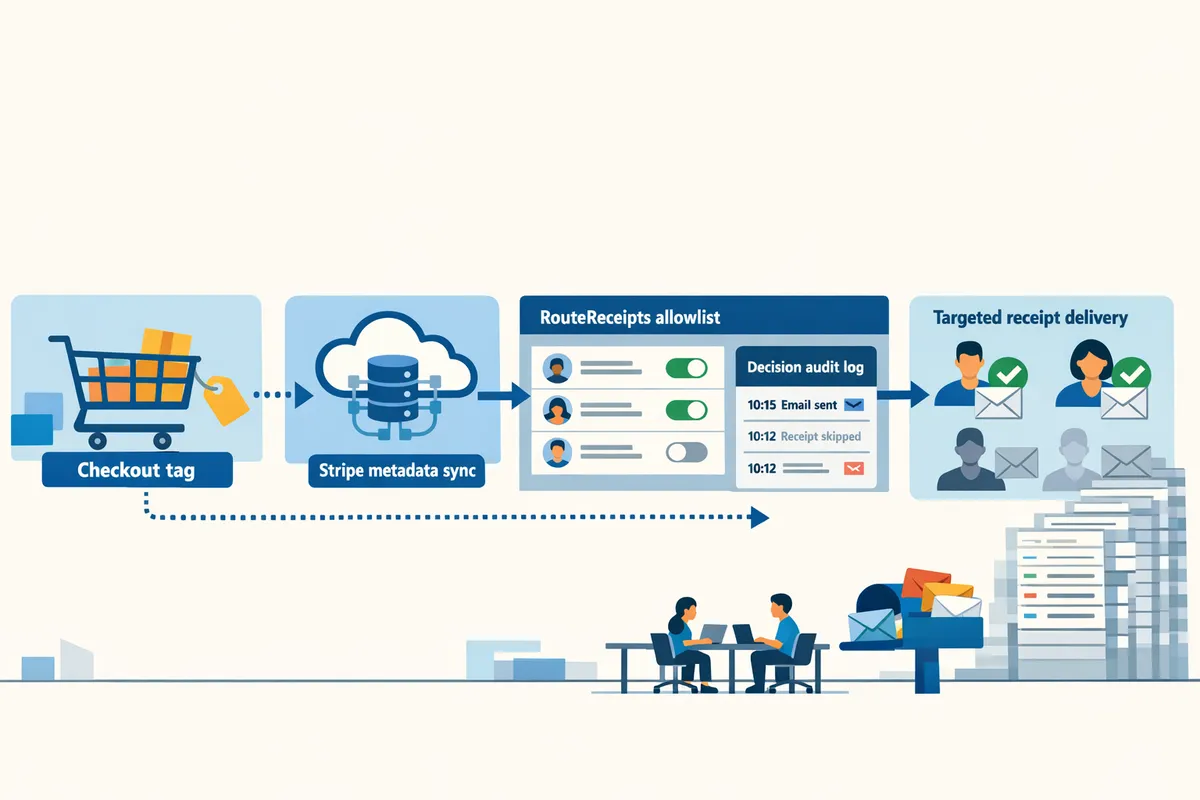
How do ecommerce teams implement selective receipts? 🛒
Ecommerce teams implement selective receipt delivery by tagging customers at checkout, syncing that tag to Stripe metadata, and using a routing tool to send receipts only to allowlisted buyers. For example, set a checkout checkbox "Send business receipt" that writes customer.metadata.send_receipt = "true" and customer.metadata.buyer_type = "B2B". Sync those fields to Stripe via your existing fulfillment webhook so customer objects carry explicit routing keys.
Step-by-step workflow.
- Tag at checkout. Add a required field (buyer_type) or attach an order-level tag for marketplaces.
- Sync to Stripe. Write buyer_type into Stripe customer metadata during payment creation so invoices inherit the flag.
- RouteReceipts reads the Stripe customer metadata, checks the allowlist, and sends or suppresses the receipt accordingly.
DIY trade-offs. Building this yourself requires webhook reliability, token rotation, deduplication logic to avoid duplicate emails, and monitoring for metadata drift. RouteReceipts removes that operational burden by offering a dashboard-native allowlist and a decision audit log.
Related: See our No‑Code Way to Route Customer Receipts in Stripe for a guided setup and testing checklist.
💡 Tip: Add a captured billing contact (name and billing email) at checkout to avoid manual follow-ups for B2B orders.
How do SaaS billing teams configure receipts for corporate clients? 💼
SaaS billing teams configure selective delivery by maintaining allowlists on a per-customer-account basis and routing subscription invoices to corporate billing contacts only. For example, when a subscription invoice is finalized, Stripe triggers an event; RouteReceipts checks the account-level allowlist and routes the invoice email to billing@enterprise.com instead of the end user.
Practical subscription flow.
- Assign an allowlist entry to the Stripe customer or account that stores the enterprise billing contact.
- On invoice.finalized, RouteReceipts consults the allowlist and issues the receipt email to the billing contact while optionally suppressing Stripe's automatic customer email.
- Export decision logs or filter events for month-end reconciliation and attach them to the accounting system export.
Why not DIY. A custom webhook approach must handle authentication, token refresh, exponential backoff, idempotency keys, and race conditions when invoices retry. Example minimal webhook sketch showing auth and retry concerns:
// Pseudocode: webhook must handle auth, retries, and idempotency
const handleInvoice = async (evt) => {
 const token = await refreshTokenIfNeeded;
 try { await deliverReceipt(evt.invoice, token); }
 catch (err) { scheduleRetry(evt.id); }
};
RouteReceipts removes that complexity by integrating in the Stripe dashboard and keeping audit logs for finance exports. See How to Limit Stripe Receipts to Chosen Customers for no-code and API options.
What compliance and privacy considerations apply? ⚖️
Regulated industries must limit retained data, capture consent, and provide tamper-evident delivery logs to meet audit and privacy requirements. For health, legal, and finance sectors, avoid embedding protected health information or sensitive legal summaries in receipt emails and keep only the minimal invoice fields needed for reconciliation.
Concrete controls to implement.
- Retention: configure a rolling retention policy for delivery logs in your archive or export only the fields required for audit.
- Consent: persist receipt consent in customer metadata with timestamp and source (UI vs API).
- Minimization: remove item-level descriptions containing sensitive data and use invoice IDs plus a secure portal link instead.
RouteReceipts stores decision logs that your compliance team can export for evidence of delivery and consent without exposing message content. Our documentation covers retention configuration and audit exports.
⚠️ Warning: Do not include personal health details or sensitive legal facts in plain-text receipt emails.
How does RouteReceipts compare to paper receipts and Stripe's default behavior? 📊
RouteReceipts reduces engineering effort while improving auditability and privacy controls compared with paper receipts, Stripe's default send-all behavior, or a custom webhook solution. The table below summarizes trade-offs across setup, maintenance, auditability, privacy controls, and cost.
| Option | Setup effort | Maintenance | Auditability | Privacy controls | Cost |
|---|---|---|---|---|---|
| Paper receipts | Low tech setup, manual process | High (manual filing, lost copies) | Low (hard to centralize) | Low (hard to redact/limit) | Operational labor and storage costs |
| Stripe default (send to all) | Minimal (default) | Minimal | Low (no decision log) | Poor (sends PII to all payers) | Billing email only cost |
| Custom webhook solution | High (auth, token rotation, idempotency) | High (monitoring, retries, quota handling) | Medium (you must build logs) | Medium (requires extra engineering) | Engineering and runtime costs |
| RouteReceipts | Low (install from Stripe Marketplace) | Low (dashboard allowlist, fewer code changes) | High (decision audit log and exports) | High (allowlist, consent capture, suppression) | Predictable subscription pricing |
For teams unwilling to build and maintain webhook systems with token refresh, retry logic, and cache invalidation, RouteReceipts provides a dashboard-native path that preserves audit trails and reduces finance support overhead. Read Why Did We Build Route Receipts? for the product rationale and operational playbook.
For setup steps, troubleshooting, and policy details, consult our Documentation and Frequently Asked Questions.
Selective receipt delivery connects to routing rules, webhooks, and notification policies. What related terms, integration options, and DIY challenges should you consider?
Selective receipt delivery ties routing rules, Stripe webhooks, invoice metadata, and notification policies together to decide who receives a receipt. Integration choice changes where decisions run: inside Stripe via a dashboard app like Route Receipts, or in your stack using webhooks and custom code. Each path affects auditability, operational work, and how you troubleshoot missing or duplicate receipts.
How do webhooks, metadata, and Route Receipts interact? 🔌
Stripe emits an event for invoice.payment_succeeded (or similar) and that event plus invoice metadata drives the routing decision. Route Receipts can operate as a dashboard-native decision layer or as a webhook consumer that inspects metadata keys such as receipt_allowed, customer_group, or internal_tags to accept or block sending. For a webhook-first flow you receive the Stripe event, run your routing rules or forward to Route Receipts, then issue a send command to Stripe or your mail service. For a dashboard-native flow Route Receipts reads Stripe objects in-place and applies the allowlist and audit-log rules without a separate webhook endpoint.
Typical data flow examples.
- Stripe event -> webhook handler -> call Route Receipts decision API -> send receipt.
- Stripe event -> Route Receipts dashboard hook -> Route Receipts blocks or permits Stripe to send the receipt.
See our no-code routing guide for a dashboard-focused setup and the documentation for webhook examples and metadata conventions.
💡 Tip: Disable Stripe's automatic receipt emails when using Route Receipts to prevent duplicate deliveries. Check the Documentation for the recommended flag and setup steps.
Why is DIY implementation operationally complex? 🧰
Building selective receipt delivery in-house forces your team to run credential rotation, token refresh, rate-limit handling, retry logic, idempotency, and monitoring for delivery failures. Each bullet below represents concrete engineering work you must build and maintain.
- Credential management. Rotate API keys, store secrets securely, and provide scoped access.
- Token refresh and retry backoff. Implement exponential backoff and circuit breakers to avoid cascading failures.
- Rate limiting and quota handling. Track Stripe and SMTP quotas, queue events, and throttle safely.
- Idempotency and race conditions. Ensure duplicated webhook deliveries do not trigger duplicate receipts and handle concurrent updates to a single invoice.
- Cache invalidation and consistency. If you cache an allowlist or customer flag, provide invalidation hooks and stale-read handling.
- Monitoring and alerting. Instrument delivery success rates, latency, and audit log completeness.
Small illustrative webhook handler (conceptual, not production-ready):
// verify signature
if (!verifyStripeSig(req)) return res.status(400)
const evt = parseEvent(req.body)
if (isDuplicate(evt.id)) return res.status(200)
const allowed = await checkAllowlist(evt.data.object.customer)
if (allowed) await sendReceipt(evt)
res.status(200)
RouteReceipts removes that complexity by integrating in the Stripe dashboard and keeping audit logs for finance exports. See How to Limit Stripe Receipts to Chosen Customers for no-code and API options.
⚠️ Warning: DIY teams commonly underestimate idempotency and retry edge cases; missing those leads to duplicate receipts and reconciliation headaches.
Which implementation option fits my team? 🔄
Pick Route Receipts when you want low engineering overhead and an allowlist UI; pick custom webhooks when you need full control and have substantial engineering resources; pick third-party plugins when you need very fast setup and limited customization. Below is a compact comparison to help decide.
| Option | Best for | Engineering effort | Key benefits |
|---|---|---|---|
| Route Receipts | Teams that want a Stripe dashboard integration and minimal engineering | Low | Allowlist UI, decision audit log, Stripe Marketplace install |
| Custom webhooks | Teams needing full control or bespoke compliance workflows | High | Full control over rules, direct integration with ERP/WMS, custom logging |
| Third-party plugins | Teams needing a quick fix with small config | Medium | Fast install, prebuilt connectors, limited customization |
Decision criteria to weigh.
- Team engineering capacity. If your team cannot commit to long-term ops work choose Route Receipts or plugins.
- Compliance or audit requirements. If you need custom retention, choose custom webhooks or extend Route Receipts with logs exported to your SIEM.
- Volume and rate limits. High-volume setups need robust queuing and retry logic; Route Receipts handles that operationally so you do not build it yourself.
- Dashboard control. If business users must manage allowlists without engineering, Route Receipts provides an allowlist UI and audit trail; see the no-code routing guide and the step-by-step no-code walkthrough for operational setup.
For install steps, audit-log details, and troubleshooting, consult the FAQ and the Documentation.
This FAQ answers common questions about selective receipt delivery and Stripe receipt routing. Frequently Asked Questions
This FAQ provides concise, implementation-focused answers about selective receipt delivery and how Route Receipts interacts with Stripe. Each answer explains the practical steps, integration points, and operational trade-offs you will face during setup or a DIY build.
How do I add a customer to a Stripe receipt allowlist? 🧾
Add the customer by tagging them in your CRM or at checkout, syncing that tag to Stripe customer metadata, or adding their email or customer ID in the Route Receipts dashboard allowlist. Start by adding a boolean flag at checkout (example metadata key: metadata.receipt_allowed=true). Sync that field from your CRM to Stripe using your existing integration or a small webhook that updates the Stripe Customer object. If you prefer a no-code flow, add the email or customer ID directly in the Route Receipts allowlist via the dashboard. See the allowlist setup guide for step-by-step instructions and screenshots.
Can I use selective receipt delivery with subscriptions and invoices? 🔁
Yes. Selective delivery works for subscriptions, invoices, and one-off charges when you attach rules to the invoice settings, subscription metadata, or Route Receipts' rule engine. For example, add metadata to a Subscription (metadata.billing_contact=true) and create a Route Receipts rule that sends receipts only for subscriptions with that flag. You can also set rules at the invoice template level to evaluate line items or tax status before sending. For a no-code walkthrough of rule placement and testing, see our step-by-step guide.
Will selective delivery affect tax or accounting records? 🧾
No. Selective delivery only changes email distribution; Stripe retains the same transaction, tax, and exportable records. Accounting exports (CSV, QuickBooks, or Xero syncs) remain identical because Route Receipts does not alter invoicing or payment objects. For reconciliation, export Route Receipts' decision log alongside your Stripe exports so each transaction row can include a delivery_decision column. That extra column lets finance reconcile who received a receipt without changing financial data.
Is selective receipt delivery compliant with GDPR and other privacy laws? ⚖️
Selective receipt delivery can meet GDPR and other privacy rules when you capture consent, enforce retention limits, and mask personal data in logs where required. Record consent timestamps in Stripe customer metadata (example: metadata.consent_ts=2025-02-01) and implement an allowlist retention policy that automatically removes entries after your legal retention window. Route Receipts stores decision logs separately and can anonymize or redact email addresses for audit exports on request. Consult legal for jurisdiction-specific requirements and review our documentation for recommended metadata patterns and retention workflows.
💡 Tip: Record consent source and timestamp in Stripe metadata to simplify audits and data subject requests.
What happens if email delivery fails — are there retries or fallbacks? 🔄
Route Receipts and Stripe will retry failed sends and surface failures in the decision log so you can act on them. Route Receipts records a failure status and retry attempts in the audit log; you can configure a fallback email (billing contact or admin) or trigger a webhook to alert a support channel after N retries. For automated monitoring, forward failure webhooks to your incident pipeline and include the original Stripe invoice ID so engineers or billing teams can correlate and remediate quickly.
How hard is it to build selective receipt delivery myself? 🧰
Building this in-house requires continuous maintenance of webhooks, idempotency, retry logic, credential rotation, quota handling, and audit logging. You must implement reliable webhook delivery with idempotency keys, backoff and retry strategies, token refresh and credential rotation, race-condition handling for concurrent invoice events, cache invalidation for allowlist changes, and monitoring/alerting for failed sends. Example minimal webhook handler (illustrative):
// pseudocode
verifyStripeSig(event);
if (seen(event.id)) return; // idempotency
if (customer.allowsReceipt) sendEmail; else logDecision(false);
onFailure -> retryWithBackoff;
Route Receipts eliminates most of that operational overhead by providing a dashboard-native allowlist, decision audit logs, and built-in retry/fallback handling, so your team avoids building and maintaining the full delivery pipeline. For the design trade-offs we considered, read why we built Route Receipts.
⚠️ Warning: DIY teams commonly underestimate idempotency and retry edge cases; missing those leads to duplicate receipts and reconciliation headaches.
Which implementation option fits my team? 🔄
Pick Route Receipts when you want low engineering overhead and an allowlist UI; pick custom webhooks when you need full control and have substantial engineering resources; pick third-party plugins when you need very fast setup and limited customization. Below is a compact comparison to help decide.
| Option | Best for | Engineering effort | Key benefits |
|---|---|---|---|
| Route Receipts | Teams that want a Stripe dashboard integration and minimal engineering | Low | Allowlist UI, decision audit log, Stripe Marketplace install |
| Custom webhooks | Teams needing full control or bespoke compliance workflows | High | Full control over rules, direct integration with ERP/WMS, custom logging |
| Third-party plugins | Teams needing a quick fix with small config | Medium | Fast install, prebuilt connectors, limited customization |