Selective Receipt Routing for Stripe App: Problem–Solution Guide and 5‑Minute Setup
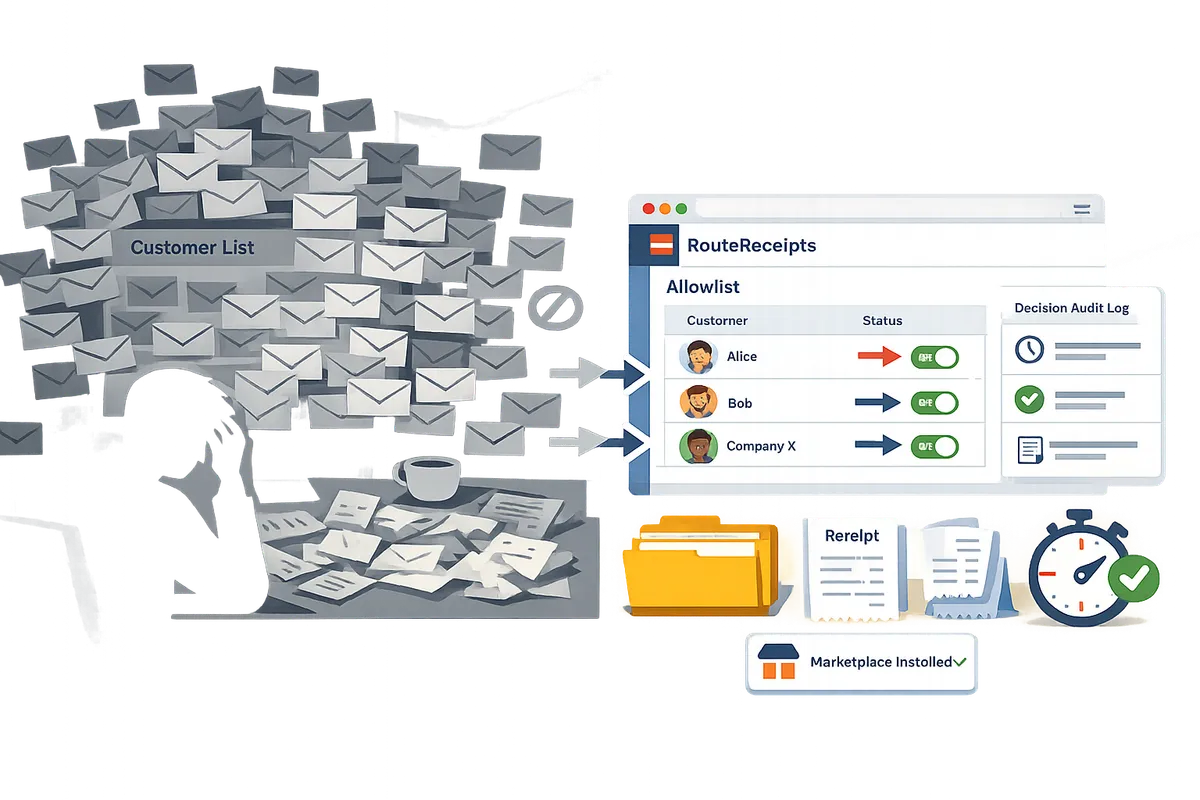
One unintended receipt sent to a corporate payer can create two hours of inbox triage and expense reconciliation work. Selective receipt routing for stripe app is a feature that lets businesses send Stripe receipts only to chosen customers, avoiding unnecessary emails for those who do not require them. RouteReceipts is a Stripe Marketplace app we built that adds an allowlist, a dashboard-native UI, and a decision audit log so teams can manage routing without custom webhooks or code. This problem-solution guide shows step-by-step how to install and configure RouteReceipts, validate routing, and take a fast path to sign up. Set up the app in about five minutes and see which receipts stop cluttering client inboxes.
What problems prevent businesses from sending targeted receipts in Stripe?
Stripe's native receipt settings force an all-or-none choice that prevents targeted receipt delivery. That binary behavior creates inbox clutter, extra work for finance and support teams, and gaps in auditability. RouteReceipts provides an allowlist-based, dashboard-native way to route Stripe receipts to chosen customers so teams can stop resending emails and reduce reconciliation time.
What are the common symptoms that indicate you need selective receipt routing? 🧭
Frequent customer complaints about unwanted receipts, repeated manual resends, and mismatched expense records are clear signs you need selective receipt routing.
- Customers tell support they received duplicate or irrelevant emails after refunds or recurring charges. This increases churn risk for retail brands with high-frequency transactions.
- Finance or account teams manually resend receipts to enterprise buyers or to internal cost centers. That costs hours per week and creates versioning errors in expense systems.
- Expense reports and accounting entries disagree because receipts land in personal inboxes instead of corporate procurement addresses. That slows month-end close and forces rework.
RouteReceipts addresses these symptoms by letting teams maintain an allowlist of customers in the Stripe dashboard and by recording each routing decision in an audit log. For background on the product intent and design trade-offs, see Why Did We Build Route Receipts?.
How do these problems affect different business models? 🏬
Retail, SaaS, and marketplace businesses each face distinct operational and compliance costs from Stripe's all-or-none receipt behavior.
| Business type | Practical symptom | Business cost | How RouteReceipts helps |
|---|---|---|---|
| Retail | High volume of low-value transactions where customers flag receipts as spam | Increased support tickets and higher churn from email fatigue | RouteReceipts lets you block receipts for retail customers while still sending to B2B buyers, cutting support workload |
| SaaS | Enterprise customers require formal invoices sent to procurement emails; SMBs prefer no receipts | Manual emailing delays renewals and complicates revenue recognition | RouteReceipts routes invoices to procurement addresses automatically, reducing late payments and manual labor. See the no-code setup guide for details. |
| Marketplaces | Single payment touches multiple sellers or entities; receipts go to the wrong party | VAT or multi-entity reporting errors and costly reconciliations | RouteReceipts supports per-customer rules and leaves a decision trail for auditors, reducing cross-entity mistakes |
For a step-by-step, no-code walkthrough of allowlist setup, consult How to Limit Stripe Receipts to Chosen Customers (Step‑by‑Step, No Code).
What are the compliance and audit risks of sending receipts to everyone? ⚖️
Unfiltered receipt delivery increases exposure of unnecessary customer data, creates holes in audit trails, and complicates multi-entity reporting.
- Data exposure: receipts often contain PII and payment metadata that teams should not distribute broadly. Unnecessary distribution raises privacy and data-retention questions.
- Audit gaps: when receipts are manually resent or deleted, auditors cannot reliably trace who received what and when, which increases remediation effort during audits.
- Multi-entity errors: marketplaces and companies with multiple legal entities face misallocated receipts that break VAT, GST, or corporate billing trails.
These issues lead to investigation time, costly reconciliations, and potential regulator inquiries. RouteReceipts reduces those risks by stopping automatic broadcast delivery, providing an allowlist, and keeping a decision audit log that documents every routed receipt.
⚠️ Warning: Sending receipts to the wrong legal entity can create tax and reporting errors. Use an audited allowlist and test routing rules in your sandbox before enabling in production.
How does selective receipt routing work and which approaches solve the problem?
Selective receipt routing applies rule-based logic to decide which Stripe customers receive a receipt. Rules evaluate customer attributes, allowlists, and transaction metadata to either send or suppress receipt emails so teams avoid blanket delivery and reduce finance overhead. The sections below define common decision points, show how security and auditability differ by approach, and compare Route Receipts with DIY webhooks and third-party automation tools.
What is selective receipt routing and how is it defined?
Selective receipt routing is a routing pattern that filters receipt delivery based on customer attributes, allowlists, or transaction metadata. For example, a B2B customer record flagged 'billing_contact=true' should receive receipts for expense reporting, while casual consumers do not. Map rules to business goals: reduce support tickets for misrouted receipts, ensure enterprise customers get receipts for accounting, and avoid duplicate emails when external billing systems also send receipts. For a practical, dashboard-first how-to, see our no-code allowlist guide for selective delivery.
What is Route Receipts and why use it instead of DIY webhooks?
Route Receipts is a Stripe Marketplace app that provides a dashboard-native allowlist, rule editor, and decision audit log so teams avoid building and maintaining custom webhook logic. Building a homegrown webhook flow often takes days to weeks to implement, plus ongoing maintenance to handle edge cases like partial payments, refunds, or duplicate sends. With Route Receipts you install from the Stripe Marketplace, create allowlist entries or rules in our dashboard, and preview matched customers without developer work. For background on the product rationale and technical trade-offs, read why we built Route Receipts.
💡 Tip: Disable Stripe's automatic receipt emails in your Stripe settings before enabling Route Receipts to prevent duplicate messages.
How do routing rules, allowlists, and metadata-driven decisions work in practice? 🔧
Routing rules check customer records, metadata fields, and receipt types and then either send the receipt or suppress it based on the matched conditions. Common rule patterns include:
- Allowlist by customer ID or email for enterprise clients who require receipts for expense systems.
- Metadata flag (for example, receipt_required = true) set by billing or CRM systems.
- Transaction thresholds (e.g., send receipts only for charges above a dollar amount or for subscription invoices).
- Receipt type exceptions for refunds or partial payments to avoid duplicate or confusing messages.
Practical setup steps:
- Identify the business case and which customers must receive receipts.
- Map that case to a customer attribute, metadata field, or invoice type.
- Create the rule in the dashboard and preview matching customers.
- Test in a sandbox account and enable the rule when results match expected cases.
Our dashboard lets finance or support teams build and test these rules without a developer. For a step‑by‑step, no-code implementation, see how to limit Stripe receipts to chosen customers.
How do security, privacy, and auditability compare across solutions? 🔒
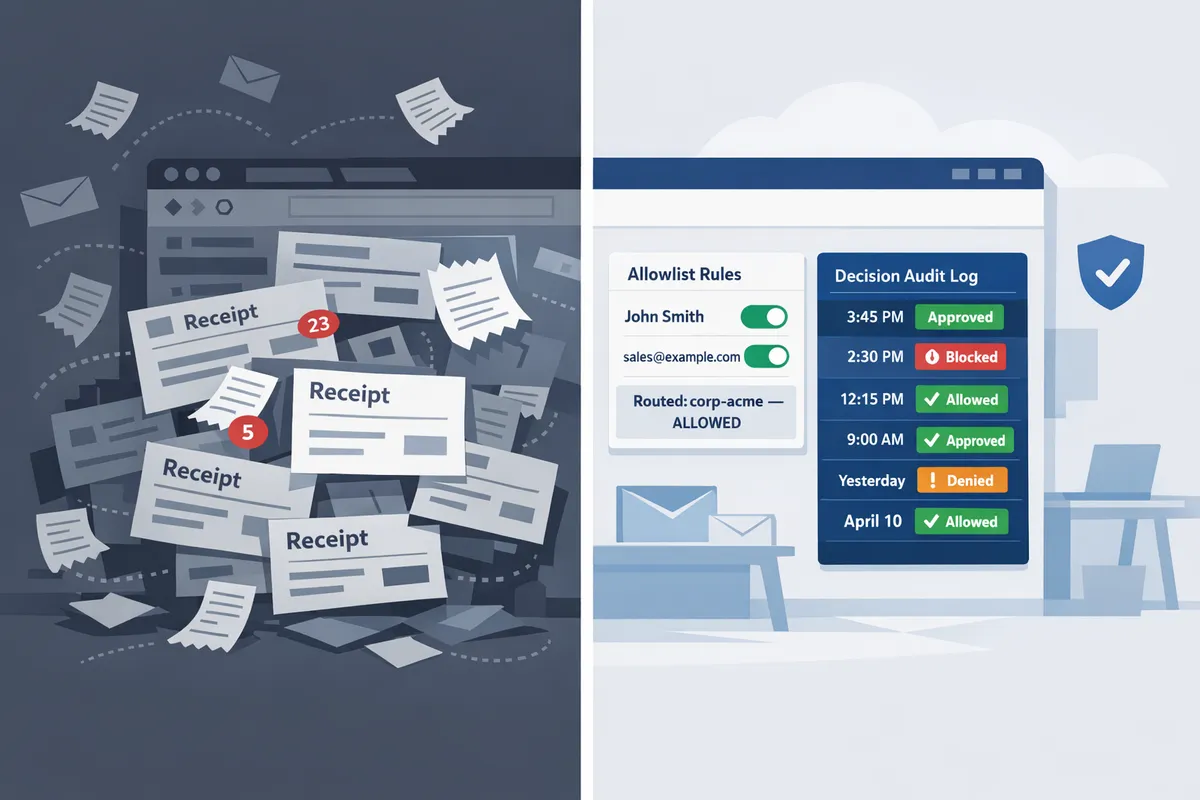
Route Receipts records each routing decision in an immutable audit log and minimizes unnecessary PII export to lower compliance risk compared with ad-hoc scripts. Teams need these features for invoicing and tax reviews: role-based access control, tamper-evident decision logs, retention and export controls, and the ability to redact or hash sensitive fields. Example audit workflow: finance filters the audit log by customer ID and date range, exports a CSV of routing decisions (without full card data), and attaches log entries to the monthly reconciliation package. By contrast, DIY scripts often require custom logging, manual redaction rules, and additional review to meet the same audit standards; third-party automation tools may store data outside your control depending on configuration. For frequently asked questions about installation, routing behavior, and disabling Stripe's automatic receipts, consult our FAQ.
How do Route Receipts, DIY webhooks, and third-party automation tools compare?
Route Receipts, DIY webhooks, and third-party automation tools vary by setup speed, maintenance burden, compliance features, and required engineering time.
| Solution | Setup speed | Maintenance hours per month | Compliance & audit features | Required engineering time (initial) |
|---|---|---|---|---|
| Route Receipts | Minutes to an hour via Stripe Marketplace and dashboard rule editor | Low. A few hours per month for rule updates and audits | Built-in decision audit log, RBAC, limited PII export, exportable logs | 0–2 hours (account admin work, no developer required) |
| DIY webhooks | Days to weeks to implement, test, and secure | Medium to high. Ongoing fixes for edge cases and API changes | Depends on implementation. Teams must build immutable logging and redaction | Several days to weeks of developer time |
| Third‑party automation tools (Zapier, Make) | Hours to days for basic flows | Medium. Triggers can break after API changes or schema updates | Limited native auditability; risk of storing PII in external platforms | Low to medium. Non-developers can configure simple rules, but enterprise scaling needs oversight |
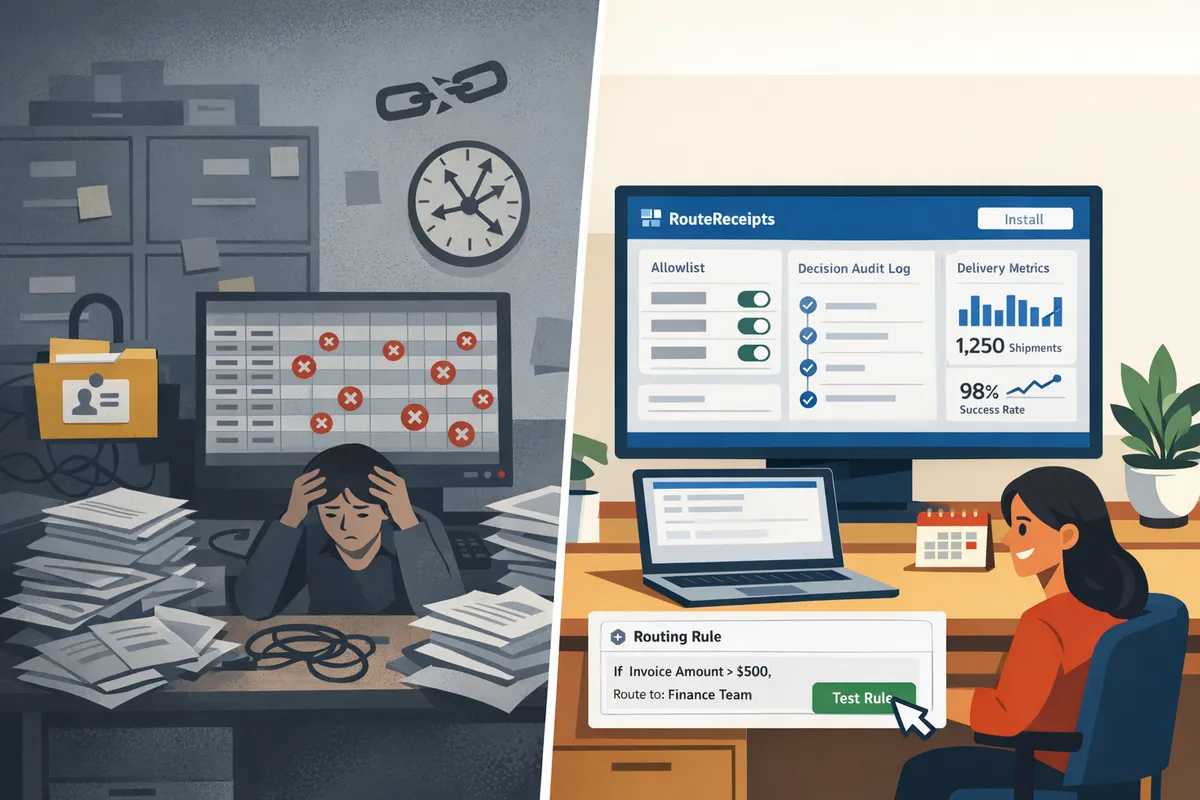
How to implement selective receipt routing with RouteReceipts and verify results in five minutes
You can install RouteReceipts from the Stripe Marketplace, add an allowlist, create a single routing rule, and test both allowlisted and non-allowlisted flows in Stripe test mode within five minutes. Follow the checklist below to reduce accidental receipts, confirm routing decisions in the audit log, and avoid surprises before go-live.
Step-by-step setup (5 minutes) ⏱️
Complete these five actions inside Stripe and the RouteReceipts dashboard to enable selective routing quickly.
- Install RouteReceipts from the Stripe Dashboard Marketplace. Click Stripe Dashboard > Marketplace, search for 'RouteReceipts,' then choose Install. Accept the install modal and grant the dashboard permissions the app requests.
- Open RouteReceipts > Allowlist. Click Add customer and enter the minimum field: customer email or Stripe customer ID. You can also upload a CSV (email or customer_id column).
- Create a routing rule in RouteReceipts > Rules. Click New rule and set Condition: 'Customer is in allowlist.' Set Action: 'Send receipt.' Name the rule so finance can identify it later (example: Enterprise Allowlist).
- Disable Stripe automatic receipts if you want RouteReceipts to be the single sender. In Stripe Dashboard > Billing settings, toggle off Automatic receipt emails for the events you manage, then leave RouteReceipts enabled to avoid duplicates.
- Enable Test Mode in RouteReceipts and turn routing On. In the RouteReceipts dashboard header, switch to Test mode, then use the Enable routing toggle. This prevents live customers from receiving test behavior.
For a guided no-code alternative and rule examples, see our Beginner's Guide to Selective Delivery and the step-by-step no-code walkthrough.
Test routing and verify audit logs ✅
Run a test charge for an allowlisted and a non-allowlisted customer and confirm RouteReceipts recorded both decisions in the audit log.
- Create two test customers in Stripe: one with the email you added to the allowlist and one without. Go to Stripe Dashboard > Payments > + Create payment and record a small test charge for each customer in Test mode.
- Open RouteReceipts > Decision audit log. Filter by Test mode and the payment IDs you created. Confirm the log shows: decision (send or suppress), rule name, and timestamp for both charges.
- Confirm email delivery status. For the allowlisted test, check Stripe Dashboard > Customers > Events or your email inbox to see the receipt. For the suppressed test, confirm RouteReceipts shows 'suppressed' and Stripe did not send a duplicate.
Checks to perform before switching to live mode:
- Audit log contains both outcomes with matching payment IDs.
- No duplicate receipt emails for allowlisted customers.
- Billing and finance users can read rule names in the audit entries.
Common edge cases and troubleshooting ⚠️
Create explicit rules and verification steps for refunds, partial payments, duplicate customer records, and international invoices to avoid misrouted receipts.
- Refunds and partial payments. Rule pattern: 'If payment.intent.status is refunded OR amount_refunded > 0, then send receipt to billing contact X.' This prevents a suppression rule from hiding refund notifications that finance needs.
- Multiple customer records. Rule pattern: 'If any customer.email matches allowlist, treat as allowlisted.' Run a quick dedupe audit in Stripe before go-live to avoid missed receipts caused by duplicate profiles.
- International invoices and locale-specific receipts. Rule pattern: 'If invoice.country != US and customer in allowlist, send localized receipt template.' Test with at least one international billing address.
- Partial-match emails (corporate alias vs personal). Use full customer_id when accuracy matters; fallback to email when customer_id is missing.
Business consequences of skipping explicit rules: unexpected support tickets, delayed reimbursements, and audit gaps. When uncertain, create a temporary catch-all rule that logs decisions but sends receipts only to finance addresses until you confirm behavior.
💡 Tip: Use the RouteReceipts decision audit log for monthly finance audits to prove which receipts were sent and why.
⚠️ Warning: Avoid including sensitive health or legal-case details in receipt bodies; keep receipts limited to necessary transaction fields.
Measure results and estimate ROI 📈
Compare support tickets, manual resends, and unnecessary emails in a 30-day window before and after deployment to estimate time and cost savings.
- What to measure: number of support tickets referencing receipts, count of manual resends by finance, and volume of receipt emails sent weekly. Export these from your support system and Stripe reporting.
- Example (illustrative): a small SaaS that previously sent 200 monthly receipts could cut unnecessary emails by a measurable share; if each unnecessary email required 2 minutes of finance time to reconcile, the team recovers those minutes as billable or operational time. Use actual ticket counts and average handling time to calculate ROI for your team.
- Use RouteReceipts' logs to produce an audit report: filter by date, export decision outcomes, and map suppressed vs sent to support ticket resolution time to quantify reductions in workload.
For a longer-run playbook on no-code routing and rule templates, read our no-code guide and the article on limiting Stripe receipts to chosen customers.
Frequently Asked Questions
This FAQ answers the most common implementation and policy questions about selective receipt routing for stripe app and Route Receipts. Use these short, action‑oriented answers to decide whether to install Route Receipts, what to test in sandbox, and which team members to involve.
Will RouteReceipts work with existing Stripe invoices and receipt settings? 🧩
Yes, Route Receipts integrates with Stripe invoice and receipt events and applies routing rules before Stripe delivers emails. The app preserves your existing invoice templates and branding while intercepting the delivery decision so you avoid duplicate or unwanted customer emails. Required permissions include a user with permission to install Stripe Marketplace apps and manage invoices (typically an account owner or admin); recommended test steps are: enable Stripe test mode, add one test customer to your allowlist, create a simple routing rule, generate a test invoice, and confirm only the allowlisted address receives the receipt and that the audit log records the decision.
Can I route receipts per customer or per subscription? 🔁
Yes, Route Receipts supports routing by customer, by subscription, or by specific metadata values. Create rules that target a customer ID, subscription ID, customer email domain, or custom metadata such as product_code or billing_entity so enterprise clients receive receipts while other customers do not. For a step‑by‑step no‑code example that uses metadata and allowlists, see How to Limit Stripe Receipts to Chosen Customers (Step‑by‑Step, No Code).
How does RouteReceipts handle refunds and partial payments? 💸
Route Receipts evaluates refund and partial payment events against your routing rules so you can choose whether to notify finance teams or suppress customer emails. Add explicit rules that match refund events (or partial payment metadata) and route those receipts to a finance allowlist, a billing group email, or suppress them for customers who prefer not to receive an extra message. Test refund flows in Stripe test mode and verify the audit log entry for each routed refund to support reconciliations.
Is there a way to audit who received a receipt and why? 📜
Yes, Route Receipts maintains a decision audit log that records the rule used, the customer ID, and the timestamp for every routing decision. You can filter the app's audit view by date, customer, or rule and export entries for finance reconciliation or compliance reviews. For guidance on audit‑log best practices and example workflows, see The No‑Code Way to Route Customer Receipts in Stripe: Beginner’s Guide to Selective Delivery.
How much technical work is required to implement selective routing? 🔧
Minimal technical work is required because Route Receipts is dashboard‑native and avoids custom webhook wiring. Typical setup steps—installing the app from the Stripe Marketplace, adding allowlist entries, creating routing rules, and running a few test invoices—require no developer time; complex multi‑entity setups (multiple Connect accounts, separate billing entities) usually benefit from a short QA pass by engineering to confirm rule priority and edge cases. If you need templates or policy examples for multi‑entity routing, see Why Did We Build Route Receipts? for design trade‑offs and implementation patterns.
💡 Tip: Test each rule in Stripe test mode with a finance allowlist and a non‑allowlisted test customer to confirm both the delivery outcome and the audit log entry.
What pricing tiers does RouteReceipts offer and how do I start? 💳
Route Receipts offers a free tier for testing limited volume and paid tiers for higher monthly routed receipt volumes. Start by installing the app from the Stripe Marketplace, follow the five‑minute setup steps earlier in this guide, and review billing or upgrade options inside the app; for detailed pricing and plan comparisons, consult our Frequently Asked Questions page. For a guided walkthrough of the no‑code setup, see How to Limit Stripe Receipts to Chosen Customers (Step‑by‑Step, No Code) and the broader blog collection on selective receipt routing.
Set up selective receipt routing for Stripe in five minutes and start routing only the receipts that matter.
This guide showed a fast, low-risk path to stop sending every receipt to every customer and keep finance inboxes clean. RouteReceipts is a specialized application designed to enhance the way businesses manage their Stripe receipt distribution. It fixes Stripe's all-or-nothing receipt behavior by letting you maintain an allowlist and send receipts only to customers who require them. The app integrates into the Stripe dashboard, provides a decision audit log, and installs from the Stripe Marketplace with minimal steps.
If you prefer a no-code walkthrough, follow the Beginner’s guide to selective delivery for step-by-step setup and testing. For background on why this matters and operational trade-offs, see Why Did We Build Route Receipts?.
Start a free trial of Route Receipts to complete the five-minute setup and validate routing on real transactions via the Stripe Marketplace or our FAQ. Taking that single step moves you from manual work and audit risk to a simple, auditable receipt flow under your control.