
Stripe Dashboard Controls for Selective Receipt Sending: The Complete Admin Playbook
Sending unnecessary receipts to 40% of customers creates inbox clutter and costs finance teams hours of support and reconciliation each month. Selective receipt sending for the Stripe Dashboard is a method that lets admins send receipts only to chosen customers using Dashboard controls and RouteReceipts. This best-practices guide shows Stripe admins how to use native Dashboard controls and our website's RouteReceipts to build an allowlist, maintain an audit log, and avoid custom webhook work. DIY approaches often require spreadsheets or engineering time, wasting hours and risking missed receipts or compliance gaps. The playbook breaks down step-by-step Dashboard actions and allowlist patterns for common billing scenarios, plus the straightforward Stripe Marketplace setup. Which Dashboard setting and allowlist pattern matches your billing mix?
How does selective receipt sending for the Stripe Dashboard work?
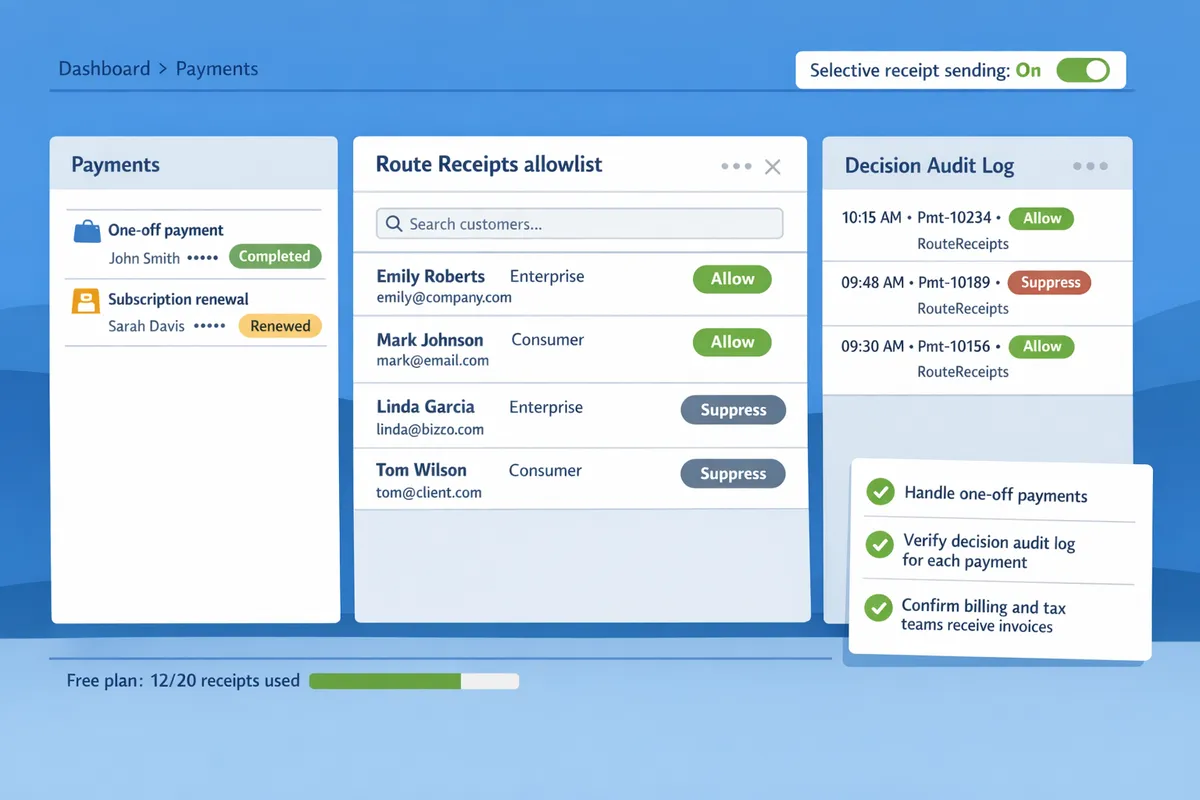
Selective receipt sending for the Stripe Dashboard is a set of admin controls and workflows that let you route payment receipts only to specified customers. This reduces unnecessary email volume and gives finance, billing, and customer success precise control over who gets post-payment confirmations. Route Receipts integrates directly in the Dashboard to apply an allowlist and record each decision so teams can enforce policy without building custom webhook logic.
What is selective receipt sending? 🧾
Selective receipt sending is a policy and dashboard-based control that restricts Stripe payment receipts to a defined set of customers. For business teams, that means defining acceptance criteria (for example: enterprise clients, accounts flagged for expense reporting, or customers in specific countries) and enforcing those rules consistently across one-off charges and subscription renewals. A clear acceptance rule set should include: an allowlist of customer IDs or metadata tags, the scope (payments, invoices, or both), fallback behavior for unknown customers, and an audit trail entry for each suppressed or allowed send. For example, a SaaS company might allow receipts for customers with a metadata tag invoice_needed=true and suppress them for free-trial accounts.
Route Receipts makes the allowlist actionable inside Stripe so admins can apply these criteria without developer time. See our no-code setup guide for a step-by-step walkthrough: The No‑Code Way to Route Customer Receipts in Stripe: Beginner’s Guide to Selective Delivery.
How do receipts differ from invoices in Stripe? 📑
A receipt is a post-payment confirmation email, while an invoice is a billing document used to request or record payment. Receipts confirm that a charge succeeded and typically include amount, payment method, and receipt number. Invoices present line items, tax details, and payment terms, and they may produce a receipt when final payment occurs. Changing whether receipts send does not change how invoices are issued or whether invoice emails and reminders are sent. For teams, that means you can suppress receipts to reduce inbox noise while still delivering invoices for tax or AR workflows.
If your accounting or tax teams expect an emailed invoice for compliance, treat invoice delivery separately from receipt routing to avoid missed documentation. For more on when to use invoices vs receipts and stepwise approaches to limit sends, consult our step-by-step guide: How to Limit Stripe Receipts to Chosen Customers (Step‑by‑Step, No Code).
Where are the Dashboard controls for receipts? 🔧
Dashboard controls for receipts live under Business Settings > Email receipts and on each Payment and Invoice detail page. The global setting (Business Settings > Email receipts) exposes toggles such as "Successful payments" which enable or disable automated receipts for all customers. Individual Payment and Invoice pages include manual "Send receipt" buttons and visibility into whether an automated receipt already went out. When implementing selective sending you must decide whether to disable the global automatic toggle to prevent duplicate sends or leave it on and let a routing app suppress unwanted messages.
Practical steps to set controls.
- Audit current flows. Check Business Settings > Email receipts and a sample of recent Payment records to see which customers already receive emails.
- Choose a global strategy. Turn off the global "Successful payments" toggle if you want Route Receipts to be the single source of truth for who receives receipts.
- Test in test mode. Send test charges to allowlisted and non-allowlisted customers and verify only intended recipients get emails.
⚠️ Warning: If you leave Stripe's global receipt toggle enabled and also run a routing app, you risk duplicate receipts. Test both modes in Stripe test mode before switching live.
For step-by-step Dashboard screenshots and toggle recommendations, refer to our Documentation: Documentation.
How does Route Receipts integrate with the Stripe Dashboard? 🔗
Route Receipts installs from the Stripe Marketplace and runs inside the Dashboard to apply an allowlist and decision audit log without custom webhooks. The install and use flow is: install Route Receipts from the Marketplace, grant it permission to read Payments and Customers, open the app inside the Stripe Dashboard, add or import customer IDs into the allowlist (or use metadata rules), and review the decision audit log where each receipt decision is recorded. Route Receipts intercepts the receipt decision point and either permits Stripe to send the receipt or suppresses it based on your allowlist.
This approach reduces hours spent on custom engineering and manual reconciliation. For example, a billing manager can add a corporate customer to the allowlist and immediately ensure future subscription renewals generate receipts without developer involvement. If you prefer a technical rationale, see Why we built Route Receipts? and the operational trade-offs: Why Did We Build Route Receipts?.
Install testing tips.
- Use Stripe test mode to add 5–10 customers to your allowlist and run charges covering one-off payments and subscription renewals.
- Verify the Route Receipts decision audit log for each payment to confirm the app recorded allow or suppress actions.
- Confirm billing and tax teams still receive invoices where required.
Which strategies ensure reliable selective receipt delivery from the Stripe Dashboard?
Reliable selective receipt delivery combines Dashboard toggles, a managed allowlist, and explicit fallback rules so receipts never get sent twice or not at all. Solid operation requires clear ownership, simple decision logic, and an audit trail you can query when support issues arrive. The following subsections show practical steps, examples, and runbooks you can use today.
How do I manage a receipt allowlist in Stripe? ✅
Manage a receipt allowlist by recording allowlist membership on the customer record (metadata or a RouteReceipts flag) and honoring that value when deciding whether to send a receipt. For a simple setup, add an allowlist boolean to each Stripe Customer metadata field named receipt_allowed:true. Example methods:
- Manual adds. Open a customer in the Stripe Dashboard and set metadata or tick the Route Receipts allowlist checkbox for enterprise customers who need receipts. This works well when you have fewer than 50 allowlist changes per month.
- CSV bulk import. Export a CSV with columns customer_id,email,receipt_allowed. Use the Stripe Dashboard bulk update or Route Receipts’ import to set metadata in batches. Include a timestamp column for auditing.
- CRM sync. Tag the customer in HubSpot or Salesforce with "needs_receipt" and schedule a weekly sync that exports that segment to Route Receipts. For near real-time updates, use Zapier to push updates into customer metadata when the CRM tag changes.
Route Receipts stores allowlist state in a native dashboard UI and writes a decision log for every send so admins can confirm who is allowed and why. For a no-code walkthrough of allowlist setup and audit logs, see the no-code allowlist guide in our beginner's article on selective delivery.
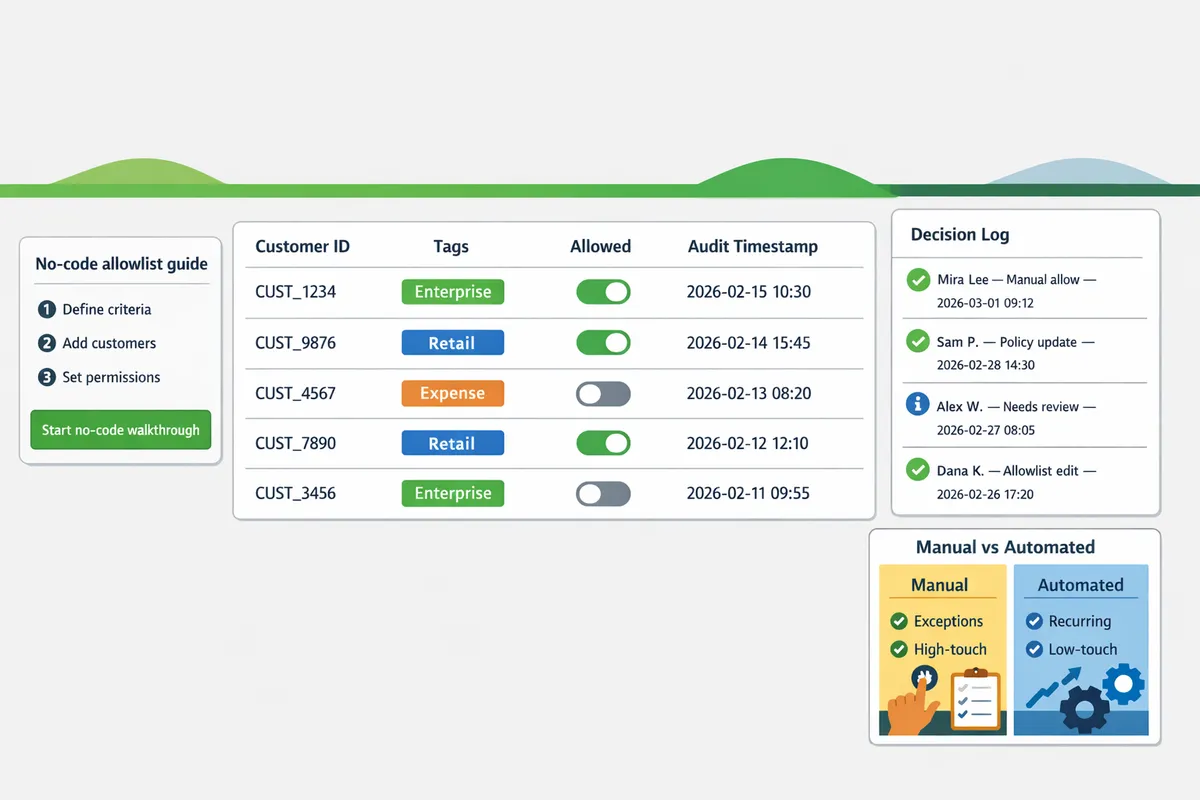
When should I use manual sends vs automated sends? 🔁
Use manual sends for exceptions and high-touch enterprise clients and automated sends for recurring or low-touch transactions. Manual sending fits scenarios where each receipt requires review, such as invoices with special tax handling, refunds tied to negotiated SLAs, or one-off enterprise billings.
Practical workload examples: a finance rep spends roughly 60–90 seconds per manual send (open record, confirm details, send). If you manually send 300 receipts per month, expect 5–7 hours of work; if you automate those, you reclaim that time for reconciliation. Use automation with guardrails when receipts follow consistent rules: subscription renewals, standard single-payment purchases, or low-value transactions.
Route Receipts lets you combine both approaches: set an allowlist so receipts auto-send for chosen customers while keeping manual send buttons for exceptions. For step-by-step no-code automation samples and testing guidance, see our step-by-step no-code guide to limit receipts to chosen customers.
How do I prevent duplicate or missing receipts? ⚠️
Prevent duplicates and missing receipts by disabling overlapping send sources, verifying allowlist state before send, and keeping an accessible decision log for each payment. Follow this operational checklist before you go live and during audits:
- Confirm Dashboard toggles. Turn off Stripe’s global automatic receipt send only if your routing system handles all receipt logic. If you keep the global toggle on, ensure your routing prevents double-sends.
- Validate allowlist state. Check the customer metadata or Route Receipts allowlist flag before issuing a send.
- Disable overlapping automation. Remove any webhooks or third-party automations that also send receipts for the same event.
- Verify delivery outcomes. Confirm webhook delivery statuses and email delivery logs for failed sends.
- Use decision logs. Query Route Receipts’ decision audit log to see why a receipt was or was not sent.
⚠️ Warning: Running both Stripe’s native automated sends and a routing app without disabling one source is the most common cause of duplicate receipts. Turn off the redundant path before testing.
How do manual, automated, and Route Receipts approaches compare? 🧾
Manual, native automated, and Route Receipts-managed approaches trade off time, error risk, control, and cost; Route Receipts aims to hit a middle ground with auditability and low maintenance. The table below summarizes practical expectations and recommended use cases.
| Approach | Typical setup time | Per-month maintenance | Error surface (missing/duplicate) | Recommended use cases |
|---|---|---|---|---|
| Manual sends | 1–2 hours to document process | High (hours per month) | Low for allowed customers; high risk if human error | High-touch enterprise invoices, negotiated refunds, ad hoc corrections |
| Native automated (Stripe) | 5–30 minutes | Very low | Low missing risk; no per-customer control can cause unwanted sends | Simple businesses where all customers should receive receipts |
| Route Receipts (managed) | 30 minutes to 2 hours to configure allowlist and rules | Low (minutes per month for updates) | Low; decision log reduces mystery and speeds troubleshooting | Mixed customer bases, tiered billing, regional compliance, teams that want control without engineering work |
Route Receipts’ dashboard-native allowlist and decision audit log reduce maintenance time compared with manual processes while avoiding the all-or-nothing behavior of native automated sends. For the engineering-free implementation path and the product rationale, see Why Did We Build Route Receipts? and our Documentation for setup and troubleshooting steps.
How do you implement and measure selective receipt sending in the Stripe Dashboard?
Implement selective receipt sending in three phases: configure Dashboard receipt toggles, install and populate an allowlist with Route Receipts, then validate in test mode and monitor decision logs. Route Receipts is a Stripe Marketplace app that gives admins a dashboard-native allowlist and decision audit log so you can send receipts only to chosen customers without building custom webhooks. Follow the steps below to set up, test, measure, and troubleshoot with examples that map to finance and support team workflows.
What are the step-by-step setup tasks? 🛠️
Turn off blanket receipt sends, install Route Receipts, and document your allowlist rules for ops and support.
- Audit current behavior. Open Stripe Dashboard > Business settings > Email receipts and note whether "Successful payments" is on. If you plan to control sends, start by toggling that off to prevent duplicate or uncontrolled emails.
- Install Route Receipts from the Stripe Marketplace and complete the OAuth flow. Route Receipts is now the gating layer that decides per-charge whether Stripe should actually deliver a receipt. For onboarding steps, follow the RouteReceipts setup guide for onboarding steps in our Documentation.
- Define allowlist criteria. Choose whether you will add customers by metadata (for programmatic control) or directly in the Route Receipts UI (for manual ops). Example rules: enterprise customers (company_custom=true), expense-enabled plans, or region-specific VAT flows.
- Populate the allowlist. Bulk-import customer IDs or update a customer property in Stripe to mark allowlist members. Use a naming convention in metadata to make future audits simple (example: receipts_allowed:true).
- Document operational rules. Create a one-page runbook for finance and support explaining who may add/remove entries, the approval process, and rollback steps if a receipt is missed.
- Enable audit logging. Confirm Route Receipts decision logs are visible in the app and that Stripe Events for payment.succeeded are retained for at least 30 days.
Reference: consult our no-code implementation guide for selective delivery for example allowlist templates and screenshots in The No‑Code Way to Route Customer Receipts in Stripe: Beginner’s Guide to Selective Delivery.
How do I test and validate selective receipt sending? 🧪
Test in Stripe test mode with representative customer records and verify decisions in Route Receipts audit logs.
- Prepare test customers. Create three test customers in test mode: one allowlisted, one explicitly blocked, and one default (no flag). Add the metadata keys you plan to use in production.
- Simulate payments. Run charges for each test customer that mirror your real transaction types (one-off charge, subscription invoice, refunded charge).
- Confirm Route Receipts decisions. Open Route Receipts audit logs and verify each simulated payment shows the expected decision (send or suppress) and the rule that triggered it.
- Verify delivery state. For a send decision, check Stripe's Payment or Invoice detail to confirm a receipt event exists and that the customer email field matches. For a suppress decision, confirm no receipt email was queued and that the payment record shows the suppressed status in Route Receipts.
- Check email headers and receipts. Use a test mailbox to confirm the receipt subject, From address, and invoice link match your templates when a send occurs.
💡 Tip: Run each scenario twice: once with the global "Successful payments" toggle on to see baseline behavior, then with it off and Route Receipts active to validate the gating logic.
See step-by-step test examples in How to Limit Stripe Receipts to Chosen Customers (Step‑by‑Step, No Code).
Which metrics should I track to measure success? 📊
Measure both operational outcomes and customer impact: suppressed receipts, delivery rate for allowed sends, manual sends, support tickets, and time saved on billing tasks.
- Suppressed receipts per period. Count how many receipts you prevented from being sent. This ties directly to reduced inbox clutter for customers.
- Delivery rate for allowed sends. Track successful delivery events versus failed deliveries for receipts that were allowed; use Stripe delivery events combined with Route Receipts logs.
- Manual sends initiated by finance. Monitor the number of manual receipt sends to catch gaps in rules.
- Customer complaints about missing receipts. Track support tickets tagged for receipts to measure friction introduced by selective sending.
- Time saved and cost impact. Calculate hours saved: average time per manual send times number of manual sends avoided.
Create a monthly dashboard that joins Stripe metrics with Route Receipts decision logs to show trends and regressions. For strategy context and ROI framing, see Why Did We Build Route Receipts? which explains common operational inefficiencies Route Receipts addresses.
What are common troubleshooting steps? 🔍
Check the Dashboard toggle, allowlist membership, and Route Receipts decision logs, then re-run test charges to validate fixes.
- Receipt still sent when it should be suppressed. Confirm Stripe's "Successful payments" toggle is off and Route Receipts is active. If toggle is on, Stripe will send receipts before Route Receipts can block them.
- Remedy: Turn the Dashboard toggle off; re-run a test charge for the affected customer.
- Receipt suppressed when it should be sent. Confirm the customer appears on the Route Receipts allowlist and that metadata keys match your rule syntax.
- Remedy: Add or correct the allowlist entry, then re-trigger a test payment.
- Decision log shows rejection without a clear rule match. Audit overlapping rules or ambiguous metadata values.
- Remedy: Temporarily enable verbose logging in Route Receipts and run the failing scenario; update rule priority to make the intent explicit.
- Duplicate receipts or unexpected manual sends. Check for concurrent systems (billing automation, CRM triggers) that may also send receipts.
- Remedy: Identify and disable secondary senders or centralize send responsibility in Route Receipts.
- Persistent delivery failures for allowed sends. Validate the customer's email on the Stripe customer record and check for bounced addresses recorded by Stripe.
- Remedy: Update the customer email and instruct support to confirm receipt delivery with the customer.
⚠️ Warning: Don’t change allowlist rules in production without a short maintenance window and a rollback plan. Mistakes can create missing receipts for enterprise customers who require them for compliance.
If you need implementation templates or troubleshooting examples, consult our Documentation for common failure modes and the no-code troubleshooting checklist.
Frequently Asked Questions
This FAQ answers the operational, testing, and compliance questions Stripe admins ask about selective receipt sending with Route Receipts. Use these responses to avoid common rollout mistakes and to create a reproducible pilot and audit plan before broad deployment.
Can I manage receipt allowlist in Stripe without Route Receipts? ❓
Yes. You can manage an allowlist using customer metadata, internal spreadsheets, or a separate database table. These methods work for small volumes but require frequent manual updates and create risk of missed or duplicate emails. For example, a finance team that updates a spreadsheet weekly will still miss purchases made between updates and must reconcile manually. Route Receipts centralizes the allowlist inside the Stripe Dashboard, removes manual reconciliation steps, and writes each decision to an audit log so ops can verify who received a receipt.
Will selective receipt sending affect invoices and tax documents? 🧾
No. Selective receipt sending only controls payment receipt emails; invoices and tax documents remain governed by Stripe invoice settings. If you need receipts and invoices to follow the same rule set, document those rules and test both paths together. Use Route Receipts' decision audit log to correlate a suppressed receipt with a separately issued invoice so your tax and finance teams can reconcile records quickly.
How do I safely test selective receipt sending in production? 🧪
Test selective sending first in Stripe test mode or with a small, low-risk live customer cohort before a full rollout. Create a test customer and run representative payment flows, then inspect Route Receipts' decision audit log to confirm the app applied allowlist rules and did not cause duplicate sends. Run a pilot of 20–50 real transactions and monitor support tickets and email bounces for 48–72 hours before expanding the cohort.
💡 Tip: When testing in live mode, use a dedicated corporate test account and tag transactions with a consistent metadata flag so you can filter logs and avoid accidental customer-facing sends.
What should I do if a customer requires receipts sent to a corporate address? 📨
Record the corporate address in the customer's contact fields or the allowlist entry and set a Route Receipts rule to override the default destination. Add an internal note explaining why the override exists and include the rule in your audit log entry for that customer. This creates a clear trail for finance and compliance teams and prevents the support burden of ad-hoc resends when expense teams request documentation.
Are there compliance risks when suppressing receipts? ⚖️
Yes. Suppressing receipts can create gaps for expense reporting, vendor audits, or tax documentation for certain customers. Mitigate this by keeping exportable decision logs, defining retention and resend policies, and offering a documented request path for customers to get suppressed receipts. Route Receipts writes each send or suppress decision to the audit log, which your finance team can export to meet audit or reconciliation requests.
⚠️ Warning: Do not suppress receipts for customers or jurisdictions that require automated transactional records for tax or legal compliance unless your finance team has approved the retention and resend process.
What support is available during Route Receipts setup? 🛟
Route Receipts provides Marketplace installation, a step-by-step setup guide, a knowledge base, and an in-dashboard audit log for verification. Follow our setup documentation to configure toggles, import an allowlist, and validate decision logs during test mode. If you prefer a no-code walkthrough, see our no-code routing guide for step-by-step instructions and common troubleshooting scenarios.
Related resources: no-code routing guide, why we built Route Receipts, and the full setup documentation.
Final admin steps to control receipt distribution from the Stripe Dashboard.
The core takeaway: set clear allowlist rules, test with a small batch, and use dashboard-native tools to avoid one-size-fits-all receipt blasts. For practical next steps, start by creating an allowlist for customers who need receipts and validate with a test charge. This reduces finance inbox noise and lowers the risk of sending unnecessary communications.
💡 Tip: Start your allowlist with enterprise accounts and high-volume customers, then expand as you confirm routing rules.
RouteReceipts is a specialized application designed to enhance the way businesses manage their Stripe receipt distribution. It integrates into the Stripe dashboard so teams can manage an allowlist without custom webhooks, keeps an audit log for decisions, and removes manual routing work. For hands-on setup, see the no-code walkthrough in our guide to routing customer receipts in Stripe or follow the step-by-step no-code limiting guide.
Install RouteReceipts from the Stripe Marketplace and follow the getting-started guide to create your first allowlist. Subscribe to our newsletter for implementation tips and updates on Stripe Dashboard Integration & Controls.