Stripe Receipt Controls for WordPress Forms (2026 Pillar): Gravity Forms v6.x, Typeform, and WP Simple Pay — Exact Settings to Stop Duplicate Emails
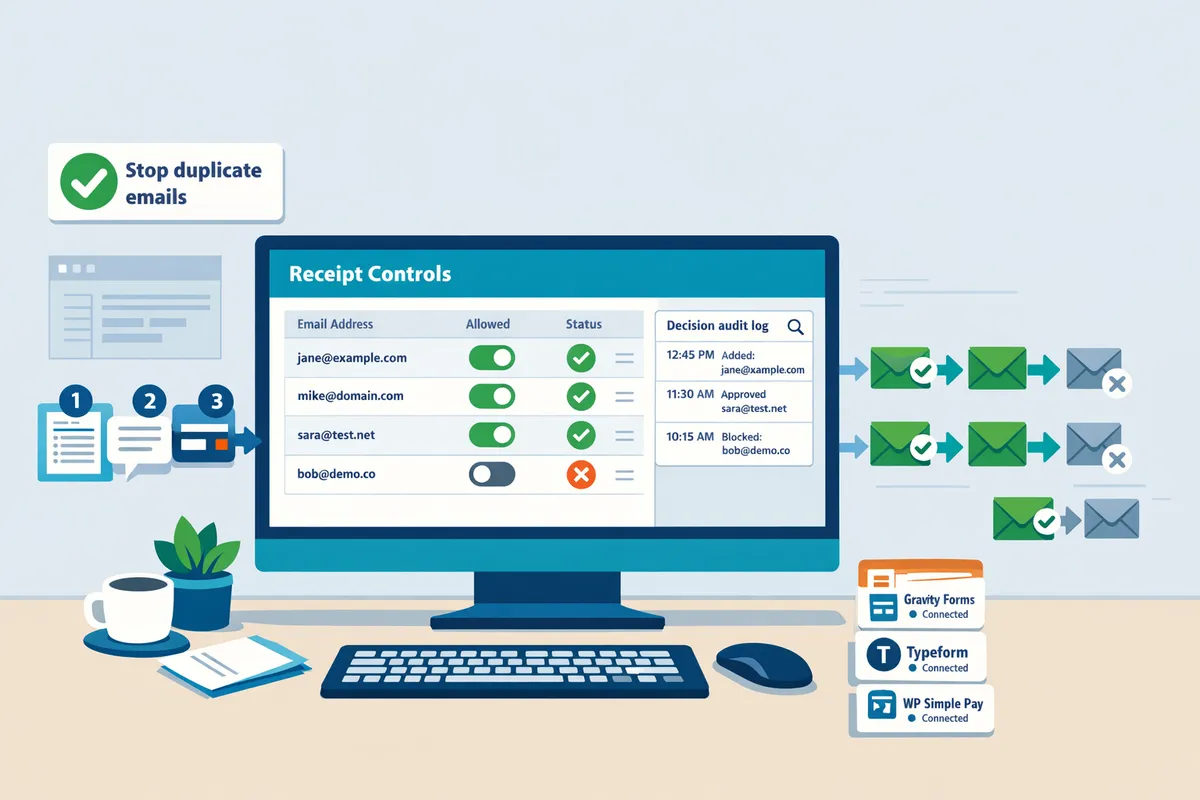
One purchase can generate two Stripe emails when a form plugin and Stripe both send receipts for the same payment. Gravity Forms Stripe receipt duplicate emails is a routing issue that happens when Gravity Forms v6.x and Stripe each trigger the same receipt for a transaction. Our website's best-practices guide shows the exact Gravity Forms and Stripe settings to stop those duplicates and reduce support workload. RouteReceipts offers a dashboard-native solution that uses an allowlist to control which customers get Stripe invoice emails, so you avoid blanket receipts and unnecessary messages. Follow our step-by-step RouteReceipts setup guide and FAQ to fix the common toggles that cause duplicates, and see which setting most sites miss.
Why do Gravity Forms and Stripe send duplicate receipt emails, and who owns the receipt?
Duplicate receipts occur when both Stripe and your form or payment plugin send a customer-facing email for the same charge. You must pick a single owner for post-payment receipts (Stripe or the form/plugin) and then configure both systems to avoid overlap. RouteReceipts can help teams keep Stripe automatic receipts enabled for only selected customers while the form plugin handles the rest; see the RouteReceipts FAQ for setup options.
Which system owns the final receipt? 📩
Either Stripe or the form/plugin owns the final receipt; pick one owner and enforce it across systems to prevent duplicates. For many stores the simplest rule is: let the system that already controls customer records send the receipt. Example: if you use Gravity Forms to collect billing contacts and you want receipts to include form-specific data, set Gravity Forms notifications as the owner and disable Stripe automatic receipts. Conversely, if you want receipts standardized from Stripe and selectively sent to finance contacts, keep Stripe as the owner and use RouteReceipts to restrict which customers receive Stripe-sent emails. Choosing ownership reduces support tickets caused by customers receiving two receipt emails with different templates.
How Stripe automatic receipts work 🧾
Stripe automatic receipts are emails Stripe sends when the account setting for receipts is enabled in the Stripe dashboard. This setting lives under the Business settings > Email receipts (Stripe Dashboard) and controls whether Stripe sends receipt emails for one-off charges and invoices. Turning the setting off stops Stripe from sending receipts for all customers, so you must ensure your form/plugin will reliably send a receipt, or use RouteReceipts to keep automatic receipts on but route them only to an allowlist of customers. When you change this setting, test in Stripe test mode with a representative transaction and check both the Stripe log and your WordPress notification log to confirm a single email is delivered.
💡 Tip: When toggling Stripe automatic receipts, run 5–10 test transactions in test mode across both Card Element and legacy setups to confirm a single receipt arrives.
How Gravity Forms, WP Simple Pay, and Typeform send emails 🔔
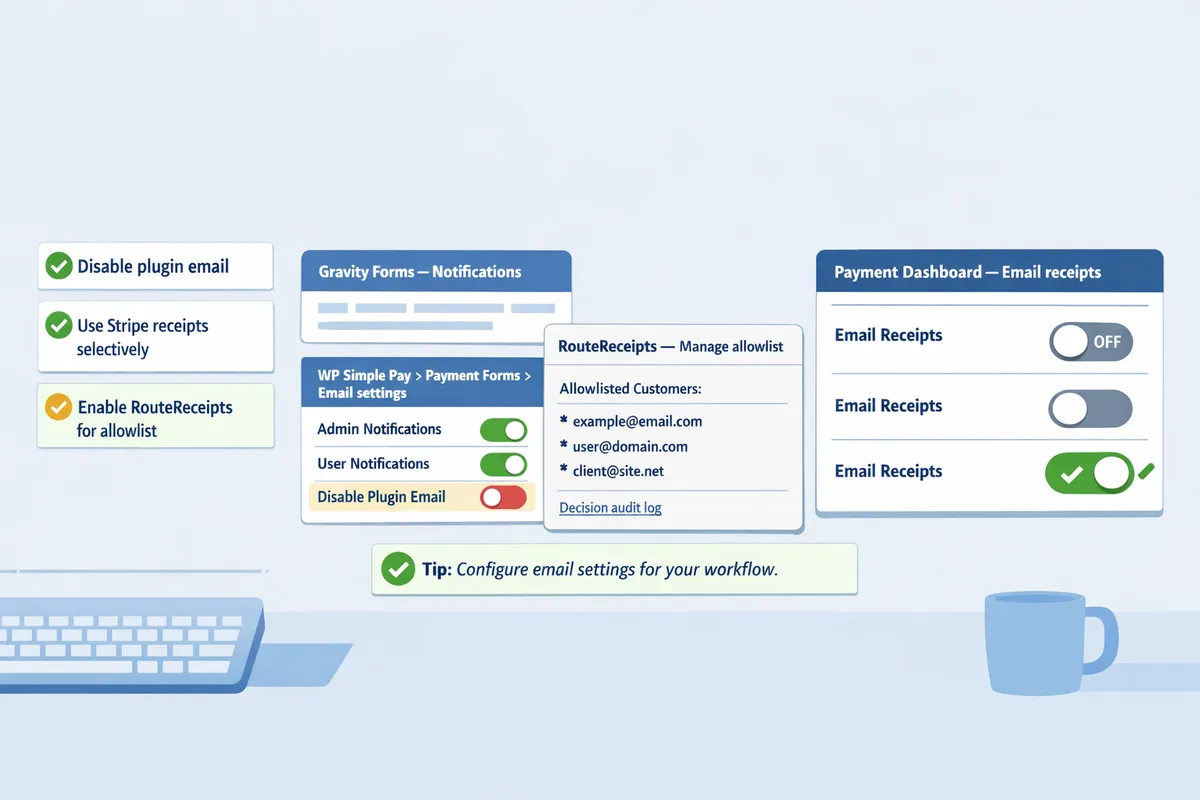
Gravity Forms and WP Simple Pay send notifications from WordPress; Typeform usually forwards payment events via webhooks that trigger external emails. Gravity Forms v6.x with the Stripe add-on can submit payments via the Card Element or legacy elements. Card Element often completes payment client-side and relies on Stripe webhooks for final confirmation; that creates duplicates if Gravity Forms also sends a payment notification on form submission. Legacy elements sometimes process server-side and behave differently, which is why duplicated or nested feeds and duplicated forms frequently cause double sends. WP Simple Pay has a built-in email option that you can disable in the plugin settings; disabling it and relying on Stripe is a common pattern. Typeform normally posts to a webhook endpoint that your service or Zapier can use to send receipts; if you also enable Stripe automatic receipts without filtering, customers get two messages.
Practical steps: 1) Decide the owner. 2) If Gravity Forms is the owner, disable Stripe automatic receipts or use RouteReceipts to block Stripe for non-allowlisted customers. 3) If Stripe is the owner, disable Gravity Forms/WP Simple Pay email notifications for payment events and rely on webhooks for any custom emails. See the RouteReceipts documentation for a no-code approach to keep Stripe automatic receipts enabled but limited to selected customers.
Comparison: Gravity Forms v6.x vs Typeform vs WP Simple Pay (receipt behavior) 📊
The three tools differ by default sender, common duplicate causes, and where you change the setting to stop duplicates.
| Product | Default receipt sender | Typical cause of duplicates | Recommended setting to stop duplicates | Where to change it (UI) |
|---|---|---|---|---|
| Gravity Forms v6.x (with Stripe add-on) | WordPress notification or Stripe (if automatic receipts enabled) | Card Element + GF notification on submission; duplicated feeds or cloned forms firing twice | Choose owner: disable GF payment notification or disable Stripe automatic receipts; use RouteReceipts to allowlist if you need Stripe to send to some customers only | Form Settings > Notifications; Stripe add-on feed settings in Gravity Forms; Stripe Dashboard > Email receipts |
| Typeform | External webhook/email service (Typeform forwards payment events) | Typeform webhook sends a plugin or Zapier email while Stripe automatic receipts are also enabled | Turn off plugin/Zapier email or disable Stripe automatic receipts; use RouteReceipts to keep Stripe receipts for a subset of customers | Typeform Connectors / Webhooks; external service (Zapier) settings; Stripe Dashboard > Email receipts |
| WP Simple Pay | WP Simple Pay email (WordPress) or Stripe (if automatic receipts enabled) | WP Simple Pay notification plus Stripe automatic receipts, or duplicate sends when subscription and invoice receipts both fire | Disable WP Simple Pay email for payments and rely on Stripe, or disable Stripe and use WP Simple Pay; use RouteReceipts when you need selective Stripe delivery | WP Simple Pay > Payment Forms > Email settings; Stripe Dashboard > Email receipts |
For a guided setup that keeps Stripe automatic receipts available only to chosen customers while your form plugin handles the rest, consult the RouteReceipts documentation and the RouteReceipts FAQ. For background on why selective routing matters and how we built the tool, read Why Did We Build Route Receipts?
How can you prevent duplicate Stripe receipt emails: proven strategies and exact settings?
Assign receipt ownership, run a short root-cause checklist, and apply the exact plugin plus Stripe toggles described below to stop duplicates fast. Follow the decision tree to determine whether Stripe or your form sends each email, then apply the specific settings for Gravity Forms v6.x, Typeform, or WP Simple Pay. When you need selective delivery instead of a global disable, RouteReceipts gives a dashboard-native allowlist you can configure quickly.
Decision tree and quick checklist for root-cause identification 🔎
Start with a single question: which system created the second email. Inspect the email headers and the first line of each receipt to determine whether Stripe or your form/plugin generated it. Use these eight quick checks in order:
- Confirm test vs live mode. Charges in test mode send test receipts; live mode sends production receipts.
- Check email headers (Message-ID, X-Stripe-Event, and Return-Path) to see which system originated the message.
- Verify plugin notification settings: user notification and admin notification toggles.
- Check Stripe Dashboard > Business Settings > Email receipts to see if automatic receipts are enabled.
- Review webhook logs in Stripe for duplicate delivery events or retry attempts.
- Look for duplicated forms, cloned feeds, or nested multi-form flows that trigger two feeds.
- Audit third-party automations (Zapier, Make, customer.io) that may send a copy.
- Reproduce the flow end-to-end in live mode with a unique email to confirm the fix.
💡 Tip: Run step 2 (email headers) before toggling settings; headers reveal the sender without changing production behavior.
Link to our troubleshooting docs for a downloadable checklist and webhook log examples in the Documentation: https://routereceipts.app/docs.
Exact Gravity Forms v6.x settings: Card Element vs legacy elements ⚙️
Pick one owner for receipts. For Card Element setups, Stripe usually sends the charge event while Gravity Forms sends its own notification; for legacy elements the plugin may handle the full flow.
Card Element (recommended flow).
- In Gravity Forms, open the form > Settings > Notifications. Turn off the form notification you do not want to send (commonly the second customer-facing notification).
- In the Stripe feed for that form, set feed priority so only the primary feed runs on payment completed. Use one feed per payment action.
- Do not disable Gravity Forms user notifications unless you intend Stripe to be the single source of receipts.
- In Stripe Dashboard, disable automatic email receipts only after confirming Gravity Forms notifications cover required data fields.
Legacy Stripe Elements (common duplicate source).
- In Gravity Forms, disable duplicate user notifications: set "Send To" to the field containing the payer email and turn off any additional customer-facing notifications.
- Set feed priority to ensure only one feed matches a submission (move unnecessary feeds to a lower priority).
- If you prefer Stripe to own receipts, disable Gravity Forms user notifications and keep Stripe automatic receipts enabled in the Dashboard.
⚠️ Warning: Changing Stripe automatic receipts affects all charges for the account. Test with a single live card and a unique email before applying account-wide changes.
Each step above maps to the duplication causes listed in the decision tree; if you need selective delivery rather than disabling Stripe globally, see RouteReceipts for allowlist workflows. See our FAQ for more on how RouteReceipts works: https://routereceipts.app/faq.
Typeform mapping and webhook tips for receipt control 🧭
Typeform Stripe receipt webhook email mapping often creates duplicates when Typeform and Stripe both send an email for the same charge. Map webhooks so a single system handles the customer-facing message.
- In Typeform, open the form > Connect > Stripe. Inspect the webhook mapping: if Typeform includes an "email" field and is configured to send a receipt, it will trigger a second email.
- Choose one path: either let Typeform send its confirmation and disable Stripe automatic receipts, or disable Typeform confirmations and let Stripe send receipts.
- If webhooks forward payment events to a CRM or Zapier, ensure the webhook does not include an extra email-send action.
- Test by submitting a live-mode transaction with a unique email and check headers to confirm the source.
For complex stacks where some customers must get the Stripe receipt and others must not, use RouteReceipts to allowlist those customers in the Stripe Dashboard rather than toggling Typeform or Stripe globally. Install and configure via our docs: https://routereceipts.app/docs.
WP Simple Pay exact steps to disable duplicate Stripe receipts 🛠️
WP Simple Pay can either send its own emails or rely on Stripe automatic receipts; pick one to avoid duplicates. The safest test sequence is configure in staging, then run a live transaction with a unique email.
- In WP Admin, go to WP Simple Pay > Settings > Emails. Toggle off the customer receipt if you want Stripe to send receipts.
- Alternatively, leave WP Simple Pay emails on and disable Stripe automatic receipts in the Stripe Dashboard.
- If you disable Stripe receipts, confirm WP Simple Pay includes charge ID and tax line items required for accounting.
- Run this live test sequence: enable setting, submit a live $1 charge, inspect the email headers and the Stripe charge record, then revert only if results match expected ownership.
Documented UI paths and testing examples live in our WP Simple Pay guide inside the Documentation: https://routereceipts.app/docs. Use "WP Simple Pay disable emails Stripe receipt" search terms in our docs to find the exact admin paths quickly.
When to use RouteReceipts instead of disabling Stripe globally 🔐
Use RouteReceipts when you need selective receipt delivery for specific customers or segments without changing Stripe's global receipt behavior. RouteReceipts is an app that routes Stripe invoice receipts based on an allowlist, so you can keep Stripe automatic receipts on while preventing most customers from receiving them.
Use cases where RouteReceipts is the right choice:
- Enterprise customers require receipts for expense reconciliation while retail customers opt out.
- You run multiple integrations (Typeform, Gravity Forms, WP Simple Pay) and cannot reliably change all notification settings without breaking workflows.
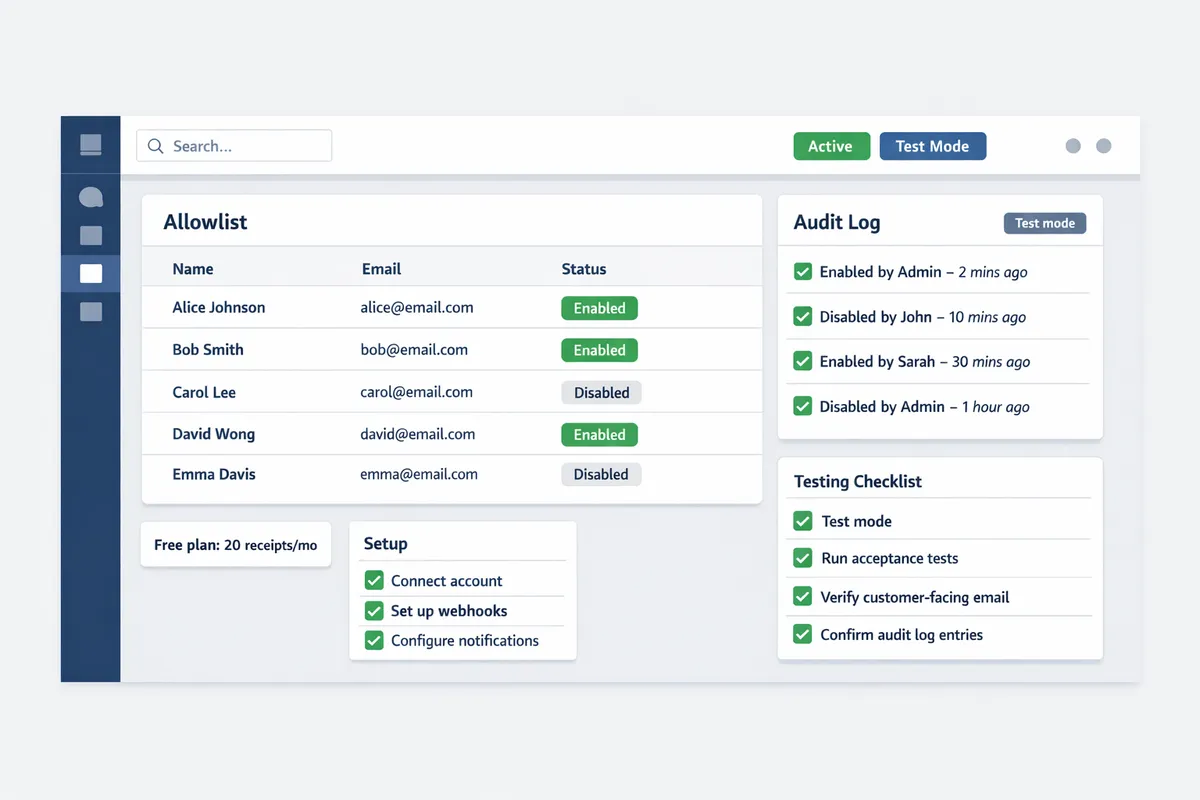
- Compliance or audit teams need an audit trail of which receipts were allowed; RouteReceipts records decisions in a dashboard-native audit log.
RouteReceipts installs from the Stripe Marketplace and configures an allowlist in minutes; our Documentation covers installation, testing, and rollback steps. RouteReceipts offers a free plan with up to 20 receipts per month for small-volume tests—see our pricing and setup in the Documentation: https://routereceipts.app/docs. For background on why selective routing matters and the product rationale, read Why Did We Build Route Receipts: https://routereceipts.app/blog/why-did-we-build-route-receipts.
How do you implement fixes, test changes, and verify that duplicates are gone?
Implement fixes in Stripe test mode first, run a defined acceptance test plan, and verify routing decisions using both customer-facing checks and Route Receipts' audit log. Testing prevents accidental message loss and proves which system owns receipts for each flow. Follow the checklist below, run the test cases, then move changes to live only after you meet the pass criteria.
Step-by-step test plan and measurable success criteria ✅
Run a 6-step test plan in Stripe test mode and require no duplicate receipts across 25 consecutive test transactions.
- Switch your Stripe account to test mode and confirm Gravity Forms v6.x, WP Simple Pay, or Typeform are using test keys.
- Disable automatic production changes: keep live mode untouched until tests pass.
- Execute these sample test cases and record results for each transaction:
- Card Element (Gravity Forms v6.x). Acceptance: one receipt only, sender matches your chosen owner, and email headers show the expected From address.
- WP Simple Pay checkout. Acceptance: plugin email appears if you chose plugin ownership; otherwise Stripe receipt appears once.
- Typeform payment with Stripe integration. Acceptance: Typeform webhook mapping results in one receipt and correct customer email. Use the long-tail Typeform Stripe receipt webhook email mapping test data.
- Nested or duplicated forms scenario. Acceptance: duplicate form submissions do not create multiple receipts.
- Test vs live mode toggle. Acceptance: test mode behaves identically to expected live setup.
- Edge case: failed payment retried then succeeds. Acceptance: only the final successful charge triggers a single receipt.
- Run 25 transactions across those cases (mix of card types and customer emails). Pass criteria: zero duplicate receipts observed and correct sender in headers for all 25.
- Verify Stripe dashboard flags. Check the payment record for receipt_sent and invoice fields to ensure the system recorded a single receipt.
- Export test evidence (email headers, Stripe event IDs, Route Receipts audit log entries). Keep this export with your release notes.
Record pass/fail per transaction using a simple spreadsheet with columns: timestamp, plugin/form, Stripe event ID, receipt sender, duplicate? yes/no, Route Receipts decision ID.
Using Route Receipts' decision audit log for validation 🧾
Route Receipts' decision audit log records whether a receipt was allowed or blocked and the rule that caused that decision.
Open the Route Receipts dashboard and filter the audit log by Stripe event ID, customer email, or timestamp to find the exact routing decision for each test charge. Each entry shows the decision (allowed or blocked), the reason (allowlist match, global rule, or manual override), and the Stripe event ID you can cross-reference in the Stripe dashboard.
Use the audit log to prove causality: match the email header's Message-ID and timestamp to the Route Receipts entry and the Stripe event ID. If the audit entry says blocked but an email arrived, that indicates a non-Route Receipts path (for example, your plugin still sending post-payment notifications). Consult the Route Receipts documentation for field definitions and common troubleshooting steps: https://routereceipts.app/docs. Also review the FAQ for install and allowlist behavior details: https://routereceipts.app/faq.
Rollback and mitigation steps if tests reveal missing receipts ⚠️
If a test shows missing receipts, revert to the previous routing configuration immediately and use a narrow allowlist while you troubleshoot.
- Revert changes: re-enable the prior Stripe receipt setting and your plugin notification settings from the backup of your configuration.
- Use a temporary allowlist: add a small set of internal test emails or finance team addresses to Route Receipts so receipts continue to flow to those accounts while you debug.
- Validate delivery for critical customers: run a small batch of live transactions to the allowlisted addresses before re-opening receipts broadly.
- Communicate proactively: if customers likely missed receipts, send a short, clear message explaining the issue and include the payment ID and invoice link.
⚠️ Warning: Do not flip global receipt rules in live mode without a rollback plan and a customer communication template ready. Missing receipts can cause support tickets and reconciliation gaps.
If you need troubleshooting pointers, our documentation covers common misconfigurations and how routing decisions are made: https://routereceipts.app/docs.
Copy-ready notification templates and implementation checklist ✉️
Provide concise notification copy and a final checklist to replace Stripe receipts when you choose plugin-managed emails.
Sample subject lines and body requirements (include these fields in every plugin email):
- Subject: Payment received: [Company] invoice #[INVOICE_ID]
- Minimum required metadata to include: payment ID, invoice or receipt link, last 4 of card, payment date, customer support contact.
Template (short): Subject: Payment received: invoice #[INVOICE_ID] Body: We received payment of [AMOUNT] for invoice #[INVOICE_ID] on [DATE]. Payment ID: [PAYMENT_ID]. View receipt: [INVOICE_LINK]. Questions? Reply to this email or contact billing@[YOURDOMAIN].
Implementation checklist before enabling in production (numbered):
- Confirm test mode: all tests passed (25 transactions, zero duplicates).
- Export evidence: email headers, Stripe event IDs, Route Receipts audit logs.
- Update plugin notifications: include required metadata and consistent From address.
- Configure Route Receipts allowlist and rules per your ownership decision.
- Staged rollout: enable for 10% of live traffic or a small customer cohort.
- Monitor for 48 hours: check support queue and audit logs for missed receipts.
For step-by-step setup, allowlist examples, and no-code routing options, see our beginner's guide and docs: https://routereceipts.app/blog/the-nocode-way-to-route-customer-receipts-in-stripe-beginners-guide-to-selective-delivery and https://routereceipts.app/docs.
Frequently Asked Questions
This FAQ answers the operational and configuration questions most site owners face when Gravity Forms, Typeform, or WP Simple Pay produce duplicate Stripe receipt emails. Use the checklist and links below to triage duplicates fast, decide which system should own receipts, and test changes safely.
Why am I getting duplicate receipt emails from Gravity Forms and Stripe? 📨
You get duplicates because both Stripe and your form plugin are configured to send customer-facing emails for the same charge. Check the full email headers to see which system generated each message (Stripe receipts usually show "Stripe" in the body and headers). Typical root causes include: the Gravity Forms Stripe feed and Stripe automatic receipts both enabled; a form notification sending a separate payment confirmation; or a webhook-based automation re-sending a receipt.
Actionable steps.
- Inspect one duplicate pair's headers to identify the sender and timestamp.
- Open Gravity Forms → Forms → Notifications and confirm whether the payment notification is enabled for that form and feed.
- Check Stripe Dashboard customer email settings and note whether automatic receipts are active.
- Pick one owner (Gravity Forms or Stripe) and disable the other. If you need selective sending, install Route Receipts and build an allowlist. See RouteReceipts documentation for setup and routing logic.
💡 Tip: When troubleshooting, test in Stripe test mode and use the same customer email to reproduce the exact routing behavior.
Does Stripe always send receipts even when my plugin sends an email? 📧
Stripe will send receipts when automatic receipts are enabled in your Stripe account, regardless of whether your plugin also sends an email. That means leaving Stripe automatic receipts on can create duplicates even if your plugin sends a well-formed payment confirmation.
What to do next.
- Decide whether Stripe or your plugin should own receipts for each product line or customer segment.
- To keep Stripe receipts off for most customers, disable automatic receipts in the Stripe Dashboard or use Route Receipts to allowlist only the customers who should receive Stripe emails. See RouteReceipts' FAQ for installation and allowlist examples.
- Validate in test mode and log sample headers to confirm only one system sends the receipt.
How do I stop duplicate receipts for WP Simple Pay specifically? ⚙️
Stop duplicates in WP Simple Pay by disabling Stripe automatic receipts or by turning off WP Simple Pay's customer emails, then validating the change in Stripe test mode. The specific toggle depends on which side you choose as the receipt owner.
Exact sequence (safe test-first approach).
- Switch Stripe to test mode and use WP Simple Pay test API keys.
- In Stripe, open Email receipts or Customer emails and toggle off the automatic receipt type you do not want to send.
- In WordPress, open WP Simple Pay settings or the individual payment form settings and disable the payment receipt/customer email option if you chose Stripe as the owner.
- Run 5–10 test transactions across card types and confirm no duplicates appear. If you need selective delivery instead of a global off, install Route Receipts and configure an allowlist for the customers who still need Stripe receipts.
Use the keyword WP Simple Pay disable emails Stripe receipt when searching plugin docs or support threads to find the exact UI label for your WP Simple Pay version.
Can Typeform webhooks cause extra receipt emails and how do I fix mapping? 🔁
Yes. Typeform webhooks or downstream automations (Zapier, Make, Integromat) can cause additional receipts if the automation creates a Stripe charge and also triggers an email. The extra send often comes from an automation step that sends a confirmation separate from the plugin and Stripe.
How to fix mapping and stop duplicates.
- Audit your Typeform integrations: open Typeform → Connect → Webhooks and list all endpoints. Identify automations that call Stripe or an email service.
- Find the automation step that sends a receipt and disable it, or change the mapping so the automation only sends metadata to Stripe rather than a customer-facing email.
- Test with a single Typeform submission that triggers the full flow. Check both the automation log and Stripe test logs to confirm only one receipt is generated.
- If you still need selective Stripe receipts based on Typeform answers (for example, B2B clients only), use Route Receipts to apply an allowlist after the charge is created. See our guide to Typeform Stripe receipt webhook email mapping for example mappings and test cases.
Will Route Receipts require code or custom webhooks to work? 🔐
No. Route Receipts installs via the Stripe Marketplace and uses a dashboard-native allowlist so most setups require no code or custom webhooks. According to RouteReceipts' documentation, you configure routing through the Stripe UI and the app's dashboard, and the app logs each routing decision for audit.
What that means in practice.
- Install Route Receipts from the Stripe Marketplace and follow the no-code onboarding in the RouteReceipts documentation.
- Create an allowlist using customer emails or Stripe customer IDs. The app will block or allow Stripe's automatic receipts per your rules without adding webhooks to your site.
- Use the decision audit log to validate routing and troubleshoot any missing receipts. For background on why this approach was built, read Why Did We Build Route Receipts.
How can I prove the fix worked to stakeholders? 📊
You prove the fix with a short acceptance test report that includes a test matrix, raw email headers, timestamps, and Route Receipts audit-log entries showing which receipts were routed. Those artifacts provide both technical proof and an audit trail for finance or compliance teams.
Suggested acceptance test matrix and evidence checklist.
- Test cases: Card Element vs legacy element, test mode vs live mode, nested/multi-page forms, duplicated forms, and WP Simple Pay forms. Run 5–10 transactions per case.
- Evidence to collect: screenshot of each transaction in Stripe, the corresponding Route Receipts audit entry, email headers from both messages if duplicates occurred, and timestamps showing only one send after the fix.
- Acceptance criteria: 0 duplicates across all cases and matching audit-log entries for each receipt decision.
⚠️ Warning: If you disable Stripe automatic receipts globally without an alternate owner, customers who expect a receipt will not receive one. Use Route Receipts allowlists or plugin notifications to preserve required receipts.
Prevent duplicate Stripe receipts by controlling delivery in plugins and at the Stripe level.
Stopping duplicate emails means turning off redundant receipt settings in your form plugin and disabling Stripe's automatic receipts, then using selective routing for exceptions. If you still see Gravity Forms Stripe receipt duplicates, check Gravity Forms' Stripe feed settings, remove duplicate webhooks, and confirm Stripe's Email customers toggle is off.
💡 Tip: Disable Stripe automatic receipts in the Dashboard before testing plugin changes to avoid repeated messages.
RouteReceipts is a specialized application designed to enhance the way businesses manage their Stripe receipt distribution. Use Route Receipts to create an allowlist for customers who should receive receipts, then install RouteReceipts from the Stripe Marketplace and follow the getting-started guide in the documentation to stop duplicates without custom code. For background on why selective routing matters, see Why Did We Build Route Receipts? and consult the FAQ for common setup questions.
Install RouteReceipts and follow the setup docs to remove duplicate delivery at the source. Subscribe to our newsletter for practical implementation tips and updates.