
Stripe Receipt Distribution and Setup: The Complete 2026 Guide to Settings, EU/UK Compliance, Invoices, and Credit Notes
Stripe's default receipt policy forces businesses to email every customer or none, causing inbox clutter and extra compliance work for finance teams. Stripe receipt distribution is the process that controls which customers receive invoices, payment receipts, and credit-note emails from Stripe. This best-practices guide explains how to configure Stripe receipt distribution for EU and UK invoice and credit note rules and how to use Route Receipts to selectively send emails only to customers who need them. Our Route Receipts setup guide walks through installing the app, disabling Stripe's automatic receipts, and creating an allowlist while our Route Receipts FAQ covers plan limits and troubleshooting. Learn which Stripe settings commonly trigger VAT or credit note errors and how to prevent them.
How do I set up selective Stripe receipt distribution for my accounts?
Disable Stripe's automatic receipt emails and route receipt decisions through Route Receipts by installing the app from the Stripe Marketplace, switching off Stripe Billing's automatic emails, building an allowlist, and validating with test invoices. This approach centralizes delivery rules so finance teams can send receipts only to customers who need them and avoid inbox clutter for others. The steps below show exact dashboard changes, testing checks, and compliance safeguards for EU and UK invoices and credit notes.
What is Route Receipts and how does it fit into Stripe's flow? 🤖
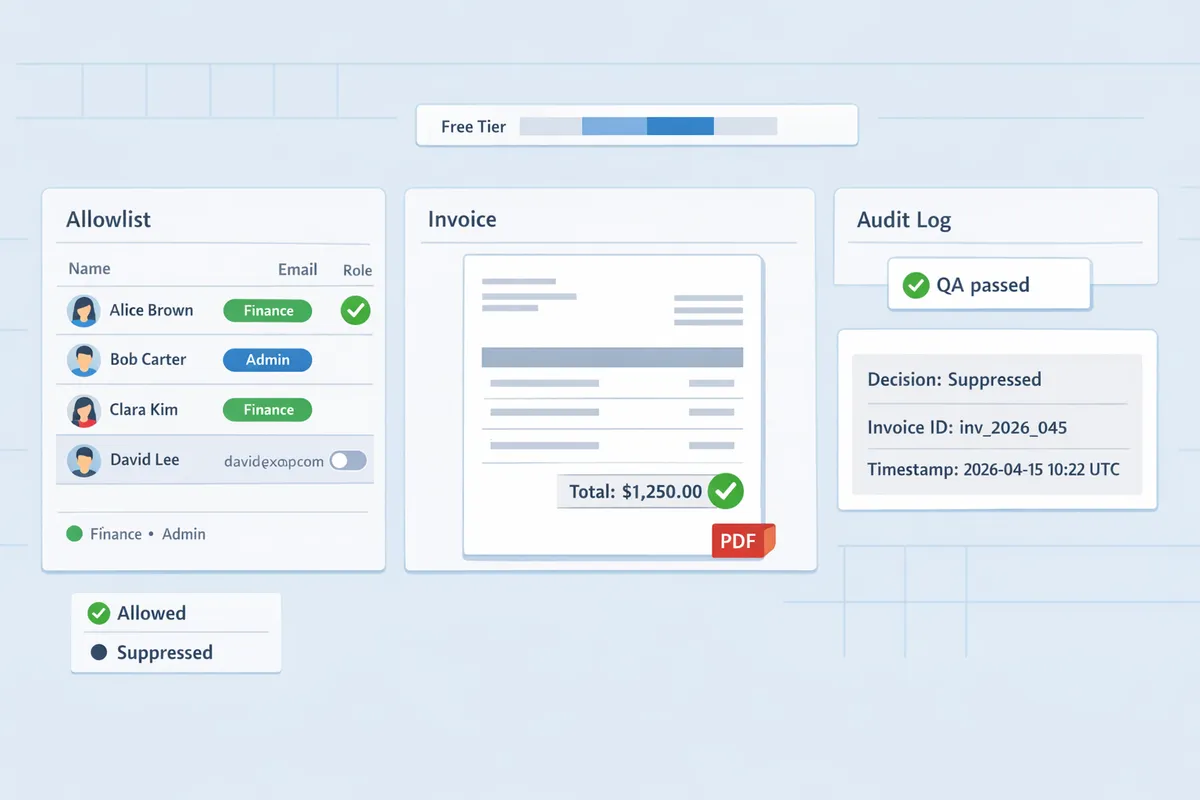
Route Receipts is an application that integrates with Stripe and selectively routes invoice and payment receipts based on an allowlist and configurable rules. According to the Route Receipts documentation, the app listens to Stripe events, evaluates each event against your allowlist and rules, and either issues the receipt email or suppresses it while logging the decision in an audit trail. That audit trail helps finance and compliance teams show who received which documents and why, which matters for audits or chargeback disputes. See the installation and audit-log details in the official Route Receipts documentation for exact event types and permission scopes.
Step-by-step Stripe Receipts setup: install, disable, and configure 🛠️
Install Route Receipts from the Stripe Marketplace, confirm permissions, disable Stripe's automatic receipts, add allowlist entries, and run test invoices to verify routing. Follow these steps exactly:
- Install the app. Go to the Stripe Marketplace and install Route Receipts. Confirm the requested permissions match what's documented. See the full install checklist in the Route Receipts documentation.
- Verify account permissions. Confirm your Stripe account user has admin rights and that Route Receipts has access to Billing and Webhook events.
- Turn off automatic receipts. In Stripe Dashboard > Billing > Settings, disable automatic email receipts for payments and invoices to avoid duplicate messages.
- Create an allowlist. In the Route Receipts dashboard add customer IDs or emails and tag them (for example, "expense-receipts" and "no-email").
- Configure rules. Map receipt sources (Checkout, Invoicing, Subscriptions, Terminal) to allowlist tags so one policy covers multiple receipt origins.
- Run a test. Create a test invoice or Checkout session for a customer on the allowlist and one not on the list. Confirm the allowlist customer receives the receipt and the other does not.
- Check the audit log. Verify each routed or suppressed event appears with a reason code. If you see duplicates, follow the duplicate troubleshooting steps in the Route Receipts FAQ.
For a no-code walkthrough and common pitfalls, read the beginner's setup guide for selective delivery.
Which Stripe products are affected: Checkout, Invoicing, Subscriptions, and Terminal 💳
Route Receipts supports receipt decisions for Checkout, Invoicing, Subscriptions, and Stripe Terminal, so a single allowlist policy governs all these sources. For example, configure a policy that sends invoice PDFs for subscription renewals to enterprise customers while suppressing one-off Checkout payment receipts for end users who opted out. You must disable automatic receipt emails in each relevant Stripe product area; turning off receipts only in Billing does not affect Terminal or some Checkout flows. Create mapping rules in Route Receipts that list event types (invoice.created, payment_intent.succeeded, terminal.reader.receipt) and associate them with allowlist tags so routing is consistent across product lines.
Required fields and EU/UK compliance for invoices and credit notes 📝
EU and UK invoices and credit notes require specific fields such as supplier name and address, invoice date, unique invoice number, VAT registration number where applicable, a clear description of goods or services, tax rate breakdowns, and for credit notes a reference to the original invoice. Missing any legally required field can render the document noncompliant; for example, UK HMRC and most EU countries require a unique invoice number and supplier address on the face of an invoice. When you suppress email delivery for a customer, ensure the stored or downloadable PDF still includes all required fields and tax breakdowns. Route Receipts logs the delivery decision but does not remove required fields from the invoice PDF; confirm your invoice template in Stripe (or your accounting integration) contains the full legal fields before enabling selective routing.
⚠️ Warning: Suppressing a receipt that doubles as a legally required invoice can expose your business to tax or recordkeeping risk. Always validate a country-specific test invoice before rolling selective routing live.
To validate compliance:
- Generate a test invoice in the Stripe Dashboard using the country and tax settings that match the customer.
- Download the invoice PDF and inspect it for the mandatory fields listed above.
- Confirm Route Receipts routed or suppressed the email as expected and that the audit log contains the decision and the invoice ID.
For exact field lists and examples per country, consult the Route Receipts documentation and the FAQ on required invoice fields.
What proven strategies ensure accurate, compliant, and branded receipt routing?
Use allowlists, recipient-role rules, branded sender identity, localized templates, and staged QA tied to audit logs to make sure receipts reach the right people and meet regional rules. These controls prevent unnecessary inbox traffic for consumers and guarantee enterprise billing teams get the invoice evidence they need. The remainder of this section shows specific allowlist patterns, branding setup, EU/UK formatting examples, a QA checklist, and a direct feature comparison that highlights where Route Receipts reduces manual work.
Allowlist patterns and multi-recipient routing 🧾
Allowlists and recipient-role rules let you send receipts only to designated contacts or departments, and they support routing to multiple recipients when required. An allowlist is a list that specifies which customer IDs, domains, or contact roles should receive receipts. For enterprise clients, map the company customer ID or their email domain (for example, customer_123 or @clientcorp.com) to an "expense" allowlist so accounts-payable@clientcorp.com and billing@clientcorp.com both receive receipts while the end user does not. Use role-based entries for cases where a single customer has both an end-user and an AP contact. Route Receipts provides a dashboard-native allowlist editor so you can add, remove, and audit rules without engineering work.
Example pattern set.
- Company-level: customer_123, customer_456.
- Domain-level: @clientcorp.com, @enterprise.co.
- Role-level: accounts-payable@client.com, expense@client.com.
For setup steps, follow our Route Receipts documentation for creating allowlist entries and testing rule precedence. Our No-Code guide shows how to define multi-recipient rules without custom webhooks.
💡 Tip: Prefer domain-level allowlist entries for enterprise clients that use multiple contact emails. Domain rules cut manual upkeep when contacts change.
Branding and sender identity configuration ✉️
Set a consistent sender name, reply-to address, and logo per business unit so receipts match corporate identity and accounting expectations. Route Receipts lets you map branded templates to specific business units or product lines so the sender name and reply-to match the inbox your accounting team monitors. Configure a stable reply-to such as finance@yourcompany.com to avoid lost replies and to ensure automated reconciliation systems recognize the sender. Include a clear logo (PNG or SVG) at the top of the receipt and a legal footer with your company registration or VAT number when needed.
Concrete steps.
- Create a branded template per business unit in the Route Receipts dashboard.
- Set the sender name and reply-to to your finance mailbox for invoice-related receipts.
- Add logo and a short legal footer tailored to the jurisdiction.
If you need visual examples, see our blog post on selective delivery for template ideas and common template mistakes that cause bounced replies.
Localization and regional formatting for EU/UK and other markets 🌍
Localize language, currency formatting, tax lines, and required legal text for each jurisdiction to remain compliant with EU and UK invoice rules. For the UK, include VAT registration number and a separate VAT line that shows taxable amount, VAT rate, and VAT amount. For EU invoices, present VAT rates and, when required, a reverse-charge note or customer VAT ID. When issuing a refund, attach the credit note reference and the original invoice ID on the receipt so accounting teams can match transactions.
Example templates and metadata.
- UK invoice: "Taxable amount: £1,000.00 | VAT 20%: £200.00 | VAT reg. no: GB123456789."
- EU invoice with reverse charge: include the phrase "VAT reverse charge applies" and the buyer VAT ID where applicable.
Route Receipts supports per-region templates so you can auto-choose language and tax lines based on invoice metadata from Stripe. See our Documentation for mapping invoice fields to localized templates.
⚠️ Warning: Avoid putting full personal identifiers like national ID numbers in email bodies unless your legal team has approved the practice and you have documented consent.
Testing and QA checklist before going live ✅
Run staged tests for every receipt source, verify required fields for each jurisdiction, and confirm allowlist behavior before switching off manual controls. Use a structured QA checklist that covers creation, delivery, bounce handling, and audit-log verification.
Staged QA checklist (step-by-step).
- Disable Stripe automatic receipts in a staging account to prevent duplicates. See our FAQ for guidance.
- Install Route Receipts in the staging environment and add representative allowlist entries.
- Create test customers that match enterprise domains, consumer emails, and role-based contacts.
- Generate test invoices, including VAT and credit-note scenarios, and send receipts to the allowlist and to non-allowlist addresses.
- Confirm multi-recipient delivery by verifying both AP and primary contacts receive the email and that reply-to works.
- Simulate bounced emails and confirm the delivery handling path and notifications.
- Review the Route Receipts decision audit log for each test case to confirm the rule applied and the timestamp.
- Record any missing fields and iterate on templates until each jurisdiction's required lines appear on the receipt.
For practical examples and a no-code testing flow, consult our beginner's guide to selective delivery and the Route Receipts documentation.
💡 Tip: Include at least one test case per country you bill to. VAT presentation rules vary and a single missed field can delay reconciliation.
Monitoring and metrics to measure delivery and business impact 📊
Track receipt send rate, bounce rate, suppressed-receipt count, and support requests tied to receipts to measure success and spot regressions. Use Route Receipts' decision audit log to link a routing decision to a specific receipt send or suppression and export those entries to your analytics stack for trend analysis.
Key metrics to capture:
- Receipt send rate: percentage of invoices that produced a routed email when expected.
- Bounce rate: hard/soft bounces reported by your ESP after a receipt send.
- Suppressed-receipt count: receipts intentionally withheld by allowlist rules.
- Support requests attributable to receipts: ticket volume and time-to-resolution after receipt issues.
Operational practices:
- Create alerts for weekly bounce-rate changes and sudden spikes in suppressed receipts.
- Correlate audit-log entries with CRM records to confirm the correct recipient got the receipt.
- Export Route Receipts decision logs to your data warehouse for quarterly ROI reporting on reduced reconciliation time. For setup details on exporting logs, consult the Documentation.
💡 Tip: Tag receipt-related support tickets in your helpdesk so you can measure reductions in manual reconciliation after routing rules change.
Troubleshooting playbook: missing receipts, duplicates, and bounced emails 🛠️
Always follow a consistent, documentable sequence to troubleshoot receipt failures: verify Stripe settings, confirm allowlist rules in Route Receipts, check decision-audit entries, inspect ESP delivery reports, then re-send when appropriate. This sequence prevents wasted time and avoids accidental duplicate sends.
Step-by-step playbook:
- Verify Stripe settings. Confirm Stripe Billing's automatic emails are disabled to prevent duplicate sends. The Documentation lists the exact setting.
- Check allowlist rules. Confirm the customer’s ID or email matches an allowlist entry and that the rule’s scope (invoices vs. credit notes) is correct.
- Inspect the Route Receipts decision audit log. Find the specific routing decision and the reason code shown in the log to see why a receipt was sent or suppressed.
- Review ESP delivery reports. Look for hard vs. soft bounces, DNS/SPF issues, or mailbox-level blocks.
- Manual re-send. If the audit log shows suppression in error, re-add the recipient or trigger a manual send from Stripe after correcting the rule.
End-to-end QA before going live:
- Create representative test customers for every receipt type: invoice, credit note, subscription invoice, and $0 invoices.
- Walk the entire path: create invoice → Route Receipts decision → ESP delivery report → audit-log entry → CRM update.
- Record a QA checklist entry for each step and sign off before scaling.
⚠️ Warning: Do not include unnecessary personal or sensitive health data in receipt emails. Treat recipient data as finance information and follow your privacy policy and Route Receipts' privacy documentation.
Integrations and automation: CRMs, ESPs, and accounting systems 🔗
Integrate Route Receipts events with your CRM, email service provider, and accounting system to automate status updates and cut manual reconciliation time. Common integration outcomes include marking an invoice as emailed in the CRM, creating an AP-ready record in accounting software, and triggering branded delivery via your ESP.
Practical integration workflow (example):
- Route Receipts writes a decision event when a receipt is routed or suppressed.
- Send that event to your integration middleware or webhook consumer.
- In your CRM (Salesforce, HubSpot), update the invoice record with "receipt emailed" and the recipient contact.
- In accounting software (QuickBooks, NetSuite), create or match the emailed invoice to a supplier/vendor record for faster reconciliation.
- In the ESP (SendGrid, Amazon SES), apply the correct sender identity and template for branded delivery.
Steps to reduce friction:
- Map Route Receipts decision fields to your CRM fields so finance sees who received the receipt.
- Use the audit log to reconcile disagreements between CRM and accounting entries.
- Automate ticket creation for delivery failures so ops staff can act immediately.
For a no-code implementation example, see the Beginner's Guide to Selective Delivery in our blog and the full integration steps in the Documentation.
Frequently Asked Questions
This FAQ answers operational, compliance, and product questions about selective Stripe receipt distribution and Route Receipts. Route Receipts is a Stripe app that controls which customers receive invoice emails by maintaining an allowlist and an auditable decision log. Read the answers below for short, actionable steps and links to setup instructions and our privacy policy.
Can I send receipts only to corporate customers and not to consumers? 🏢
Yes. Route Receipts lets you create allowlists and rules so only designated corporate customers receive receipts. Use customer metadata, billing email domains, or a specific customer tag to group enterprise accounts and add those groups to the allowlist. For example, add all @company.com addresses or customers with metadata key customer_type=enterprise to a single allowlist entry so accounts-payable gets the receipts while consumer addresses are excluded.
Creating these rules costs time up front but saves finance teams hours per month by preventing unnecessary emails and manual sorting. See the step-by-step installation and allowlist patterns in our Documentation and the no-code setup walkthrough in The No-Code Way to Route Customer Receipts in Stripe: Beginner’s Guide to Selective Delivery.
How does selective receipt routing affect VAT invoices and UK requirements? 🇬🇧
Selective routing does not remove required invoice fields; any document that functions as an invoice or credit note must still include VAT and supplier information. Route Receipts only controls delivery decisions; the invoice content (invoice number, supplier name and address, VAT ID, taxable breakdown, and tax totals) must still be generated by Stripe or your invoicing tool and attached when the document serves as an official invoice or credit note.
For example, when issuing a credit note, include the original invoice reference and the credit note number on the document before Route Receipts sends it to the allowlisted recipients. Consult our EU/UK compliance section in Documentation for the exact fields and examples of compliant credit-note attachments.
Will disabling Stripe's automatic receipts break my invoicing workflow? ⚙️
No. Disabling Stripe's automatic receipts prevents Stripe from sending messages directly while Route Receipts continues to preserve invoice generation in Stripe and handle delivery decisions. Follow these quick validation steps: 1) Install Route Receipts from the Stripe Marketplace, 2) switch off Stripe Billing's automatic email receipts, and 3) run a test invoice and confirm the route decision appears in the Route Receipts dashboard.
If you skip the confirmation step you risk duplicate sends or missed deliveries. Our Documentation includes a pre-launch QA checklist and a short troubleshooting section for duplicate or missing receipts.
How do I add multiple recipients for a single invoice? 👥
You can deliver one invoice to multiple recipients by adding multiple emails to a single allowlist entry or by defining recipient roles (for example, accounts-payable and project manager) inside Route Receipts. Typical patterns include adding ap@company.com plus pm@company.com to the same allowlist line or using role metadata so the app sends to different addresses based on the customer's configured roles.
Use the templates in Documentation to set up common multi-recipient patterns, such as AP plus a secondary operational contact. The no-code guide includes sample allowlist entries that map to common corporate workflows.
What happens when a receipt bounces or an address is invalid? 📬
When a receipt bounces, Route Receipts logs the bounced delivery in the decision audit log and shows bounce counts in the dashboard so teams can remediate quickly. The recommended troubleshooting playbook is: 1) validate the address against known company domains, 2) correct the contact in Stripe, 3) re-send the invoice via Route Receipts, and 4) escalate to support if bounces persist.
💡 Tip: Configure an automated ticket in your support system when a customer hits a bounce threshold so accounts-payable can follow up before payment windows close.
See the Documentation troubleshooting section for the exact dashboard fields and example workflows that map bounce events into support queues.
Does Route Receipts store customer data and how is it handled? 🔒
Route Receipts stores only the Stripe data necessary to evaluate allowlist rules and to record routing decisions, and our Privacy Policy explains retention, third-party processing, and user rights. Stored items typically include customer ID, billing email, select metadata used in rules, and delivery/audit logs; Route Receipts does not store payment card data.
Review the Privacy Policy for details on retention periods and data subject requests, and check our FAQ for how we handle exports and deletions.
⚠️ Warning: Avoid placing sensitive personal health information or other regulated personal data in invoice fields sent via email unless you have explicit consent and a compliant data-handling process.
Take the next step to control Stripe receipt distribution.
Selective receipt routing reduces inbox clutter, keeps EU/UK invoice and credit note workflows auditable, and saves finance teams time. Start with practical Stripe receipts setup steps: disable Stripe's automatic receipts, create an allowlist, and confirm routing decisions in the audit log. For a step-by-step install and troubleshooting, see the Route Receipts Stripe setup documentation.
💡 Tip: Disable Stripe automatic receipts before enabling Route Receipts to avoid duplicate emails.
Route Receipts is a specialized application designed to enhance the way businesses manage their Stripe receipt distribution. This app addresses a significant limitation within Stripe's native functionality, which traditionally forces businesses to either send receipts to all customers or none at all. Route Receipts empowers businesses with the flexibility to selectively send receipts to specific customers, thereby preventing unnecessary email clutter for those who do not require them. This is particularly beneficial for businesses with diverse customer bases, such as enterprise clients who need receipts for expense tracking and others who prefer not to receive them. By integrating directly into the Stripe dashboard, Route Receipts allows users to manage an allowlist of customers effortlessly, without the need for complex coding or custom webhook integrations. The application features a dashboard-native user interface, a decision audit log for transparency, and a straightforward setup process via the Stripe Marketplace. Route Receipts offers a tiered pricing model, starting with a free plan that includes 20 receipts per month, with the option to upgrade for higher volume needs. This solution is ideal for businesses seeking to streamline their financial communications and maintain a professional relationship with their clients by ensuring that only necessary communications are sent.
Install Route Receipts from the Stripe Marketplace and follow the getting-started guide in the documentation to create your allowlist and enforce selective delivery. For background reading, see our no-code guide to selective delivery and the article on why we built Route Receipts. Subscribe to our newsletter for implementation tips and updates.