
Stripe Receipt Management App: Complete Buyer’s Guide, Key Features, and Pricing
Enterprise finance teams can receive hundreds of unnecessary Stripe receipts per month, creating inbox clutter and extra reconciliation work. A Stripe receipt management app is a tool that controls which customers receive Stripe receipts instead of an all-or-nothing policy. Our our Route Receipts buyer's guide compares Stripe receipt management solutions and evaluates Route Receipts for Enterprise Receipt Management, focusing on selective delivery, dashboard-native controls, and decision audit logs. Route Receipts integrates into the Stripe dashboard, lets teams maintain an allowlist, and removes the need to manage custom webhooks and token refresh. The app offers a free plan with 20 receipts per month and tiered upgrades for higher volume. This beginner's guide starts from zero and helps finance leaders weigh operational trade-offs before deciding to build or buy.
What is a Stripe receipt management app and how does it work?
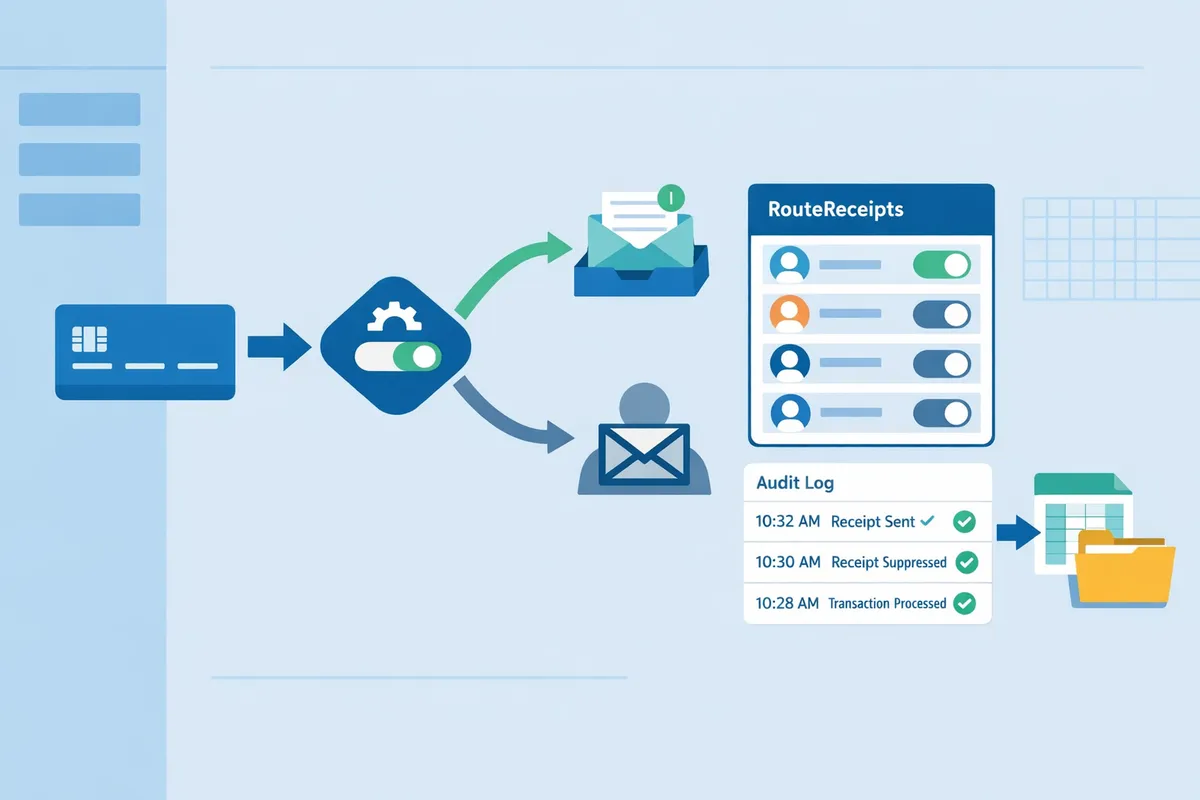
A Stripe receipt management app is a software category that gives selective control over sending and managing payment receipts for Stripe payments. This matters because Stripe's Dashboard sends receipts at the account level by default, which creates unnecessary emails for many customers and extra reconciliation work for finance teams. Our website recommends evaluating apps that integrate into the Stripe Dashboard, offer per-customer rules, and provide audit trails so teams can route receipts only where they are needed.
How Stripe's native receipts behave
Stripe's native receipts send transaction emails for the entire Stripe account with limited per-customer control. Stripe's Dashboard lets you toggle automatic receipts on or off at the account level and shows receipt history, refunds, and invoice versions in the Dashboard UI. The metadata that appears on those emails comes from invoice and charge metadata fields; you cannot add a routing rule per customer without building custom webhook logic. If you try a DIY solution you must handle credential rotation, webhook signing verification, idempotency keys to prevent duplicate emails, retry logic with backoff for failures, and maintain an audit trail to show why a receipt was or was not sent. Our website covers why this matters in detail in Why Did We Build Route Receipts?, and the no-code alternative steps appear in The No‑Code Way to Route Customer Receipts in Stripe: Beginner’s Guide to Selective Delivery.
⚠️ Warning: If you keep Stripe's automatic receipts enabled while routing receipts externally you will often send duplicates; disable automatic receipts or configure suppression as part of setup.
Core features to expect 📋
Core features buyers should expect include allowlisting, dashboard-native controls, decision audit logs, accounting exports, and multi-currency/tax handling. Evaluate each capability with concrete criteria:
- Allowlist or per-customer rules. Check whether rules accept customer IDs, emails, or metadata tags and whether rules support bulk imports and exceptions.
- Dashboard installation and admin roles. Verify the app installs from the Stripe Marketplace and respects role-based access control for finance and ops teams.
- Decision audit logs and timestamps. Look for immutable logs that record who made each routing decision and why, with exportable CSVs for audits.
- Accounting and ERP integrations. Confirm support for CSV exports and direct connectors to QuickBooks or Xero and whether mapping rules preserve Stripe metadata for reconciliation.
- Multi-currency and tax handling. Confirm the app respects the charge currency and includes localized tax lines on receipts.
Route Receipts implements these features as dashboard-native controls so teams avoid building and maintaining webhook orchestration. For setup steps and configuration details see our Documentation.
Key terms and definitions
Receipt allowlist is a configuration that specifies which customers receive email receipts. Example: an allowlist can target customer IDs for enterprise clients who require receipts and exclude guest checkouts.
Decision audit log is an immutable record that captures every routing decision, who made it, and when. Example: a finance user approves a customer on 2025-02-12 and the audit log stores the user ID, timestamp, and rule version.
Webhook is an HTTP callback that Stripe sends for events like invoice.paid. Example: a webhook delivers payloads to a routing app; a DIY approach requires signature verification and retry logic to be reliable.
Idempotency keys are unique tokens that prevent duplicate processing of the same event. Example: when re-sending a receipt after a transient failure, idempotency keys stop double emails; building this into your own system requires persistent key storage and expiry rules.
Reconciliation mapping is the set of rules that map Stripe objects (charges, invoices) to accounting entries in ERP systems. Example: map invoice.metadata.department to QuickBooks class for automated reconciliation.
Connected account scopes are the permissions an installed app receives for Stripe Connect accounts. Example: scoped access allows a receipt app to read charges and send receipts for specific connected accounts without full account privileges.
Each of these primitives adds operational burden if built in-house: you must implement token refresh, quota monitoring, retry backoff, race-condition handling for concurrent events, and monitoring/alerting. Route Receipts handles these operational concerns through a marketplace-installed integration and retains an audit log and reconciliation-friendly exports so finance teams avoid building that infrastructure themselves. See our Documentation for the exact scopes required and the FAQ for common install questions.
How do I set up Route Receipts in the Stripe Dashboard?
Install Route Receipts from the Stripe Marketplace and configure an allowlist in the Stripe Dashboard without writing custom webhooks. This avoids building and operating credential rotation, token refresh, and webhook retry logic yourself. Follow the checklist below to install, test in Stripe test mode, and monitor the first 24–72 hours of production traffic.
Step-by-step setup checklist ✅
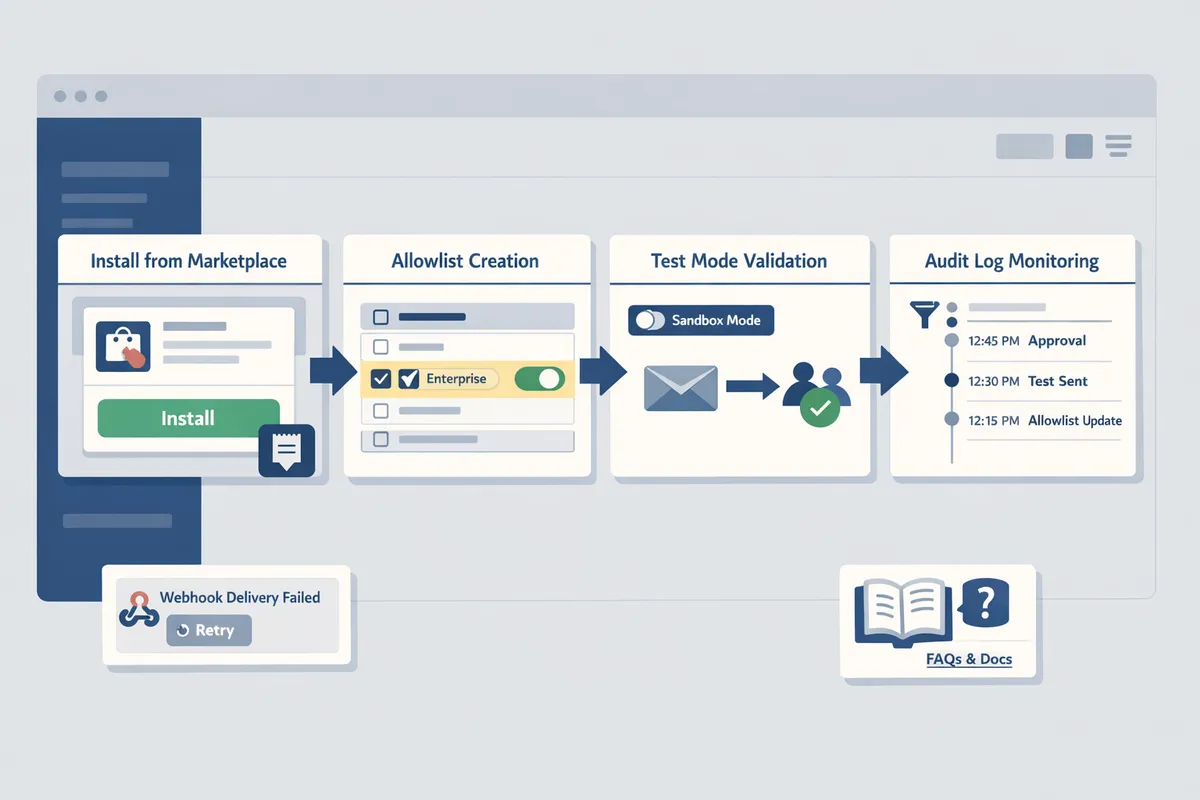
Follow these numbered steps to install Route Receipts, grant required OAuth scopes, create an allowlist, validate behavior in test mode, and monitor the audit log after going live.
- Install Route Receipts from the Stripe Marketplace and grant OAuth scopes. Specify a single production account during install. See the Route Receipts setup guide for screenshots and permission details.
- Example scopes: read customers, read invoices, manage webhooks. Grant only the scopes listed in the install flow.
- Configure organization-level admin roles and access in your Stripe org. Assign a small set of finance admins to manage the allowlist to reduce accidental rule changes.
- Example: Create a "Receipts Admin" role with access to Apps and Audit Log.
- Create an allowlist using customer IDs or metadata rules. Use customer.metadata.receipt_allowed=true for programmatic control or paste customer IDs for manual control.
- Example metadata rule: customers with metadata key receipt_pref set to enterprise.
- Test in Stripe test mode with sandbox customers and webhooks. Disable automatic Stripe receipts for test customers to confirm Route Receipts sends only allowed receipts. Verify decision entries in the Route Receipts audit log.
- Test case: simulate a failed delivery and confirm webhook retry and idempotency handling prevent duplicate emails.
- Flip to production and monitor the audit log for the first 24–72 hours. Watch for unexpected decision overrides, duplicate sends, or omitted receipts and adjust rules as needed.
- Tip: use the audit log filters to export decisions for reconciliation.
💡 Tip: Use a staging allowlist to test receipt rules before applying them to live customers.
Refer to the Route Receipts documentation for screenshots, permission checklists, and troubleshooting steps. If you want the product rationale and design trade-offs that shaped the allowlist UX, read Why Did We Build Route Receipts?.
Common setup pitfalls and how Route Receipts avoids them ⚠️
Common setup pitfalls include credential management, token refresh, webhook retry handling, duplicate sends, and missing audit trails; Route Receipts reduces those operational burdens by using Stripe OAuth, built-in retry handling, decision logging, and dashboard-native controls.
Running your own receipt router requires secure secret storage, automated token refresh, idempotency keys, exponential backoff for retries, monitoring for quota errors, and an audit trail for finance teams. For example, DIY webhook handlers must implement idempotency to avoid duplicate receipts when Stripe retries events after transient failures.
| Pitfall | DIY burden (what you must build/maintain) | How Route Receipts handles it |
|---|---|---|
| Credential management and token refresh | Secure vault, rotation scripts, and monitoring for expired tokens | Uses Stripe OAuth at install so you avoid storing long-lived API keys |
| Webhook retry handling and idempotency | Backoff logic, deduplication, and event ordering | Internal retry logic and decision deduplication prevent duplicate receipts |
| Duplicate receipts when Stripe sends automatic emails | Must detect and disable Stripe automatic receipts per-customer | Dashboard option to route and prevent duplicate sends controlled by allowlist rules |
| Missing audit trails for compliance | Build logging, retention, and export features | Route Receipts provides a decision audit log visible in the Dashboard |
| Access control and accidental rule changes | Implement RBAC and approval workflows | Organization-level admin roles and restricted app permissions limit changes |
Monitor the first 72 hours after going live by exporting the audit log and sampling receipts against Stripe invoice events. If you see unexpected behavior, check webhook delivery attempts in the Stripe Dashboard and consult the Route Receipts documentation for troubleshooting steps. For common questions about install scope and duplicates, see our Frequently Asked Questions.
How should enterprises evaluate and compare receipt management apps?
Enterprises should score receipt management vendors on mapping accuracy, admin controls, auditability, integrations, and operational SLAs to pick a solution that reduces finance friction. Route Receipts stands out because it provides dashboard-native allowlist controls and an audit log that remove much of the engineering work needed for selective delivery. This section supplies a feature comparison table and a weighted decision checklist you can use in procurement and vendor proof-of-concept (POC) scoring.
Feature comparison table 📊
The table below compares Route Receipts, Stripe native receipts, and typical third-party competitors across the features finance teams ask about most.
| Feature | Route Receipts | Stripe native receipts | Third-party competitors |
|---|---|---|---|
| Allowlist control | Yes (dashboard-native allowlist of customer IDs/emails) | No (account-level on/off only) | Varies (often requires webhooks or custom rules) |
| Dashboard integration | Yes (installed from Stripe Marketplace; UI inside Stripe Dashboard) | Native (but no per-customer controls) | Typically external dashboard or separate app portal |
| Accounting sync | Integrates via webhooks or connectors; supports common workflows | Requires manual export or separate connector | Varies; confirm on vendor page |
| Audit log | Yes (decision audit log for routed receipts) | Limited (receipt history only) | Varies; many lack transaction-level routing audit trails |
| Multi-currency support | Yes (matches Stripe payment currency) | Yes (handled by Stripe) | Varies; confirm on vendor page |
| Setup complexity | Low (Marketplace install; minimal config) | Low (toggle on/off) | Medium to high (requires webhook setup, auth, and mapping) |
| Pricing model | Tiered usage-based plans; starts with a free tier | Included in Stripe fees | Subscription or usage pricing; often extra for enterprise features |
Route Receipts provides a dashboard-native allowlist and an explicit audit log, which both reduce the need to build a custom routing service. Third-party apps often require you to operate credential rotation, webhook handling, and mapping rules yourself. For background on the product rationale and implementation trade-offs, read Why Did We Build Route Receipts?.
Decision checklist for enterprise buyers ✅
Use a weighted checklist to score vendors across security, reconciliation automation, integrations, and total cost of ownership. Follow the numbered steps below to produce an objective vendor score.
- Security and compliance (30%).
- Score vendors on encryption in transit, role-based access control, and data retention policies. Ask for SOC 2 or equivalent attestation where applicable. Route Receipts supports role-based access through the Stripe Dashboard and centralizes receipt routing so you avoid giving engineering teams broad keys to payment systems.
- Reconciliation and mapping accuracy (25%).
- Evaluate whether the app matches receipts to Stripe payments automatically and how it handles edge cases like refunds, partial captures, and subscriptions. Test with 50 representative transactions including refunds and currency conversions. Route Receipts keeps routing logic close to Stripe payment metadata to reduce mismatches.
- Integrations and API reliability (20%).
- Check connectors to your ERP, accounting software, and notification systems. Verify vendor SLAs for webhook delivery, error retries, and rate limiting. If you build a DIY webhook router you must handle token refresh, credential rotation, backoff and retry logic, and monitoring for duplicate messages. Route Receipts removes that operational burden by managing routing inside the Stripe Dashboard and providing documented behavior; see our Documentation for setup details.
- Total cost of ownership and operational burden (25%).
- Calculate engineering hours needed for a DIY solution: webhook infrastructure, retry logic, cache invalidation, concurrent write safeguards, and ongoing monitoring. Compare that to vendor licensing plus integration time. Route Receipts reduces engineering work by offering install-from-marketplace setup and an audit log so finance and compliance teams can review routing decisions without engineering involvement.
💡 Tip: Run a short POC with both standard payments and edge cases (refunds, multi-currency, subscription proration) to measure mapping accuracy before committing to a vendor.
Scoring example: assign each vendor a 0–5 score per category, multiply by the category weight, and sum to a 100-point scale. Use the resulting number to compare Route Receipts against Stripe native behavior and other vendors. For quick answers to common installation questions consult our Frequently Asked Questions and the detailed setup steps in Documentation.
What are the operational trade-offs of DIY receipt controls and what does Route Receipts remove?
DIY receipt controls require building and operating production-grade systems for security, reliability, and auditability, and Route Receipts removes most of that operational lift by running those pieces out of the box. Engineering teams must build credential rotation, token refresh, webhook reliability, idempotency, retry logic, monitoring, and audit trails to reach production readiness; Route Receipts delivers a dashboard-native allowlist, decision audit log, and managed webhook handling from the Stripe Marketplace. This matters because the hidden costs of operating those systems show up as ongoing engineering tickets and slow finance workflows.
⚠️ Warning: Avoid sending sensitive personal health information or unnecessary PII in transactional emails.
Production deployment playbook for engineering and finance 🛠️
A safe production rollout requires staged testing, idempotency key design, webhook verification, retry strategies, monitoring, and documented data retention. Idempotency key is a token that ensures repeated webhook deliveries do not create duplicate records. Webhook verification is a security check that confirms the event came from Stripe by validating the signature. Retry logic is operational code that schedules repeated delivery attempts with backoff to handle transient failures.
Follow this checklist to reduce rollout risk:
- Create a staging Stripe account and mirror webhook endpoints. Test with signed webhook payloads and expired tokens. Link testing steps to our Documentation for exact signature checks. https://routereceipts.app/docs
- Design idempotency keys: use "receipt-route:{stripe_event_id}" or include customer_id plus timestamp to avoid collisions.
- Implement webhook verification and reject events failing signature checks. Log raw payloads to an immutable audit store for 90+ days.
- Build retry and backoff: exponential backoff with jitter, capped retries, and alert on repeated failures.
- Instrument monitoring and alerts: SLA on delivery, error-rate dashboards, and on-call escalation.
- Publish data retention policy and automated purge for test vs production data.
💡 Tip: Run webhook signature verification in staging with the same secret rotation schedule you plan for production to catch token refresh bugs early.
Route Receipts removes the need to build and operate these layers by providing a dashboard-native integration, managed webhook routing, and a decision audit log. For more context on design choices and the rationale, see Why Did We Build Route Receipts?.
ROI and time-savings scenarios for finance teams 💰
A modeled ROI compares manual reconciliation hours against the hours after automating allowlist routing and CSV exports. Start by measuring current baseline time per receipt and current monthly volume; then model automated coverage and hourly cost to estimate savings.
Step-by-step method to model hours saved:
- Measure baseline. Track the average minutes spent reconciling a single receipt (for example, 5 minutes) and the monthly receipt count.
- Estimate automation impact. Choose a realistic reduction percentage for manual work after routing and automatic exports (for modeling, pick 50% to 80% as scenarios).
- Calculate hours saved. Multiply receipts by minutes saved and convert to hours. Multiply hours by fully loaded hourly cost to get monthly savings.
- Compute break-even. Compare monthly savings against Route Receipts subscription and any integration costs.
Example model: 500 receipts × 5 minutes = 2,500 minutes (42 hours). If allowlist routing and exports remove 70% of manual reconciliation, the team saves 29 hours per month. Multiply by a $60/hour loaded rate to estimate monthly labor savings. Use conservative, mid, and aggressive scenarios to show range.
Route Receipts removes duplicate-receipt handling and provides native export hooks to accounting tools, reducing manual CSV work and helpdesk tickets. See our Frequently Asked Questions for operational details on disabling Stripe automatic receipts and preventing duplicates. https://routereceipts.app/faq
Advanced resources and integrations 🔗
Route Receipts integrates with accounting, expense, and reporting systems and exposes audit and export endpoints to streamline reconciliation. Common integration targets include QuickBooks Online, Xero, NetSuite, Expensify, and BI tools for reconciliation reporting; consult our Documentation for exact connector behavior and field mappings. https://routereceipts.app/docs
Advanced integration points to plan for:
- Mapping: map Stripe customer.metadata.company_id to an ERP vendor or GL code. Maintain a small mapping table in your ERP or in Route Receipts' allowlist metadata.
- Export patterns: use scheduled CSV/SFTP exports or webhook-forwarding for real-time ingestion into accounting systems.
- Multi-tenant Stripe Connect: implement tenant-level allowlists and per-connected-account audit trails to keep recon on a per-merchant basis.
- Observability: push Route Receipts decision logs into your SIEM or BI pipeline to correlate receipt delivery with payment and accounting events.
A DIY approach would require building and maintaining credential rotation, token refresh, quota monitoring, retry/backoff handlers, and concurrency controls for exports. Route Receipts removes that operational burden by providing managed routing, an audit trail, and built-in export hooks, letting engineering focus on platform-specific mapping rather than connectivity plumbing. For additional integration patterns and no-code setup, see The No‑Code Way to Route Customer Receipts in Stripe and our blog for implementation case studies. The No-Code Way link is provided in the No-Code Way article and our blog.
Frequently Asked Questions
This FAQ answers the most common buyer questions about Route Receipts compatibility, security, pricing, and testing. It clarifies how Route Receipts works with Stripe Connect, how allowlists and rules control delivery, and what to validate in staging before enabling the app in production. See our reasoning and implementation playbook in Why Did We Build Route Receipts? for background on design trade-offs and auditability.
Is Route Receipts compatible with Stripe Connect?
Yes. Route Receipts supports Stripe Connect and enforces allowlist decisions per connected account. Route Receipts installs from the Stripe Marketplace and requests the OAuth scopes required to act on behalf of connected accounts. That lets each connected account maintain separate allowlists and routing behavior without sharing credentials. Building the same behavior yourself would require implementing OAuth consent flows, credential rotation, token refresh, per-account webhook routing, and quota handling for every connected account.
Can I send receipts to only some customers?
Yes. Route Receipts uses an allowlist and rule-based matching so you send receipts to selected customers or customer segments. An allowlist is a list that specifies customer IDs or emails that should receive receipts. Route Receipts also supports rule-based matching on invoice metadata, customer metadata, and subscription attributes so you can target segments such as "enterprise customers" or "expense-reporting users." The dashboard lets finance or support teams edit the allowlist without writing webhooks, and the app can disable Stripe's automatic receipts to prevent duplicates. For a no-code setup guide, see The No‑Code Way to Route Customer Receipts in Stripe.
How does Route Receipts affect accounting workflows?
Route Receipts maps receipts to Stripe payment records and provides exports or integrations to reduce manual reconciliation work for finance teams. Route Receipts writes the payment ID and routing decision to a decision audit log so each receipt record ties back to the exact Stripe charge or invoice. You can export matched receipts as CSV or push them to downstream systems using existing integrations to speed bank-reconciliation and month-end close. DIY approaches require building idempotent webhook handlers, retry logic with exponential backoff, cache invalidation for mapping lookups, and monitoring to avoid race conditions between payment events and receipt-sending logic.
How secure is customer data with Route Receipts?
Route Receipts uses Stripe's OAuth and stores only minimal routing metadata while sensitive payment data remains on Stripe. The decision audit log keeps routing decisions, timestamps, and identifiers needed for audits, not raw card data or full payment credentials. Route Receipts relies on Stripe for authentication and token exchange, which reduces our surface area for handling payment credentials and simplifies compliance scope. Role-based dashboard access and audit trails let finance and security teams review who changed allowlists and when. For implementation and security details, consult our Documentation.
What pricing plans does Route Receipts offer?
Route Receipts offers tiered pricing with a free plan and paid tiers for higher volume, and enterprise quotes are available on request. Pricing covers usage-based tiers and seat-level admin controls; you can upgrade within the app as volume grows. For current plan limits, overage policies, and enterprise options, check the Route Receipts pricing details on our Frequently Asked Questions page or contact sales through the app. Building an in-house system with the same features typically requires upfront engineering hours plus ongoing maintenance costs for monitoring, webhook retries, and credential rotation.
How do I test Route Receipts before switching production?
Test Route Receipts in a staging Stripe account using test-mode customers and simulated payments to verify allowlist behavior and audit-log entries. Follow these steps:
- Create a staging Stripe account and enable test mode.
- Install Route Receipts from the Stripe Marketplace into that test account and grant the OAuth scopes.
- Add test customers (customer IDs or emails) to the allowlist in the Route Receipts dashboard.
- Simulate payments using Stripe test cards and webhooks, then confirm receipts are sent only to allowlisted customers.
- Inspect the decision audit log for correct payment IDs, timestamps, and routing reasons.
- Test error scenarios: webhook delivery failures, duplicate events, and token expiry to confirm retry behavior.
💡 Tip: Use Stripe's test webhooks and enable verbose logging during validation so you can reproduce and trace any routing mismatches.
For step-by-step setup and troubleshooting, see our Documentation and the guide Why Did We Build Route Receipts? which includes implementation templates and common test cases.
Choose a selective receipt workflow and schedule a Route Receipts consultation.
As you compare Stripe solutions, pick an approach that reduces inbox clutter and keeps delivery auditable for finance teams. A stripe receipt management app should let you target receipts to the customers who need them while avoiding custom webhook complexity. For background on why selective routing matters, read our post on Why Did We Build Route Receipts?.
Route Receipts is a specialized application designed to enhance the way businesses manage their Stripe receipt distribution. This app addresses a significant limitation within Stripe's native functionality, which traditionally forces businesses to either send receipts to all customers or none at all. Route Receipts empowers businesses with the flexibility to selectively send receipts to specific customers, thereby preventing unnecessary email clutter for those who do not require them. This is particularly beneficial for businesses with diverse customer bases, such as enterprise clients who need receipts for expense tracking and others who prefer not to receive them. By integrating directly into the Stripe dashboard, Route Receipts allows users to manage an allowlist of customers effortlessly, without the need for complex coding or custom webhook integrations. The application features a dashboard-native user interface, a decision audit log for transparency, and a straightforward setup process via the Stripe Marketplace. Route Receipts offers a tiered pricing model, starting with a free plan that includes 20 receipts per month, with the option to upgrade for higher volume needs. This solution is ideal for businesses seeking to streamline their financial communications and maintain a professional relationship with their clients by ensuring that only necessary communications are sent.
💡 Tip: Start with the no-code guide to validate rules before production. See The No‑Code Way to Route Customer Receipts in Stripe: Beginner’s Guide to Selective Delivery for setup steps.
For enterprise evaluations, consider RouteReceipts as a practical stripe receipt app for enterprises and schedule a consultation to review your use case. Book a consultation through our Documentation page or check the Frequently Asked Questions if you need immediate answers.