
Stripe Terminal SDK Receipts Implementation Mini-Kit 2026
A single misrouted Stripe Terminal receipt can generate 20+ support tickets and extra accounting reviews for merchants.
Stripe Terminal SDK receipts implementation is an integration process that routes emailed and printed receipts from in-person Stripe Terminal payments so only chosen customers receive them.
Our app RouteReceipts is a Stripe app that controls which customers receive invoice receipt emails by using an allowlist, a dashboard-native interface, and a decision audit log. This integration-guide walks through step-by-step setup to connect Stripe Terminal, disable Stripe's automatic receipts, create an allowlist, and verify routing decisions; refer to the RouteReceipts documentation and the RouteReceipts FAQ for installation and troubleshooting. You may be surprised how few steps prevent duplicate or unnecessary receipts while keeping records auditable.
How does RouteReceipts fit into a Stripe Terminal SDK receipts workflow?
Route Receipts integrates into the Stripe Terminal SDK flow as a dashboard-native decision layer that controls which customers receive emailed receipts while leaving on-reader printed receipts intact. This reduces unwanted emails, creates a clear audit trail for receipt decisions, and lets teams manage routing from the Stripe dashboard rather than custom webhooks. Below we map Route Receipts into the Terminal payment lifecycle and show when to keep printing, when to email, and how to verify routing behavior.
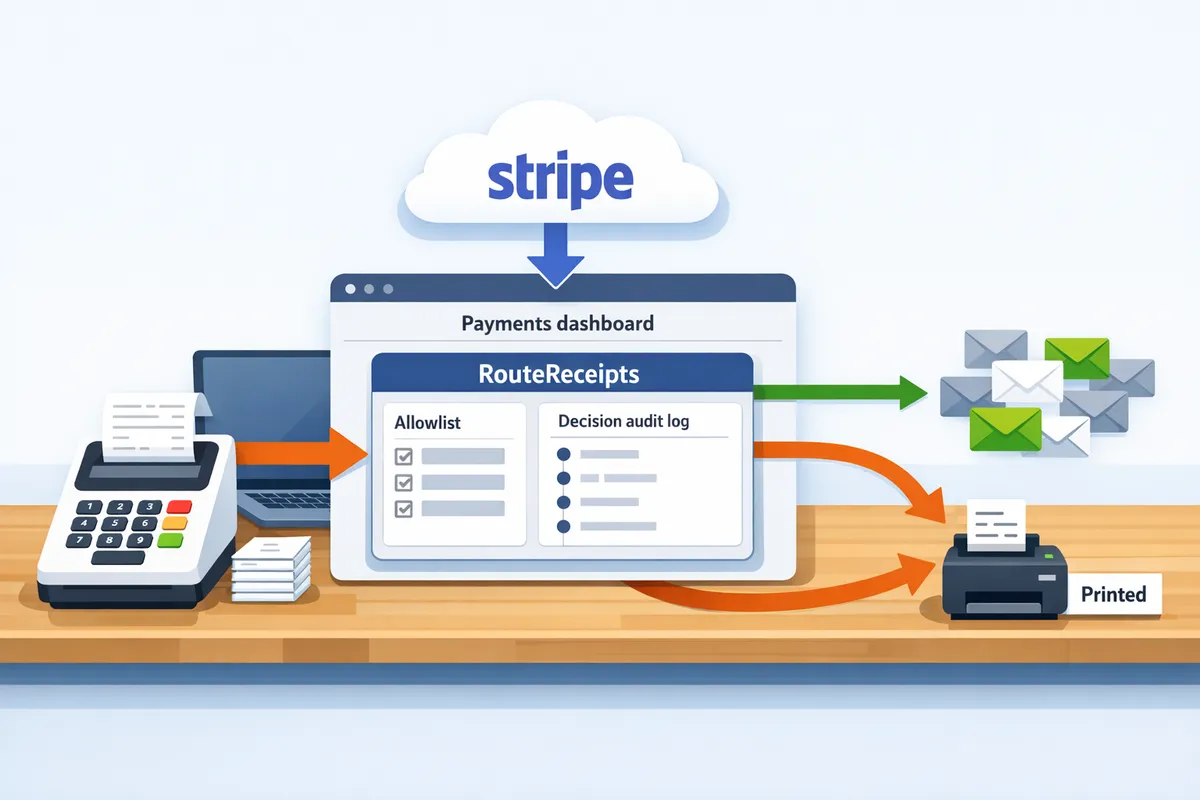
Route Receipts is a Stripe app that routes receipt emails by maintaining an allowlist 📦
Route Receipts is a Stripe app that routes emailed receipts by maintaining an allowlist of customer IDs or emails. Route Receipts installs from the Stripe Marketplace and sits in the lifecycle after a payment finalizes but before Stripe sends an automatic email, so it can suppress or allow that email based on your rules. Our dashboard-native UI shows a decision audit log for every routed receipt and makes adding or removing customers a two-click action. For setup details and troubleshooting (including how to disable Stripe's automatic receipts to avoid duplicates), see the Route Receipts documentation and the FAQ.
💡 Tip: Disable Stripe’s automatic email receipts in your dashboard when you install Route Receipts to prevent duplicate emails. See the installation steps in the documentation.
When should you send a printed receipt versus an emailed receipt? 🖨️
Printed receipts give immediate, in-person proof of purchase; emailed receipts serve expense tracking and later reconciliation. Use printed receipts for retail checkout, returns at the counter, and hospitality where a customer needs instant proof. Use emailed receipts when customers need a searchable record for expenses, taxonomy in accounting, or when your enterprise clients require consolidated digital trails. For POS flows: collect customer email at pos stripe terminal before completing payment if you plan to email; then let Route Receipts decide whether that email is delivered based on allowlist membership. Example: a cafe prints every sale but emails receipts only for loyalty members. Example: a B2B office captures email and routes all invoices to accounting via Route Receipts.
The table below compares native Stripe automatic receipts with Route Receipts' allowlist routing ⚖️
The table below compares native Stripe automatic receipts with Route Receipts' allowlist routing across delivery method, when to use, configuration steps, and business impact.
| Feature | Delivery method | When to use | Configuration steps | Business impact |
|---|---|---|---|---|
| Stripe automatic receipts | Email sent automatically after payment finalization | Small single-location retailers or merchants who want everything emailed | Enable automatic receipts in Stripe Dashboard (default) | Minimal setup; higher inbox volume for customers and finance teams |
| Route Receipts allowlist routing | Email sent only if customer is on allowlist; printed receipts remain from reader | Multi-tenant venues, enterprise clients, or businesses that need selective delivery | Install Route Receipts from Stripe Marketplace, disable Stripe auto-emails, create allowlist in dashboard | Reduces unwanted emails, creates audit log for each routing decision, lowers support tickets |
Recommended approach by merchant type:
- Small retailers: Use Stripe automatic receipts for simplicity unless inbox complaints rise. See our Beginner’s guide to selective delivery for a no-code alternative.
- Multi-tenant venues (markets, co-working): Use Route Receipts to keep customer communications scoped per tenant and reduce cross-tenant inbox noise.
- Enterprise customers: Use Route Receipts to ensure only authorized accounting contacts receive receipts and to maintain an auditable decision log.
For setup walk-throughs and edge-case troubleshooting, consult the Route Receipts documentation, the FAQ, and our post on why we built Route Receipts.
How to set up Stripe Terminal SDK receipts implementation step-by-step
RouteReceipts is a Stripe app that controls which customers receive emailed receipts by using an allowlist, and this section gives the step-by-step setup to connect it with a Stripe Terminal SDK integration. Follow the tasks in order to avoid creating duplicate emails, broken print flows, or lost audit trails. Each subsection maps to a concrete action your POS, QA, and finance teams should perform.
Prerequisites and requirements (Stripe account, reader firmware, and RouteReceipts plan) 📋
You must have a Stripe account with Terminal enabled, a supported reader online, and RouteReceipts installed to control receipt routing. Confirm the reader shows as "connected" in Stripe Dashboard and update reader firmware if it reports a compatibility warning. Minimum SDK versions to test against: iOS Terminal SDK 2.4.0 or later, Android Terminal SDK 2.4.0 or later, and JavaScript Terminal SDK 1.12.0 or later. Verify your environment with these checks before changing receipt behavior:
- Stripe account: Terminal enabled, payments accepted, and access to the account's Settings > Customer emails page.
- Reader health: physical device powered, paired (if Bluetooth), and online; run a test transaction in dev to confirm connectivity.
- RouteReceipts plan: install the app from the Stripe Marketplace and grant it permission to read payment events (see the RouteReceipts documentation for install steps).
- QA staging account: use a separate Stripe test account with a test reader to validate routing decisions before touching production.
Refer to the RouteReceipts documentation for install prerequisites and troubleshooting steps.
Disable Stripe automatic receipts and install RouteReceipts in the dashboard 🔌
You must disable Stripe's automatic customer emails before installing RouteReceipts so the app can control delivery decisions. In the Stripe Dashboard go to Settings > Customer emails and uncheck the boxes for successful payments and refunds to prevent Stripe from sending receipts automatically. Then install RouteReceipts from the Stripe Marketplace, open the app, and follow the dashboard flow to create an allowlist and enable the decision audit log. RouteReceipts intercepts the receipt event, checks the allowlist and audit settings, and returns a send/skip decision back to Stripe or your integration. Steps to follow:
- Disable automatic receipts in Stripe Dashboard (Settings > Customer emails).
- Install RouteReceipts via Stripe Marketplace and authorize access.
- In RouteReceipts dashboard create allowlist entries (customer ID or email) and enable the decision audit log.
- Run a test payment in staging and confirm no automatic Stripe email is sent unless allowlisted.
⚠️ Warning: Do not disable automatic receipts in production until RouteReceipts is installed and tested in staging, or you risk stopping all customer emails. Test the full flow end-to-end first.
For a visual walkthrough and the exact dashboard paths, see the RouteReceipts documentation and our beginner's guide to selective delivery.
Collect customer email at the POS and attach it to Terminal payments 📧
Collect the customer's email at the POS and attach it to the PaymentIntent or customer object before confirming the Terminal payment so RouteReceipts can match allowlist entries. UX patterns that reduce friction include a mandatory receipt toggle (Email, Print, No receipt), a single-line email input with inline validation (example: name@company.com), and an optional phone field for SMS receipts formatted like +12223334444. Practical steps:
- Prompt before payment: show a small modal asking for receipt preference and email.
- Validate on input: check email contains an @ and domain; show a short error if invalid.
- Attach to payment: set receipt_email on the PaymentIntent or add email to the customer record before confirming the payment. RouteReceipts will use that email or customer ID to consult the allowlist.
- Guest handling: if the customer declines, mark the payment metadata with "no_receipt" so finance reports can filter accordingly.
💡 Tip: Ask for explicit consent for emailed receipts and store consent in metadata to satisfy auditors and reduce disputes.
See the RouteReceipts FAQ for common questions about matching by email versus customer ID and handling declined receipts.
Platform patterns: iOS, Android, and JavaScript code patterns for receipts 💻
Each SDK should present a receipt prompt before confirmation, attach the email to the payment object, and call the print routine on the reader when the customer chooses a paper receipt. Common platform patterns to implement and test:
- iOS. Present a pre-confirm receipt modal in the terminal flow, write receipt_email to the PaymentIntent, then call the reader's print API after a successful payment when the customer requested a paper copy. Test on a physical P400 or supported reader, not only the simulator.
- Android. Use a lightweight dialog for email capture, update the PaymentIntent with receipt_email, confirm the payment, and trigger the reader print job. Confirm Bluetooth reconnection logic for readers that sleep between transactions.
- JavaScript (web or React). Show an inline receipt field, add receipt_email to the server-side PaymentIntent before the confirm call, and use the Terminal SDK print method for on-reader printing where supported.
Testing checklist for all SDKs (numbered):
- Printed-only flow: customer requests only a paper receipt; ensure no email is sent.
- Emailed-only flow: email attached and allowlist decision permits email delivery.
- Refund and partial payment flows: ensure refunds follow the same routing rules.
- Offline and reconnect: simulate reader offline, then reconcile queued decisions.
RouteReceipts ties into these patterns by making the allowlist decision after the PaymentIntent contains the email or customer reference. For platform samples and deeper flow diagrams, see the RouteReceipts documentation and our no-code beginner's guide.
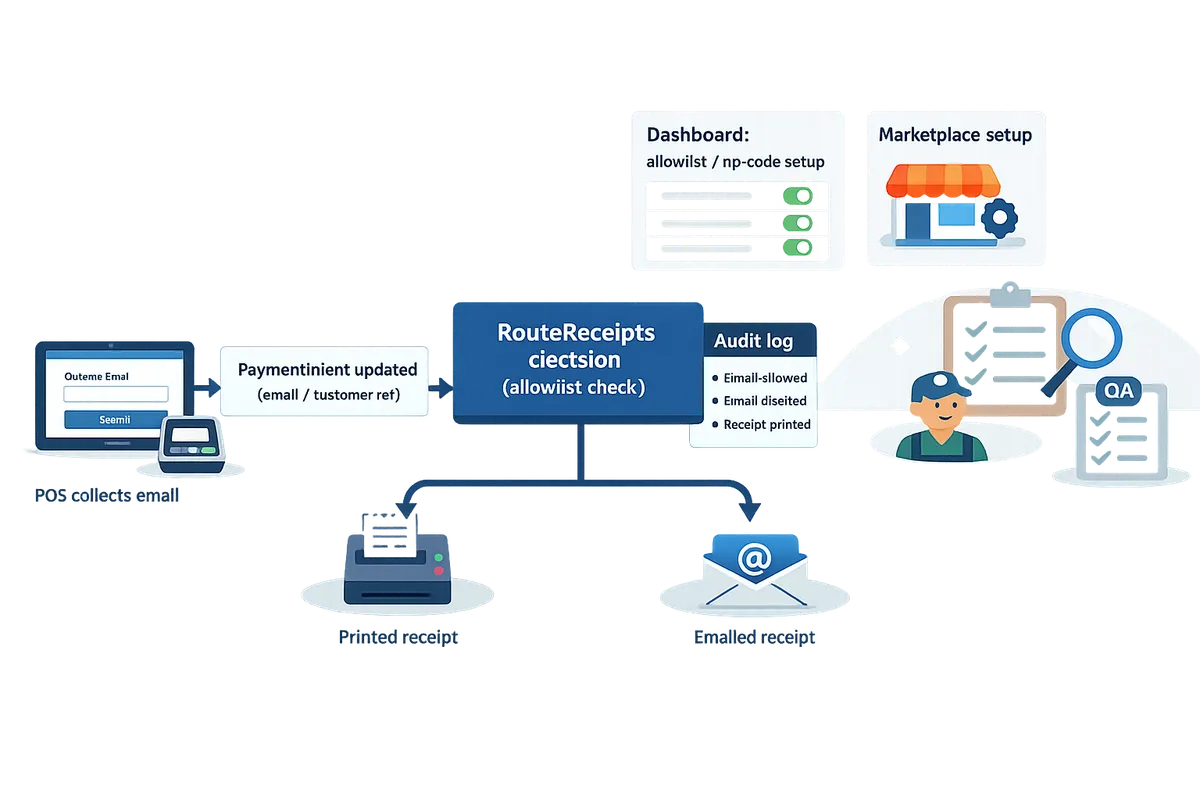
How to test, troubleshoot, and optimize Terminal receipts across channels
Use a checklist-driven QA flow plus targeted troubleshooting to verify printed receipts on readers and emailed receipts routed by Route Receipts. This approach reduces reconciliation noise and prevents duplicate or missing receipts before they reach customers. The steps below cover staging tests, common printer and offline issues, localization checks, and exporting Route Receipts audit logs for finance teams.
Testing checklist and QA for receipts ✅
Run a stage-by-stage checklist that verifies printed output, emailed rendering, allowlist routing, and common refund or split-payment scenarios. Allowlist is a list that specifies customer IDs or emails authorized to receive emailed receipts. Follow this numbered QA sequence in a staging Stripe account, then repeat in a low-risk production slice.
- Prepare test data. Create 10 customers that represent real cases: corporate expense emails, guest checkout, multi-location customers, and no-email customers.
- Configure Terminal readers. Confirm reader firmware, paper loaded, and printer settings in the Terminal app. Print a one-line test receipt.
- Validate printed receipts. Test logo alignment, line wrapping, currency display, and long item names across three reader models.
- Validate emailed receipts. For each test customer, trigger a payment and check HTML rendering in Gmail, Outlook, and Apple Mail.
- Test routing rules. Add and remove customers on the Route Receipts allowlist and confirm emailed receipts are sent only to allowed entries.
- Test refunds and partial refunds. Verify both printed and emailed refund receipts include original payment ID and refund reason.
- Run edge cases. Simulate card declines, split payments across tender types, and partial approvals.
For setup steps and troubleshooting of duplicates or missing emails, follow our Route Receipts documentation and the no-code routing guide for selective delivery.
💡 Tip: Run the full checklist once per week during peak hours for 30 days after launch to catch timing-related issues.
Troubleshooting printers, offline flows, and duplicate/missing receipts 🛠️
Most printer and receipt-routing problems trace to pairing state, offline cached payments, or Stripe automatic receipts still enabled. Check pairing, power, and paper first. Then check whether Terminal queued payments completed while offline. Route Receipts decision logs show whether a receipt was routed or blocked.
Common symptoms and fixes:
- Reader will not pair. Restart the reader, confirm Bluetooth or network is enabled, and check reader firmware. If pairing fails across readers, review your network firewall rules.
- Blank or malformed prints. Verify the receipt template image size and wrapper tags used by your POS. Reduce logo width to 48–64 px for thermal printers.
- Duplicate emailed receipts. Confirm Stripe automatic receipts are disabled when using Route Receipts. See the FAQ on disabling Stripe receipts and avoid sending both automatic and routed emails. (Frequently Asked Questions)
- Missing emailed receipts for allowed customers. Open the Route Receipts dashboard and inspect the decision audit log for that payment ID. Look for rule_matched and email_sent fields.
- Cached payments in offline mode. Confirm the reader uploaded queued transactions after reconnect. If receipts did not send, re-run a re-sync using the Terminal SDK sync workflow.
When troubleshooting, map each symptom to the Route Receipts dashboard row and include the payment ID, timestamp, and decision when escalating to support.
Localization, multi-currency support, and tax formatting 🌐
Validate currency format, symbol position, decimal separators, and tax line presentation per region to keep customers and accounting aligned. Test printed and emailed receipts across at least three locales your business serves, such as EU (comma decimals), US (period decimals), and JP (no decimals for Yen).
Checklist for localization verification:
- Confirm currency code appears on line items when payments use multiple currencies in one batch. This prevents ambiguous totals for split payments.
- Verify symbol placement. Some locales place the symbol before the amount; others place it after. Print examples for both positions.
- Check decimal separators and minor-unit display. For example, Euros often display 1.234,56 while US dollars display 1,234.56.
- Validate tax presentation. Show subtotal, tax rate, tax amount, and tax-inclusive vs tax-exclusive labeling clearly. For VAT, include the VAT registration number when required by law.
Route Receipts does not alter currency or tax formatting. Use your POS receipt template and Stripe payment metadata to render correct locale-specific text. For design specifics and template examples, see our deployment notes in the documentation.
Reconciliation and auditability using Route Receipts logs 🔍
Export Route Receipts decision logs and join them to Stripe payment records to reconcile who received an emailed receipt. The audit log contains enough fields for month-end matching and compliance reviews.
Steps to reconcile receipts:
- Export a CSV from the Route Receipts dashboard for the reconciliation period. Include at minimum: timestamp, payment_id, customer_id, decision, rule_matched, email_sent, and actor.
- Export Stripe Charges or PaymentIntent records for the same period with payment_id, amount, currency, and status.
- Join on payment_id and verify email_sent matches your finance rules for taxable transactions.
- Flag mismatches and create tickets with linked payment_id and the Route Receipts decision row.
Example audit fields to include in exports:
- payment_id
- customer_id or customer_email
- timestamp (UTC)
- decision (allow, block)
- rule_matched
- email_sent (true/false)
- admin_user (if manual allowlist change)
For step-by-step export and sample CSV headers, see the Route Receipts documentation. For the reasoning behind selective delivery and audit logging, read Why Did We Build Route Receipts?.
Frequently Asked Questions
This FAQ answers the most common implementation, testing, and product questions about Stripe Terminal SDK receipts and RouteReceipts routing. RouteReceipts is a Stripe app that controls which customers receive emailed receipts by using an allowlist. Use the short Q&A entries below to resolve common setup, testing, and routing decisions quickly.
Can I print a receipt from the reader and still prevent an emailed receipt?
Yes. RouteReceipts lets you print on-reader receipts while suppressing emailed receipts for customers not on the allowlist. Our website's Documentation explains the three key steps: disable Stripe's automatic emailed receipts, enable RouteReceipts routing, and confirm the Terminal SDK is configured to print on demand. See the installation and setup walkthrough in the Documentation for exact toggles and where to check the printed output.
💡 Tip: Disable Stripe's automatic emailed receipts before enabling RouteReceipts to avoid duplicate emails during a rollout.
How do I collect customer email at the POS with Stripe Terminal?
Collect the email in your POS UI and attach it to the Terminal payment as metadata so RouteReceipts can evaluate it against your allowlist. Make email capture optional for walk-up retail and required for invoices or expense claims; in either case validate the address format and show the cashier a confirmation screen to catch typos. Our website's beginner guide includes UX patterns and sample metadata keys you can use: The No‑Code Way to Route Customer Receipts.
What happens if a customer wants both a printed and emailed receipt?
RouteReceipts supports delivering both printed and emailed receipts when the customer is on the allowlist and the reader prints on demand. The recommended flow is: prompt the cashier for email consent, print the on-reader receipt, then let RouteReceipts send the email after capture according to your allowlist rules. Our website shows a sample POS flow and the audit-log entry you should expect when both channels are used.
How do I test refund receipt delivery for partial refunds?
Create a partial refund on the payment and verify RouteReceipts applies your routing rules for refund receipts. Check the payment and refund metadata for the expected refund amount and reason, confirm any printed refund slip on the reader, and inspect the RouteReceipts decision entry in the dashboard audit log to ensure the email was allowed or suppressed. The Documentation contains a concise test case with the metadata fields and where to look for the audit entry.
Will RouteReceipts add latency to my Terminal payment flow?
No significant latency should be introduced because RouteReceipts evaluates routing after payment capture using dashboard hooks. If you observe delays, our website recommends checking network reliability for the dashboard, inspecting the audit log for retry patterns, and following the troubleshooting steps in Documentation to isolate the edge case. For operational context on why we built routing this way, see Why Did We Build Route Receipts?
How do I handle localization and multi-currency receipts in Terminal?
Format currency, decimal separators, and tax lines when you create the receipt content and verify both printed templates and email templates for each locale. Test one printed template and one email template per locale, confirm the Terminal reader renders currency symbols correctly, and ensure tax line labels match local requirements to avoid reconciliation mismatches. Our Documentation lists checks for decimal separators and currency symbol placement, and our blog covers common cross-border formatting pitfalls.
These are the final steps to complete stripe terminal sdk receipts implementation.
You now have a step-by-step path to route receipts from Stripe Terminal so printed and emailed options behave the way your customers expect. Follow the remaining setup tasks, test one transaction, and confirm receipt routing decisions in the dashboard audit log.
RouteReceipts is a specialized application designed to enhance the way businesses manage their Stripe receipt distribution. It lets you maintain an allowlist in the Stripe dashboard so receipts go only to selected customers, adds a decision audit log for transparency, and installs from the Stripe Marketplace with a straightforward setup flow. RouteReceipts offers a tiered pricing model, starting with a free plan that includes 20 receipts per month.
Install RouteReceipts and follow the installation walkthrough in the Documentation to finish wiring receipt routing to your Terminal flow. For a dashboard-first, no-code option see the no-code selective delivery guide, and read why we built RouteReceipts for the product rationale. Refer to the blog and FAQ for troubleshooting and plan details.
Subscribe to our newsletter for implementation tips and updates.