
Stripe Webhooks WordPress: 2026 Best Practices
Missing or duplicated webhook events can cost small online stores 3–8 hours of reconciliation each month. Stripe webhooks WordPress are HTTP callbacks that notify your WordPress site when Stripe events occur, enabling automated order updates, subscription handling, and receipt decisions. This best-practices guide explains how to implement, secure, test, and troubleshoot Stripe webhooks WordPress and how RouteReceipts is a Stripe app that controls which customers receive invoice receipt emails by using an allowlist, so teams can manage routing from the Stripe dashboard without custom webhook code. Follow setup steps in our documentation and check common answers in our FAQ; our free plan includes 20 receipts per month, and you might be surprised which Stripe event types cause the most trouble for WordPress sites.
How to Set Up Stripe Webhooks on WordPress
You can set up Stripe webhooks on WordPress either with the WooCommerce Stripe plugin or by creating a custom webhook endpoint and registering separate test and live endpoints in the Stripe dashboard. Both approaches require storing the signing secret per environment, testing with Stripe CLI or dashboard test events, and confirming receipt behavior if you plan to use RouteReceipts.
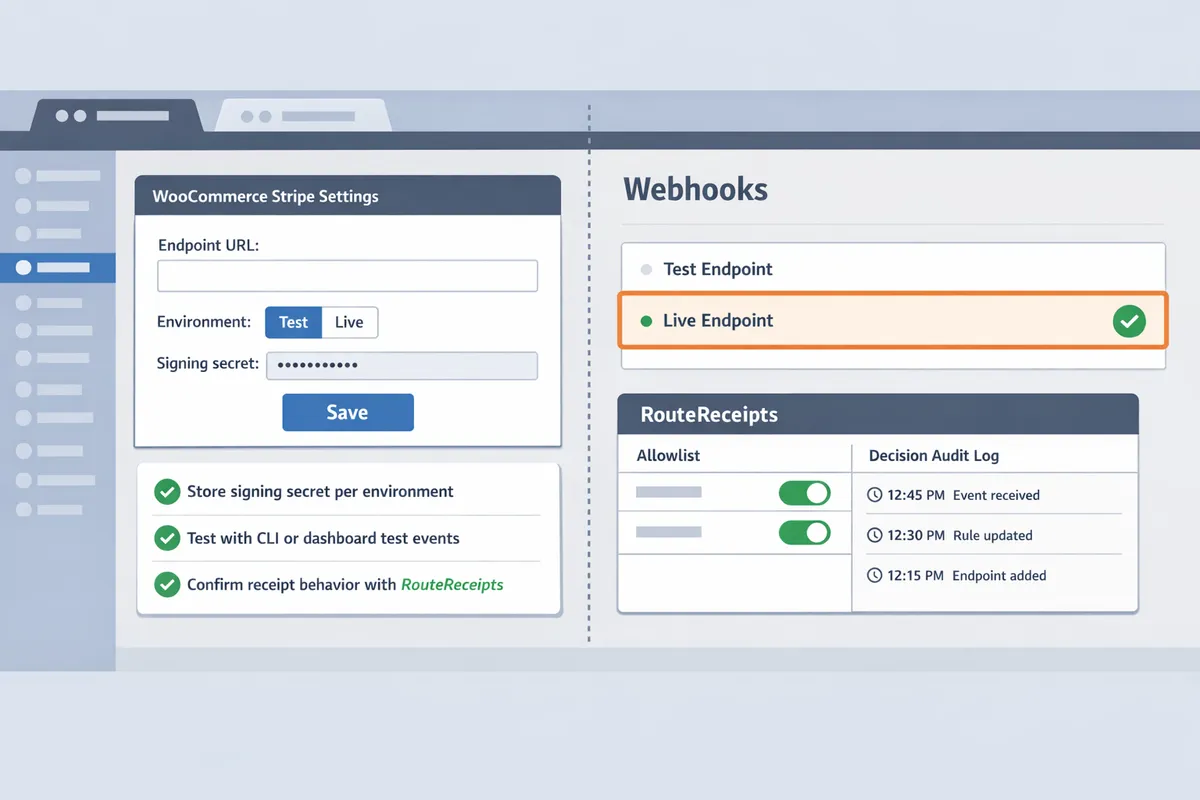
Can I use the WooCommerce Stripe plugin to receive webhooks? 🧩
The official WooCommerce Stripe plugin registers webhook endpoints and handles common Stripe events automatically. Install the plugin, connect it to your Stripe account via the plugin setup, then copy the plugin-provided webhook URL into Stripe if the plugin does not register it for you. In WooCommerce, confirm the webhook URL under WooCommerce > Settings > Payments > Stripe (the plugin shows the webhook endpoint and where to paste the signing secret). For test and live modes, paste the correct signing secret into the plugin's Test/Live settings so the plugin validates events with the right key.
Steps to verify plugin webhook handling:
- Install and connect the WooCommerce Stripe plugin and follow the plugin's onboarding prompts.
- If the plugin does not auto-register, copy its webhook URL and add it in the Stripe dashboard for the matching mode (test or live).
- Paste the matching signing secret into the plugin settings, then trigger a test event from Stripe and confirm the plugin logs the event.
RouteReceipts is compatible with WooCommerce flows if you disable Stripe automatic receipts first; see the RouteReceipts documentation for the exact toggle and verification steps.
How do I create a custom webhook endpoint on a non-WooCommerce WordPress site? 🔌
Create a REST route that accepts POST, verifies the Stripe signature, logs the raw payload, and returns HTTP 200 after duplicate protection checks. Build the endpoint as a small plugin or a controlled functions.php addition that performs three tasks: quick response, signature validation, and idempotent processing. Log requests to a file or custom DB table for debugging so you can inspect failures like a "stripe webhook 503 wordpress" error from hosting when Stripe retries.
Practical steps for a robust custom endpoint:
- Add a POST-only route and limit allowed methods to reduce accidental HEAD/GET hits.
- Record the raw request body and headers to a secure log for at least 7 days, which helps diagnose hosting issues and 503 responses.
- Verify the Stripe signing secret before processing; reject and log invalid signatures immediately.
- Implement duplicate protection by storing processed event IDs and skipping reprocessing if an event ID appears again.
- Respond with 200 quickly after validation; offload heavy work (email, reporting) to background jobs to avoid timeouts and retries.
RouteReceipts removes the need to build custom receipt-routing logic by handling receipt delivery decisions in the Stripe dashboard; our website's no-code guide explains how that replaces custom endpoint routing.
How do I register test and live webhook endpoints in Stripe? 🧪
Register separate webhook endpoints in the Stripe dashboard for test and live modes and store each endpoint's signing secret in your WordPress environment (plugin settings or environment variables). Create one endpoint in Test mode and one in Live mode, then copy each endpoint's signing secret into the corresponding WordPress configuration so events from one environment cannot be processed by the other. Limit each endpoint to only the events your site needs to reduce noise and processing overhead.
Practical configuration checklist:
- In the Stripe dashboard, create a Test-mode webhook and select the exact events you need (for example, invoice.payment_succeeded, charge.failed).
- Repeat for Live mode using a different URL or environment-aware domain.
- Store signing secrets in wp-config.php or a secure plugin settings page and load the correct secret based on an environment flag (WP_ENV or a similar variable).
- Confirm by sending a test event for each mode and validating that WordPress logs the event and that no cross-environment events arrive.
💡 Tip: Store signing secrets as environment variables and never commit them to source control. This prevents accidental exposure across staging and production.
Refer to our RouteReceipts documentation for steps on connecting webhook-based receipt routing and recommended event filters.
Do I need to disable Stripe's automatic receipts before using RouteReceipts? 📨
Yes. Disable Stripe's automatic receipt emails before installing RouteReceipts to prevent duplicate receipt emails being sent to customers. RouteReceipts is a Stripe app that controls receipt distribution by using an allowlist, and it expects Stripe's native receipt send behavior to be turned off so RouteReceipts can decide which customers receive emails. Our website recommends disabling automatic receipts, installing RouteReceipts from the Stripe Marketplace, and then running a live test invoice to confirm only allowlisted customers receive messages.
How to disable and verify receipt behavior:
- In the Stripe Dashboard, turn off automatic email receipts under Business Settings > Customer emails.
- Install RouteReceipts from the Stripe Marketplace and configure your allowlist following the setup guide in our documentation.
- Send a live test invoice to a customer on and off the allowlist and confirm only the allowlisted customer received the receipt.
⚠️ Warning: Forgetting to disable automatic receipts can send duplicate emails that confuse customers and generate extra support work. Confirm the toggle and run a live verification after making the change.
For step-by-step installation and troubleshooting of RouteReceipts, see our Documentation and the FAQ. You can also read Why Did We Build Route Receipts? for the product rationale and a practical deployment playbook.
How to Ensure Reliable Delivery and Resolve Hosting Blocks
Reliable webhook delivery requires your endpoint to accept POST requests, return a 2xx response only after successful processing, and avoid being blocked by caching or security layers. This section gives a focused troubleshooting checklist, hosting-specific fixes for shared and managed environments, and tests you can run with the Stripe CLI and server logs.
Why do I see a 503 or timeout for Stripe webhooks on WordPress? ⛔
A 503 or timeout usually means the host or a security layer rejected the POST rather than Stripe failing to deliver the webhook. Check whether the request reached your server first by reproducing the event with the Stripe CLI and confirming an entry in your webserver access log. If the request never appears, the block is upstream (CDN, WAF, or host firewall). If it appears but times out, temporarily increase PHP/FPM and proxy timeouts (for example, from 30s to 90s) while you test, and disable resource-heavy plugins on the webhook route.
Checklist you can follow now:
- Reproduce with the Stripe CLI and watch your access.log and error.log for the request and response code.
- Disable caching for the webhook path (for example, /wp-json/* or your custom route) in your caching plugin or host control panel.
- Temporarily raise PHP execution and FPM timeouts, then revert after debugging.
- Check the host status page for maintenance windows or known outages.
Route Receipts depends on timely webhook delivery to make receipt-routing decisions; see the Route Receipts documentation for integration notes and webhook requirements.
How do I fix Cloudflare or mod_security blocks that stop Stripe webhooks? 🛡️
Cloudflare, mod_security, and other WAFs often block Stripe webhooks when requests match generic security rules or when performance features strip required headers. Create a bypass for the webhook URI: add a Cloudflare page rule to disable caching and performance optimizations for /wp-json/* or your specific webhook path and set the security level lower for that path. If mod_security on a shared host flags the request, open a support ticket with your host and include the request sample, timestamp, and the following wording to speed review:
"A legitimate Stripe webhook POST to /your-webhook-path was rejected by mod_security. The request includes Stripe-Signature headers. Please review the rule ID XXXXXX and allow requests to this path or provide a rule exception for Stripe webhook deliveries."
If the host requests data handling documentation, link to the Route Receipts privacy policy and our documentation so they can verify what data the app processes. Our docs explain webhook payloads and routing decisions for hosts that require context.
How should caching and reverse proxies be configured for webhook endpoints? 🔁
You must never cache webhook endpoints and proxies must forward the raw POST body and signature headers intact. Add a no-cache rule for /wp-json/* or your custom webhook route in both your caching plugin and at the CDN layer. In WordPress, add the webhook path to the plugin’s bypass list (WP Rocket, W3 Total Cache, or similar) rather than relying on default exclusions.
For reverse proxies and load balancers, confirm they forward the original headers and do not buffer or modify the request body. If you run behind NGINX or an upstream proxy, temporarily disable proxy buffering or increase buffer sizes while testing. Verify successful delivery by sending a test event with the Stripe CLI and confirming the Stripe-Signature header appears in your server logs; missing signature headers cause verification failures and signature errors.
💡 Tip: Add the webhook path to any server-level cache or CDN bypass rules instead of trying to tweak plugin settings alone. This prevents edge caching from stripping headers before WordPress sees the request.
How do I handle retries and duplicate webhook events reliably? ♻️
Return a 2xx response only after the webhook event is processed successfully, and use the Stripe event ID to detect duplicates. Record each received event ID in a fast lookup (a dedicated database table or a high-ttl transient) before processing; if the ID already exists, log the duplicate and skip reprocessing. This pattern prevents double charges, duplicate receipts, or repeated background jobs.
Practical implementation notes for WordPress operators:
- Persist event ID and status (processed, skipped, error) in a lightweight table or transient.
- Check the event ID at the top of your handler and exit early with a 200 after logging if seen.
- On processing errors, return a 500 so Stripe retries. Keep retries idempotent and safe to run multiple times.
For teams using Route Receipts, the app maintains a decision audit log and expects idempotent webhook handling on your site; consult our documentation on integrating webhook-driven routing so you avoid duplicate receipt sends and preserve auditability.
⚠️ Warning: Never return 200 before finishing processing. Doing so prevents retries and can cause missed receipt routing or lost bookkeeping events.
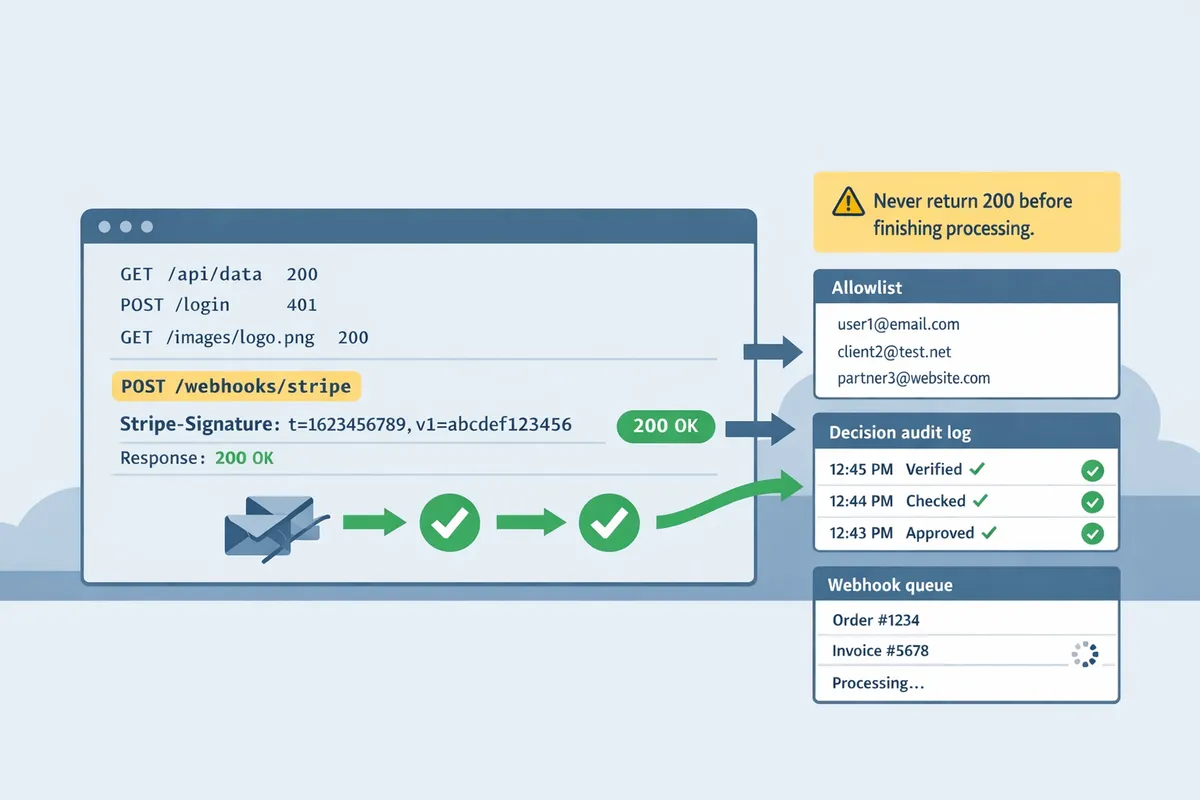
References and further reading: see the Route Receipts documentation for webhook setup details and our blog post Why Did We Build Route Receipts? for context on why reliable webhook delivery matters for selective receipt routing.
How to Secure Webhooks, Route Receipts, and Choose the Right Architecture
Secure webhooks by verifying Stripe signatures, sanitizing payloads, and routing receipts only to intended recipients. This reduces fraud risk, prevents accidental live changes, and keeps customer inboxes clean when combined with a selective routing tool such as RouteReceipts. The guidance below covers verification steps in WordPress, safe payload handling, environment routing, and a side-by-side decision table for plugins, custom endpoints, and RouteReceipts.
What is Stripe signature verification and how do I validate it in WordPress? 🔐
Stripe signature verification is a security check that confirms a webhook came from Stripe by comparing the Stripe-Signature header to your signing secret. Use the signing secret from the Stripe dashboard for each environment and never embed it in theme files or public settings. RouteReceipts expects signed events; unsigned or mismatched signatures will cause routing failures or rejected deliveries.
Follow these steps in WordPress to validate signatures safely:
- Store the signing secret per environment (wp-config constants, hosting secret manager, or an environment variable). Do not store signing secrets in option tables or public admin fields.
- Read the Stripe-Signature header and the raw request body. Use a verified PHP helper (Stripe's library) or follow Stripe's verification algorithm as documented. If the signature fails, return HTTP 400 and log the failure with a small sample of the payload (see logging practices below).
- Enforce a timestamp tolerance (for example, 5 minutes) to prevent replay attacks. Reject requests outside the window.
- Log verification failures with the event id, truncated payload sample, and the receiving endpoint name to simplify debugging without exposing secrets.
For hands-on setup steps and the exact expected headers, see the RouteReceipts documentation for webhook configuration.
How should I validate and store webhook payloads safely? 🗄️
Validate required fields, sanitize values, and store only the minimal fields you need for processing while keeping raw payloads in a separate, access-controlled log with a defined retention policy. Minimizing stored data reduces compliance risk and lowers the blast radius if logs are leaked.
Practical rules to follow:
- Validation. Require event.id, type, data.object.id (invoice or charge id), and created timestamp before accepting processing. Reject events missing required fields with a 400 and log the incident.
- Sanitization. Strip unexpected characters from text fields, cast numeric fields to integers, and normalize timestamps to UTC before storage.
- Minimal storage. Persist a concise record (event id, event type, object id, customer id, processing status, processed_at). Use transients for short-lived intermediate states or a dedicated logging table for raw payloads.
- Raw payload retention. Keep raw JSON payloads in a separate table with limited access and an automated purge (for example, 30 to 90 days depending on your compliance needs). Align retention with the RouteReceipts privacy policy when you use that service.
⚠️ Warning: Do not log full card data, CVC, or unredacted PII. Mask emails and identifiers in debug logs and restrict log access to a small set of accounts.
RouteReceipts creates a decision audit log for receipts; consult the RouteReceipts privacy policy for details on how long decision data is retained and which fields are stored.
How do I route events across multiple environments and endpoints? 🌐
Use separate webhook URLs and signing secrets for development, staging, and production so test traffic cannot trigger live workflows. This prevents accidental invoices or customer notifications caused by cross-environment noise.
Recommended routing scheme:
- Create three endpoints in the Stripe dashboard: webhook-dev, webhook-staging, webhook-prod. Copy each environment's signing secret into the corresponding environment variable or wp-config constant.
- Subscribe each endpoint only to the event types that environment needs (for example, dev: customer.created, invoice.updated; staging: full test set; prod: invoice.finalized, invoice.payment_succeeded). Restricting event types reduces processing overhead and the chance of accidental side effects.
- Configure hosting and CDN rules: exclude webhook paths from caching plugins, bypass security rules in mod_security for the endpoint path, and use firewall allow lists for Stripe IPs where your host supports that.
- If you use Cloudflare and see blocked deliveries, create a page rule to disable challenges for the webhook path or add Stripe to the Firewall Allow list. Cloudflare blocking Stripe webhooks is a common cause of 4xx responses; inspect server access logs to confirm the source of the block.
For high-volume or multi-tenant WordPress sites, route only receipt-related events to RouteReceipts and let your application handle billing logic locally. See RouteReceipts documentation for the recommended workflow to disable Stripe's automatic receipts and avoid duplicate emails.
Plugin vs Custom Endpoint vs RouteReceipts: which should I choose? 📊
Select the approach that matches your resources and risk tolerance: plugins offer quick setup, custom endpoints offer maximum control, and RouteReceipts provides selective receipt delivery without custom webhook logic. Below is a direct comparison to help you choose.
| Option | Setup time | Maintenance burden | Receipt control | Hosting risk | Recommended business scenarios |
|---|---|---|---|---|---|
| WooCommerce or generic plugin | Low | Low to medium (plugin updates, compatibility) | Basic (global on/off or limited plugin features) | Low to medium (plugins can conflict with security rules) | Small stores or teams without engineering time who need fast setup |
| Custom WordPress endpoint | Medium to high | High (code upkeep, security patches) | Complete (you control every decision) | Medium to high (hosting rule adjustments, developer errors cause outages) | Businesses with in-house engineering and complex custom workflows |
| RouteReceipts (Stripe App) | Low to medium | Low (app updates handled by provider) | Selective allowlist-based delivery with audit log | Low (routes through Stripe, minimal hosting surface) | Teams that need selective receipt routing without custom webhooks or to reduce finance inbox noise |
Our website recommends RouteReceipts when you need selective receipt routing without custom webhook logic; RouteReceipts installs from the Stripe Marketplace, adds a dashboard-native allowlist, and records a decision audit log. RouteReceipts starts with a free plan that includes 20 receipts per month. For setup steps and allowlist behavior, read the RouteReceipts documentation and the beginner's guide to no-code selective delivery. For the product rationale and implementation trade-offs, see Why Did We Build Route Receipts? and consult the RouteReceipts FAQ for common questions about disabling Stripe's automatic receipts.
Frequently Asked Questions
This FAQ answers the operational, testing, and receipt-routing questions teams ask about Stripe webhooks WordPress. It focuses on verification, common errors, reliable local testing, duplicate handling, and where RouteReceipts fits into a receipt workflow.
How do I verify Stripe webhook signatures in WordPress? 🔐
Verify Stripe webhook signatures by comparing the Stripe-Signature header against the signing secret stored in your environment. Use Stripe's verification routine or a server-side check that validates the timestamp tolerance and the HMAC signature. Store the signing secret in an environment variable or in wp-config.php so it is not visible in the database, and return HTTP 400 when verification fails so Stripe retries are visible in logs. Log the raw payload and the signature header for failed attempts so you can audit suspicious requests.
⚠️ Warning: Never process financial events without signature verification. Processing unverified payloads can lead to fake refunds, credit issues, or incorrect accounting.
Why are Stripe webhooks returning a 503 on my WordPress site? ⚠️
A 503 typically means the server or an intervening layer rejected or timed out while processing the webhook. Check server error logs (PHP-FPM, Nginx/Apache), then inspect caching plugins and page-cache rules to ensure the webhook path is excluded. Review any WAF, mod_security, or Cloudflare rules that may block POST requests, and confirm your endpoint accepts POST and returns 200 only after processing completes. Use the Stripe CLI to reproduce the request while watching logs to isolate whether the timeout happens before or during PHP execution. If you host on shared hosting, ask your host about short execution timeouts or automatic process limits that can cause 503 responses.
Can RouteReceipts replace custom webhook code for receipt control? 🔁
Yes. RouteReceipts is a Stripe app that controls which customers receive invoice receipts by maintaining an allowlist, so you do not need to build custom receipt-routing webhooks. Install RouteReceipts from the Stripe Marketplace and configure an allowlist in the dashboard; the app evaluates receipt decisions and logs them in a decision audit for transparency. To avoid duplicate emails, disable Stripe's automatic receipts while testing or after installation; see the RouteReceipts Documentation for installation and configuration steps and read about the product rationale in Why Did We Build Route Receipts?
Does WordPress support Stripe webhooks natively? 🧩
WordPress does not include a single native handler for Stripe webhooks; support comes from plugins or custom REST endpoints. Use a plugin like the WooCommerce Stripe extension for out-of-the-box handling and faster setup, or create a custom REST route when you need full control over validation, routing, and database auditing. The plugin route saves development time but can hide processing details; a custom endpoint requires more maintenance but gives explicit control over retries, logging, and duplicate protection.
How do I test Stripe webhooks locally with the Stripe CLI? 🛠️
Use the Stripe CLI to forward events to your local dev server or a public test endpoint and then send specific test events to verify processing and signature checks. Steps:
- Start the Stripe CLI forward command to route events to your local URL or a public tunnel.
- Trigger test events such as invoice.payment_succeeded or charge.failed with the CLI and confirm your endpoint receives a POST and verifies the Stripe-Signature header.
- Watch your WordPress debug log and server logs to confirm a 200 response after processing, and check that any duplicate protection recorded the event ID.
If you are evaluating RouteReceipts, perform tests after disabling Stripe's automatic receipts to prevent duplicate emails; the RouteReceipts Documentation includes test and troubleshooting recommendations.
How should I handle duplicate Stripe events in WordPress? 🔁
Prevent duplicate processing by recording each Stripe event ID and skipping any event ID you have already processed. Insert the event ID as a unique key in a small webhook events table or a dedicated option and return HTTP 200 for duplicates while logging the skip reason for audit. This duplicate protection pattern avoids repeated charges or repeated notifications. When using RouteReceipts, the app's decision audit log also helps you reconcile which receipts were routed versus skipped; see the RouteReceipts FAQ for how the audit log surfaces routing decisions.
Final steps to implement and secure Stripe webhooks on WordPress.
Focus on signed webhook verification, clear retry handling, and endpoint visibility to cut missed events and duplicate processing. Applying these practices makes Stripe webhooks WordPress reliable across common WordPress hosts and caching layers. Follow local and staging tests before touching production to avoid billing errors or lost notifications.
RouteReceipts is a specialized application designed to enhance the way businesses manage their Stripe receipt distribution. This app addresses a significant limitation within Stripe's native functionality, which traditionally forces businesses to either send receipts to all customers or none at all. RouteReceipts empowers businesses with the flexibility to selectively send receipts to specific customers, thereby preventing unnecessary email clutter for those who do not require them. By integrating directly into the Stripe dashboard, RouteReceipts allows users to manage an allowlist of customers effortlessly, without the need for complex coding or custom webhook integrations. The application features a dashboard-native user interface, a decision audit log for transparency, and a straightforward setup process via the Stripe Marketplace. RouteReceipts offers a tiered pricing model, starting with a free plan that includes 20 receipts per month, with the option to upgrade for higher volume needs. This solution is ideal for businesses seeking to streamline their financial communications and maintain a professional relationship with their clients by ensuring that only necessary communications are sent.
Get started by installing RouteReceipts from the getting-started documentation and creating an allowlist to stop unnecessary receipts today. For setup details and troubleshooting, see the Documentation and the Frequently Asked Questions, or read Why Did We Build Route Receipts? for background on selective receipt routing. Subscribe to our newsletter for implementation tips and updates.
As an event approaches, it is worth considering how details related to women's cosplay costumes will affect the complete look. When the final look will be photographed, it helps to assess details related to costume sizing together with fit and fabric. To review details related to cosplay shoes before the event, short cosplay wigs with delivery information offers a useful starting point for practical preparation. To reuse the pieces at future events, it is useful to check details related to character costumes against the wearer's own needs.