
The 2026 No‑Code Pillar for Selective Stripe Receipts: Payment Links ‘After’ Workflows, Deactivation/Limited‑Use Rules, Zapier/Make Migration, and ROI
Sending receipts to every buyer costs finance teams up to 10 hours monthly and fills client inboxes with irrelevant emails. This article covers targeted receipt delivery in Stripe without code and no-code workflows for selective delivery. Targeted receipt delivery in Stripe without code is a no-code capability that lets businesses send receipts only to specific customers rather than all buyers. Our RouteReceipts app integrates into the Stripe dashboard and offers an allowlist, dashboard-native controls, and a decision audit log. We offer a free plan that includes 20 receipts per month and clear upgrade paths for higher volume. See the RouteReceipts documentation for setup and the RouteReceipts FAQ for data-handling. Which after-sale workflow recovers the most revenue while cutting inbox noise?
How do the core principles of targeted receipt delivery in Stripe without code work?
Targeted receipt delivery in Stripe without code sends receipts only to selected customers using dashboard-native allowlists and rule-based routing. This approach reduces unnecessary emails and ties receipt delivery to business rules, auditability, and consent. Core principles include explicit allowlists, a webhook-free setup option such as Route Receipts, and a decision audit log that preserves routing history for finance and compliance reviews.
What is targeted receipt delivery and how does it differ from Stripe-native receipts? 🔍
Targeted receipt delivery is a selective routing model that sends invoice or payment receipts only to customers who meet explicit business rules. Allowlist routing is the most common method: you mark specific customer records, plan IDs, or billing emails to receive receipts while everyone else does not. Stripe-native receipts operate as an all-or-none switch that sends automated receipts to every customer email on the charge or not at all. That difference matters in scenarios such as:
- Enterprise billing where procurement teams require receipts for expense posting.
- Reseller or white-label models where end customers receive partner invoices instead of platform emails.
- Subscription plans with mixed tax treatments or region-specific communication rules.
For a practical implementation walkthrough, see our beginner's guide to selective delivery which outlines the dashboard-based allowlist approach and audit-log considerations.
How does Route Receipts implement allowlist-based routing without webhooks? 🧭
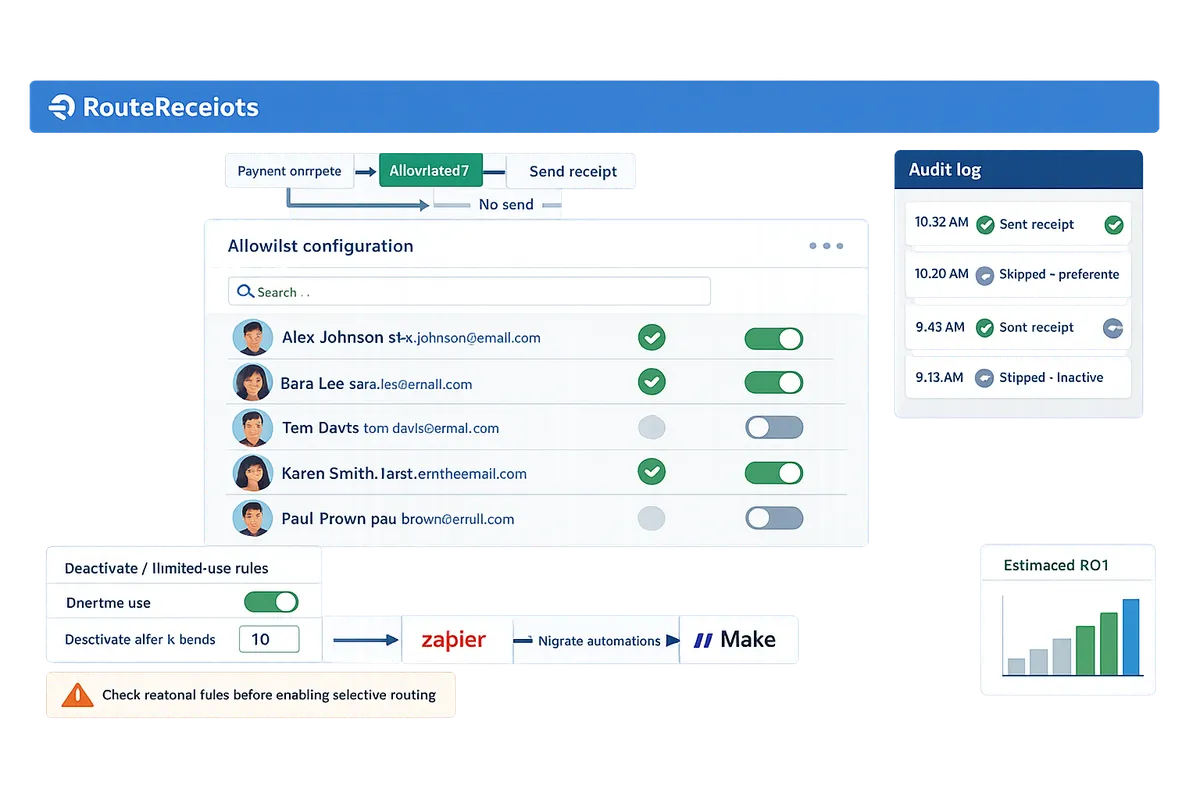
Route Receipts implements allowlist-based routing directly inside the Stripe dashboard so teams can control receipt delivery without building webhook integrations. Route Receipts installs through the Stripe Marketplace, intercepts Stripe's receipt decision flow, and applies your allowlist rules before a receipt email is sent. A typical no-code setup follows these steps:
- Install Route Receipts from the Stripe Marketplace and grant the requested scope.
- Turn off Stripe's automatic receipt emails in your Stripe account to prevent duplicate sends.
- Create an allowlist by customer email, customer ID, or subscription plan inside the Route Receipts dashboard.
- Test with a sandbox or a low-volume payment link to confirm routing decisions and delivery.
- Use the Route Receipts audit log to review each routing decision and export entries for finance teams.
This webhook-free setup streamlines operations for non-technical teams and reduces the engineering time needed to manage selective receipt rules. For step-by-step screens and troubleshooting, consult the Route Receipts documentation.
What privacy and compliance rules affect selective receipt sending? ⚖️
Selective receipt sending must follow email-consent laws, data minimization principles, and local record-retention requirements. Different jurisdictions treat receipt emails differently: EU GDPR requires a lawful basis such as contract or consent; Canada requires express or implied consent under CASL for marketing-like messages; several U.S. states impose data handling and breach notification obligations. Practical steps to stay compliant include:
- Map consent flags to the Stripe customer record or CRM so routing only sends to customers who have agreed to receive transactional emails.
- Retain minimal metadata for each routed receipt: transaction ID, customer identifier, timestamp, routing decision, and the email address used. This metadata supports audits without storing full invoice content longer than necessary.
- Use the Route Receipts decision audit log to produce an immutable trail for tax and finance reviews.
⚠️ Warning: Sending receipts to customers without proper consent or retaining unnecessary personal data can create regulatory risk and increase audit exposure. Check regional rules before enabling selective routing.
For specifics on how Route Receipts handles data and retention, review the Route Receipts privacy policy and documentation, and consult legal counsel for region-specific obligations.
Which proven strategies and techniques reduce email clutter and improve payment outcomes with selective receipts?
Selective receipt routing reduces inbox noise and improves payment clarity by sending receipts only to contacts who need them. Evidence from finance teams shows fewer reconciliation errors and fewer support tickets when receipts target billing contacts rather than every payor. The patterns below offer decision flows, no-code templates, and safeguards you can apply immediately.
When should you use Stripe-native receipts, Route Receipts, or a DIY webhook approach? 🧾
Choose Stripe-native receipts for simplest setup, Route Receipts for no-code selective control, and a DIY webhook when you need fully custom logic. Stripe-native receipts are built-in notification emails from your payments provider that work without install and are fastest to enable. Route Receipts is a dashboard-native app that lets teams selectively route Stripe receipts using an allowlist and stores a decision audit log for transparency. A DIY webhook approach gives maximum control at the cost of engineering time and ongoing maintenance.
| Capability | Stripe-native receipts | Route Receipts | DIY webhook solution |
|---|---|---|---|
| Setup speed | Fast. Enable in Stripe dashboard. | Fast. Install from Stripe Marketplace and configure allowlist. | Slow. Requires developer time and test cycles. |
| Granular control | Low. Global enable/disable and templates only. | High for selective sends via allowlist and routing rules. | Very high. Custom rules per event and metadata. |
| Maintenance burden | Minimal. Stripe handles updates. | Low. Dashboard-native app reduces operational upkeep. | High. You own updates, retries, and auditing. |
| Auditability | Basic. Stripe logs events. | Strong. Decision audit log records routing choices. | Depends on implementation. Requires logging infrastructure. |
| Compliance & governance | Works for standard needs. | Designed to retain audit trails and reduce risky suppression mistakes. | Flexible, but increases compliance risk if not tested. |
| Cost at scale | Included with Stripe. | SaaS pricing; reduces engineering cost and risk. | Developer hours and hosting costs. |
Route Receipts reduces maintenance overhead compared with DIY webhooks by keeping routing configuration inside the Stripe UI. For a step-by-step install and allowlist setup, see the product Documentation and our beginner's guide on selective delivery.
💡 Tip: Start with a small allowlist 10–20 customers when testing new routing rules to validate outcomes before wider rollout.
Segmentation rules and decision flows for selective sending 🧩
Use segmentation rules that map customer attributes and event types to allowlist decisions so receipts go only to the right contacts. Build simple decision flows that check (1) customer role or tag, (2) invoice currency or country, and (3) plan or product code, then route to send or suppress actions. For example: 1) If customer has billing_contact tag and invoice total > local VAT threshold, send receipt. 2) If invoice originates from reseller-managed account with separate billing, suppress direct receipt and notify reseller contact. 3) If multi-currency invoice and customer prefers localized receipts, route to the contact matching the invoice currency.
Practical application: create a named rule set in Route Receipts for Enterprise billing contacts and another for Reseller flow. Use test invoices to validate each rule and confirm the Route Receipts audit log shows expected decisions. For a step-by-step example of allowlist configuration, see How to Limit Stripe Receipts to Chosen Customers (Step-by-Step, No Code).
No-code workflow examples: Payment Links after flows, refunds, and multi-currency receipts 🔁
Payment Links after workflows run post-payment checks then route receipts by allowlist, event type, and business rules. Example template: when a Payment Link completes, use a no-code platform or Route Receipts to (1) wait 30 seconds for settlement, (2) check customer tags and invoice metadata, and (3) send receipt only if the contact is on the allowlist or the event is a refund. For partial refunds, route a separate refund receipt to the original billing contact and include a short note explaining prorated amounts.
Migration notes from Zapier or Make: verify event ordering and deduplication logic. Zapier automations that triggered on charge.succeeded may fire earlier than a settled invoice event; reconfigure to use invoice.finalized or payment_intent.succeeded and add duplicate protection. Route Receipts removes the need for separate webhook hosting by handling routing inside Stripe, which reduces the number of steps to test during migration. See the Documentation for routing decision examples and troubleshooting tips.
Operational safeguards and anti-abuse techniques 🛡️
Operational safeguards use rate checks, duplicate protection, and decision audit logs to prevent accidental mass suppression or duplicate sends. Implement these controls: set rate limits on automated suppressions, enable duplicate protection to block repeated sends within a short window, and monitor the Route Receipts decision audit log for unusual patterns. Track these KPIs daily: delivery rate, suppression rate, bounce rate, and audit-log exceptions.
Quick troubleshooting checklist: 1) Confirm invoice event type used by your workflow (invoice.finalized vs payment_intent.succeeded). 2) Verify customer metadata and tags match segmentation rules. 3) Inspect the Route Receipts audit log for the routing decision and timestamp. 4) Re-run test invoices into a sandbox account before changing rules in production.
⚠️ Warning: Suppressing receipts for customers in jurisdictions that require invoice delivery or retention can create compliance and tax reporting risk; verify local rules before broad suppression.
How do you implement, monitor, and measure targeted receipt delivery in Stripe without code?
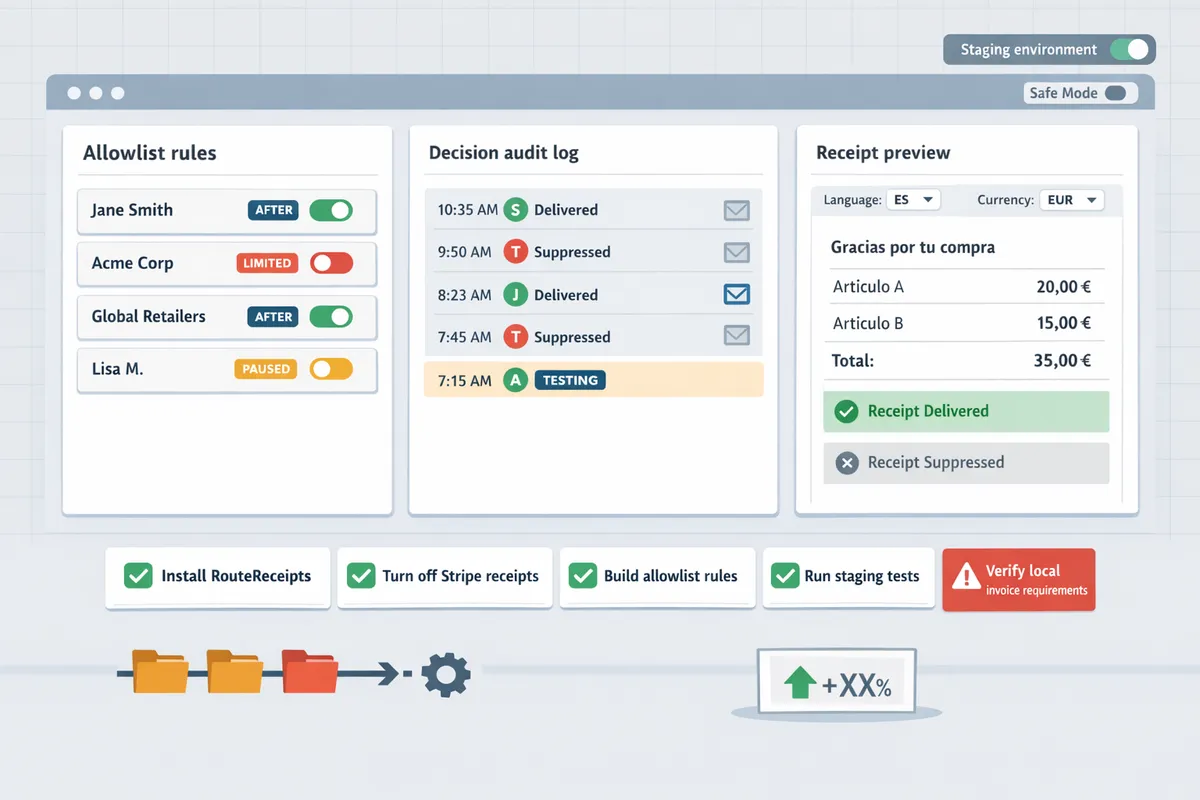
You implement targeted receipt delivery by installing Route Receipts, turning off Stripe automatic receipts, building allowlist rules, and running staged tests while tracking delivery and finance KPIs. This setup removes the need for custom webhooks and focuses ops on business rules rather than code. The rest of this section gives a compact no-code checklist, monitoring playbook, and a migration roadmap from Zapier/Make with measurable checkpoints.
Step-by-step no-code setup checklist (webhook-free setup) ✅
Install Route Receipts from the Stripe Marketplace, disable Stripe automatic receipts, and create allowlist entries to start routing receipts without webhooks. Follow these steps exactly so finance and RevOps avoid missed or duplicated messages:
- Install Route Receipts. Open the Stripe Marketplace and add Route Receipts to the account you use for billing. See the installation steps in the Route Receipts documentation for screenshots and permission notes.
- Disable Stripe automatic receipts. In the Stripe Billing email settings, turn off automatic invoice and payment receipts so Route Receipts can make the routing decision.
- Build an allowlist. Add customers, subscription plans, or metadata rules that should receive receipts. Use clear naming conventions like expensing-allowlist to make audit reviews faster.
- Stage tests. Create three test tiers: single-customer proof, segment test (10–50 customers), and full rollout. For each tier, verify the audit-log decision matches expected behavior.
- Verify audit logs. Confirm Route Receipts’s decision audit log shows entries for every routed receipt and any suppressed events.
- Publish and monitor. Move from staged tests to production only after the audit log and delivery metrics match expectations.
💡 Tip: During setup, confirm each allowlist email address exists and matches the customer record to reduce bounce risk. Missing or mistyped addresses are the most common cause of delivery failures.
For a visual, follow the step screenshots in the Route Receipts docs and compare your allowlist rules to the beginner guide on selective delivery.
Monitoring, troubleshooting, and KPIs to watch 📊
Monitor delivery rate, bounce rate, receipt count by customer segment, and audit-log decision counts to know whether selective routing reduces noise without harming collections. These four metrics answer whether you are sending fewer irrelevant emails while preserving successful payment communications.
- Delivery rate. Track the percent of receipts that reach inboxes. A sudden drop usually indicates a configuration error or an email deliverability issue.
- Bounce rate. Monitor hard bounces per domain and remove or verify failing addresses from allowlists.
- Receipt count by segment. Compare pre- and post-rollout counts for segments such as enterprise, self-serve, and trial users to quantify noise reduction.
- Audit-log decision counts. Use Route Receipts’s decision audit log to reconcile which receipts were suppressed and why.
Troubleshooting checklist:
- If receipts are missing, confirm Stripe automatic receipts are disabled and the allowlist rule covers the customer metadata. See the troubleshooting section in the docs for common causes.
- If customers receive duplicates, check for overlapping automations in Zapier/Make or an active Stripe template still sending receipts.
- If suppression is unexpected, review the audit-log decision entry to see which rule applied and adjust rule priority.
⚠️ Warning: Avoid including sensitive health or legal details in receipts. Check your privacy policy and consult legal when storing or sending sensitive customer data; see Route Receipts’ privacy policy for how data is handled.
Build dashboards in your BI tool or inside your ops tooling that surface these KPI trends weekly. Link the audit-log entries to ticket IDs so finance can trace exceptions quickly. For more setup and audit-log examples, consult the Route Receipts documentation and the FAQ.
ROI and migration playbook from Zapier/Make to Route Receipts 🧾
Migrate with a phased playbook: inventory existing automations, map triggers to allowlist rules, run a parallel test window, and retire Zapier/Make flows after validation. This approach keeps business rules intact while reducing maintenance and incident volume.
- Inventory automations. Export or list every Zapier and Make flow that sends receipts or touches receipt-related customer records. Document trigger events, filters, and any conditional branches.
- Map triggers to allowlist rules. For each flow, translate its business rule into an allowlist condition in Route Receipts (customer tag, plan, invoice metadata). Keep a one-to-one mapping log to simplify rollback.
- Run parallel testing. Run Route Receipts in parallel with existing flows for a 7–14 day window. Measure delivery and audit-log parity: every routed or suppressed receipt must match expected outcomes.
- Acceptance criteria. Approve migration when audit logs match expected decisions and KPIs (delivery rate, bounce rate) remain stable.
- Retire and document. Disable the old Zapier/Make flows, update runbooks, and add the new operational owner for allowlist changes.
Business outcomes to track during migration:
- Reduced incident volume. Track the number of receipt-related support tickets before and after migration.
- Lower maintenance time. Measure hours spent maintaining Zapier/Make flows versus allowlist edits in Route Receipts.
- Improved governance. Use the audit log as the single source of truth for who changed routing rules and when.
For practical examples and mapping templates, see the migration guidance in the Route Receipts docs and read our background on why we built Route Receipts to understand the governance benefits.
Frequently Asked Questions
This FAQ answers common buyer and implementation questions about targeted receipt delivery in Stripe without code and Route Receipts. These questions focus on how Route Receipts routes receipts for Payment Links, how suppression affects finance workflows, and practical steps for moving off Zapier or Make. Read the specific entries below for step-by-step actions, audit recommendations, and links to configuration docs.
Can I set selective receipts in Stripe without writing code? ✅
Yes, Route Receipts enables selective receipt delivery in Stripe without writing code. Route Receipts installs from the Stripe Marketplace and uses a dashboard-native allowlist and rule set so teams avoid building webhook integrations or custom backend logic. After installation you create allowlist entries (for customers, plans, or metadata) and Route Receipts evaluates each payment event against those rules before deciding whether to send a receipt. Route Receipts also records the decision in an audit log for downstream review. For setup details and common configuration patterns, see the step-by-step instructions in our Documentation and the Beginner's Guide to selective delivery.
How does Route Receipts work with Stripe Payment Links? 🔗
Route Receipts evaluates Payment Link payment events after the payment completes and then applies allowlist rules to decide whether to send or suppress the receipt. This after workflow means Route Receipts inspects the final payment or invoice state produced by the Payment Link and consults your allowlist criteria (customer ID, plan, locale, or custom metadata) before issuing an email. To use this flow you should disable Stripe's automatic receipts so Route Receipts controls delivery; our Documentation explains the exact dashboard toggle and the order of operations during Payment Link checkouts. Example: a company can allow receipts only for enterprise contacts who purchase via a public Payment Link while suppressing receipts for guest purchases.
Will suppressing receipts affect my accounting or reconciliation? 🧾
No. Suppressing email receipts does not change Stripe's payment or invoice records that accounting uses for reconciliation. Route Receipts only controls outbound email delivery; all transaction, invoice, and ledger entries remain intact in your Stripe account. Route Receipts also stores a decision audit trail so finance teams can prove whether and why a receipt was suppressed, which helps during audits or expense disputes. If your finance process relies on emailed receipts for vendors or employees, plan a reissue workflow: flag the customer, update contact info, and send a manual receipt from the Stripe dashboard or Route Receipts audit view. See our article on Why Did We Build Route Receipts? for typical finance use cases and audit expectations.
How do I migrate existing Zapier or Make automations to Route Receipts? 🔁
Migrate by cataloging current automations, mapping each trigger to an allowlist rule, testing in parallel, and then retiring the old flows. Follow this step-by-step migration path:
- Inventory: list every Zapier/Make flow that sends receipts, including triggers, filters, and connected fields.
- Map: convert each filter condition to a Route Receipts allowlist rule (customer, plan, metadata, locale). Use our Documentation to match webhook payload fields to allowlist attributes.
- Configure: create rules, enable decision logging, and disable Stripe automatic receipts only when ready to test.
- Parallel test: run Route Receipts alongside your existing automations for 48–72 hours and compare audit logs.
- Retire: once audit logs show parity, disable Zapier/Make flows and monitor delivery metrics for 7 days.
💡 Tip: Run parallel tests for 72 hours and compare Route Receipts audit logs with your Zapier or Make logs to confirm exact parity before cutting over.
For migration examples and common mappings, see the Beginner's Guide and our Documentation.
Is customer data shared with third parties when using Route Receipts? 🔒
Route Receipts stores only the Stripe metadata necessary for routing and auditing and does not share full customer records with third parties by default. Route Receipts operates inside your Stripe account and keeps minimal routing metadata and decision logs; our Privacy Policy explains what fields we read from Stripe and what we persist. If you enable third-party integrations for analytics or delivery, those services receive only the limited metadata required for the operation. Consult the Route Receipts privacy policy for specifics and discuss any regulatory concerns with your compliance team before enabling cross-border or external logging features.
What happens if a receipt bounces or an email address is invalid? ✉️
Bounced or invalid-email deliveries appear in Route Receipts delivery reports and the audit log so teams can take corrective action. When Route Receipts records a delivery failure, it tags the customer record and surfaces the bounce reason in the decision entry so support or finance can request an updated contact and reissue the receipt if needed for expense purposes. Recommended workflow: flag the account, contact the buyer for a corrected email, update the Stripe customer, and use the Route Receipts audit interface to resend a receipt or generate a PDF for manual distribution. Monitor delivery and bounce trends in the Route Receipts reports to detect systemic issues and review the troubleshooting section in Documentation for common causes.
⚠️ Warning: Do not delete records of bounced receipts if they are required for expense verification; keep the audit trail intact while you request corrected contact info.
Start implementing selective receipt routing today.
The main takeaway: pick a small, high-impact rule set and test it to stop unnecessary receipts while keeping expense workflows intact. If your goal is targeted receipt delivery in Stripe without code, begin by building an allowlist for the customers who need receipts and run tests on recent invoices.
Choose a webhook-free setup when you want minimal engineering overhead and faster rollout. For step-by-step setup and rollback guidance, see our beginner's guide to selective delivery and the step-by-step no-code walkthrough in the blog.
RouteReceipts is a specialized application designed to enhance the way businesses manage their Stripe receipt distribution. Use RouteReceipts to map allowlist rules inside your Stripe dashboard, confirm decisions in the audit log, and stop sending receipts to customers who do not need them.
Schedule a consultation to map your receipts policy and deploy RouteReceipts for your account. Start the process by reviewing the setup documentation to prepare your allowlist and testing plan. For product rationale and implementation templates, read Why Did We Build Route Receipts?